
User`s guide
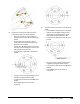
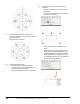
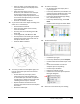
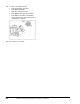
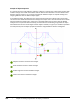
Table Of Contents
- Introduction
- Chapter 1: Taking the AutoCAD Tour
- Chapter 2: Creating Basic Drawings
- Chapter 3: Manipulating Objects
- Lesson: Selecting Objects in the Drawing
- Lesson: Changing an Object's Position
- Lesson: Creating New Objects from Existing Objects
- Lesson: Changing the Angle of an Object's Position
- Lesson: Creating a Mirror Image of Existing Objects
- Lesson: Creating Object Patterns
- Lesson: Changing an Object's Size
- Challenge Exercise: Grips
- Challenge Exercise: Architectural
- Challenge Exercise: Mechanical
- Chapter Summary
- Chapter 4: Drawing Organization and Inquiry Commands
- Chapter 5: Altering Objects
- Lesson: Trimming and Extending Objects to Defined Boundaries
- Lesson: Creating Parallel and Offset Geometry
- Lesson: Joining Objects
- Lesson: Breaking an Object into Two Objects
- Lesson: Applying a Radius Corner to Two Objects
- Lesson: Creating an Angled Corner Between Two Objects
- Lesson: Changing Part of an Object's Shape
- Challenge Exercise: Architectural
- Challenge Exercise: Mechanical
- Chapter Summary

270 ■ Chapter 4: Drawing Organization and Inquiry Commands
7.
Use the Rotate command to rotate both
centerlines 30 degrees. Use the center of the
large circle as the
base point for the rotation.
8.
Thaw the Dimension Layer:
■ On the Home tab, click Layers panel >
Layer Control list. Click the snowflake icon
to thaw the Dimensions layer.
■ Zoom out to the extents of your drawing.
9.
To observe object properties in the Layer
Control list:
■ With the command line blank, click any
dimension.
■ Notice that the Dimensions layer appears
in the Layer Control list.
■ Press ESC so that the command line is
blank.
■ Move your cursor over any object on the
Visible layer as shown below. Notice the
padlock symbol that is displayed. Objects
on the visible layer are locked and cannot
be modified, however, you may add more
geometry to any locked layer.