
User`s guide
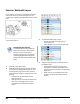
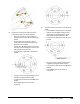
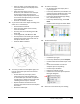
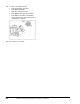
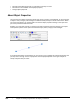
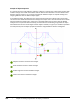
Table Of Contents
- Introduction
- Chapter 1: Taking the AutoCAD Tour
- Chapter 2: Creating Basic Drawings
- Chapter 3: Manipulating Objects
- Lesson: Selecting Objects in the Drawing
- Lesson: Changing an Object's Position
- Lesson: Creating New Objects from Existing Objects
- Lesson: Changing the Angle of an Object's Position
- Lesson: Creating a Mirror Image of Existing Objects
- Lesson: Creating Object Patterns
- Lesson: Changing an Object's Size
- Challenge Exercise: Grips
- Challenge Exercise: Architectural
- Challenge Exercise: Mechanical
- Chapter Summary
- Chapter 4: Drawing Organization and Inquiry Commands
- Chapter 5: Altering Objects
- Lesson: Trimming and Extending Objects to Defined Boundaries
- Lesson: Creating Parallel and Offset Geometry
- Lesson: Joining Objects
- Lesson: Breaking an Object into Two Objects
- Lesson: Applying a Radius Corner to Two Objects
- Lesson: Creating an Angled Corner Between Two Objects
- Lesson: Changing Part of an Object's Shape
- Challenge Exercise: Architectural
- Challenge Exercise: Mechanical
- Chapter Summary

268 ■ Chapter 4: Drawing Organization and Inquiry Commands
Exercise: Work with Layers
In this exercise, you freeze and thaw layers and lock
and unlock them. You create new layers, set the
current layer, andcreate new geometry on the current
layer.
The completed exercise
Completing the Exercise
To complete the exercise, follow the
steps in this book or in the onscreen
exercise. In the onscreen list of
chapters and exercises, click Chapter
4: Drawing Organization and Inquiry
Commands. Click Exercise: Work with
Layers.
1.
Open M_Create-Layers.dwg.
2.
Study the drawing, paying particular attention
to the color and linetype of the objects. Turn
the Dimensions layer off to make it easier to
view and make changes to the geometry in the
drawing:
■ On the Home tab, click Layers panel >
Layer Control list.
■ Click the Sun icon to freeze the Dimensions
layer. The icon changes from a sun to
a snowflake indicating that the layer is
frozen.
3.
To make the hidden layer current:
■ On the Home tab, click Layers panel >
Layer Control list.
■ Select Hidden to set it as the current layer.
4.
Zoom into the area shown and draw lines on
the Hidden layer:
■ Using the Line command, create a line
from point 1 to point 2 and another from
point 3 to point 4 as shown in the following
illustration.
■ Make sure you are snapping to the exact
endpoint or intersection on the existing
objects.