
User`s guide
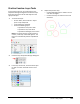
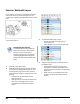
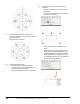
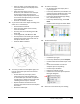
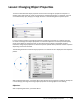
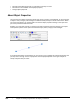
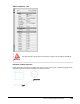
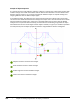
Table Of Contents
- Introduction
- Chapter 1: Taking the AutoCAD Tour
- Chapter 2: Creating Basic Drawings
- Chapter 3: Manipulating Objects
- Lesson: Selecting Objects in the Drawing
- Lesson: Changing an Object's Position
- Lesson: Creating New Objects from Existing Objects
- Lesson: Changing the Angle of an Object's Position
- Lesson: Creating a Mirror Image of Existing Objects
- Lesson: Creating Object Patterns
- Lesson: Changing an Object's Size
- Challenge Exercise: Grips
- Challenge Exercise: Architectural
- Challenge Exercise: Mechanical
- Chapter Summary
- Chapter 4: Drawing Organization and Inquiry Commands
- Chapter 5: Altering Objects
- Lesson: Trimming and Extending Objects to Defined Boundaries
- Lesson: Creating Parallel and Offset Geometry
- Lesson: Joining Objects
- Lesson: Breaking an Object into Two Objects
- Lesson: Applying a Radius Corner to Two Objects
- Lesson: Creating an Angled Corner Between Two Objects
- Lesson: Changing Part of an Object's Shape
- Challenge Exercise: Architectural
- Challenge Exercise: Mechanical
- Chapter Summary

Lesson: Using Layers ■ 267
Practice Exercise: Layer Tools
In this practice exercise, you create layers in the
Properties Manager dialog box and select the layer
from the Layer Control list to draw objects on the
appropriate layer.
1.
To create the layers:
■ On the ribbon, click Home tab > Layers
panel > Layer Properties.
■ In the dialog box, click New.
■ Create the following layers:
❏ Layer Name: Circle, Color: Red
❏ Layer Name: Line, Color: Blue
❏ Layer Name: Rectangle, Color: Green
Note: If you enter the layer name and then a
comma, a new layer name field appears. The
layers are automatically listed in alphabetical
order.
2.
Close the Layer Properties Manager dialog box.
3.
In the Layer Control list, select the Circle layer
to make it current and draw circles on that
layer.
4.
Repeat the previous step:
■ Click the Rectangle layer to make it current
and draw rectangles.
■ Click the Line layer to make it current and
draw lines.