
User`s guide
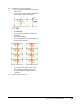

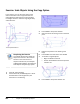

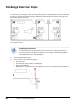
Table Of Contents
- Introduction
- Chapter 1: Taking the AutoCAD Tour
- Chapter 2: Creating Basic Drawings
- Chapter 3: Manipulating Objects
- Lesson: Selecting Objects in the Drawing
- Lesson: Changing an Object's Position
- Lesson: Creating New Objects from Existing Objects
- Lesson: Changing the Angle of an Object's Position
- Lesson: Creating a Mirror Image of Existing Objects
- Lesson: Creating Object Patterns
- Lesson: Changing an Object's Size
- Challenge Exercise: Grips
- Challenge Exercise: Architectural
- Challenge Exercise: Mechanical
- Chapter Summary
- Chapter 4: Drawing Organization and Inquiry Commands
- Chapter 5: Altering Objects
- Lesson: Trimming and Extending Objects to Defined Boundaries
- Lesson: Creating Parallel and Offset Geometry
- Lesson: Joining Objects
- Lesson: Breaking an Object into Two Objects
- Lesson: Applying a Radius Corner to Two Objects
- Lesson: Creating an Angled Corner Between Two Objects
- Lesson: Changing Part of an Object's Shape
- Challenge Exercise: Architectural
- Challenge Exercise: Mechanical
- Chapter Summary

Lesson: Creating Object Patterns ■ 227
8.
Specify the unit cell as indicated:
■ Click the endpoint of the line of the lower
interior wall.
■ For the other corner, click the endpoint of
the line of the upper interior wall.
■ Click PREVIEW.
■ Your rectangular array should appear as
illustrated.
■ Do not press ENTER.
■ Use the wheel on the mouse to adjust the
display of your drawing.
■ If necessary, press ESC to return to the
dialog box and reselect the unit cell,
or press ENTER to complete the Array
command.
9.
Close all files. Do not save.