
User`s guide

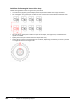
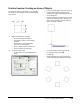
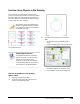
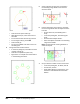
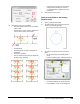

Table Of Contents
- Introduction
- Chapter 1: Taking the AutoCAD Tour
- Chapter 2: Creating Basic Drawings
- Chapter 3: Manipulating Objects
- Lesson: Selecting Objects in the Drawing
- Lesson: Changing an Object's Position
- Lesson: Creating New Objects from Existing Objects
- Lesson: Changing the Angle of an Object's Position
- Lesson: Creating a Mirror Image of Existing Objects
- Lesson: Creating Object Patterns
- Lesson: Changing an Object's Size
- Challenge Exercise: Grips
- Challenge Exercise: Architectural
- Challenge Exercise: Mechanical
- Chapter Summary
- Chapter 4: Drawing Organization and Inquiry Commands
- Chapter 5: Altering Objects
- Lesson: Trimming and Extending Objects to Defined Boundaries
- Lesson: Creating Parallel and Offset Geometry
- Lesson: Joining Objects
- Lesson: Breaking an Object into Two Objects
- Lesson: Applying a Radius Corner to Two Objects
- Lesson: Creating an Angled Corner Between Two Objects
- Lesson: Changing Part of an Object's Shape
- Challenge Exercise: Architectural
- Challenge Exercise: Mechanical
- Chapter Summary

226 ■ Chapter 3: Manipulating Objects
■ Click the Center point button (3).
■ With Object Snap on, select the center of
the table.
■ For the total number of items (4), enter 6.
■ For the angle to fill (5), enter 360.
■ Click PREVIEW (6).
■ Do not press ENTER. Press ESC to return to
the dialog box.
4.
Change the total number of items:
■ In the Array dialog box, enter 8 for the total
number of items (4).
■ Click OK to complete the polar array.
■ Eight chairs are arrayed around the table as
in the following illustration.
5.
Zoom to display the area that is indicated in
the following image. Make certain the walls are
visible.
6.
Use the Rectangular array option to populate
the remaining offices with the objects from the
first two:
■ On the Home tab, click Modify panel >
Array.
■ In the Array dialog box, click Rectangular
Array.
■ Click the Select objects button.
■ Select the objects that are indicated in the
following image. Press ENTER.
Note: Use two separate crossing windows to
select the objects.
7.
Set your desired number of rows and columns:
■ In the Array dialog box, for Rows, enter 4.
■ For Columns, enter 2.
■ Under Offset Distance and Direction, click
Pick Both Offsets.