
User`s guide
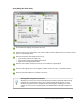

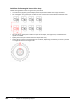
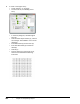

Table Of Contents
- Introduction
- Chapter 1: Taking the AutoCAD Tour
- Chapter 2: Creating Basic Drawings
- Chapter 3: Manipulating Objects
- Lesson: Selecting Objects in the Drawing
- Lesson: Changing an Object's Position
- Lesson: Creating New Objects from Existing Objects
- Lesson: Changing the Angle of an Object's Position
- Lesson: Creating a Mirror Image of Existing Objects
- Lesson: Creating Object Patterns
- Lesson: Changing an Object's Size
- Challenge Exercise: Grips
- Challenge Exercise: Architectural
- Challenge Exercise: Mechanical
- Chapter Summary
- Chapter 4: Drawing Organization and Inquiry Commands
- Chapter 5: Altering Objects
- Lesson: Trimming and Extending Objects to Defined Boundaries
- Lesson: Creating Parallel and Offset Geometry
- Lesson: Joining Objects
- Lesson: Breaking an Object into Two Objects
- Lesson: Applying a Radius Corner to Two Objects
- Lesson: Creating an Angled Corner Between Two Objects
- Lesson: Changing Part of an Object's Shape
- Challenge Exercise: Architectural
- Challenge Exercise: Mechanical
- Chapter Summary

222 ■ Chapter 3: Manipulating Objects
3.
To create a rectangular array:
■ Create another 1 x 1 rectangle.
■ On the Home tab, click Modify panel >
Array.
■ In the Array dialog box, click Rectangular
Array (1).
■ Click the Select objects button (2), and click
the rectangle. Press ENTER to return to the
dialog box.
■ Enter 12 for Rows (3) and Columns (4).
■ Enter 2 for Row offset (5) and Column
offset (6).
■ Click OK (7).
■ Zoom to display your rectangular array,
which should resemble the following
illustration.