
User`s guide
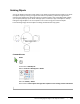

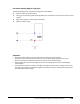
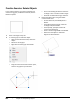
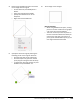
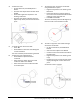
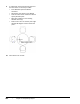
Table Of Contents
- Introduction
- Chapter 1: Taking the AutoCAD Tour
- Chapter 2: Creating Basic Drawings
- Chapter 3: Manipulating Objects
- Lesson: Selecting Objects in the Drawing
- Lesson: Changing an Object's Position
- Lesson: Creating New Objects from Existing Objects
- Lesson: Changing the Angle of an Object's Position
- Lesson: Creating a Mirror Image of Existing Objects
- Lesson: Creating Object Patterns
- Lesson: Changing an Object's Size
- Challenge Exercise: Grips
- Challenge Exercise: Architectural
- Challenge Exercise: Mechanical
- Chapter Summary
- Chapter 4: Drawing Organization and Inquiry Commands
- Chapter 5: Altering Objects
- Lesson: Trimming and Extending Objects to Defined Boundaries
- Lesson: Creating Parallel and Offset Geometry
- Lesson: Joining Objects
- Lesson: Breaking an Object into Two Objects
- Lesson: Applying a Radius Corner to Two Objects
- Lesson: Creating an Angled Corner Between Two Objects
- Lesson: Changing Part of an Object's Shape
- Challenge Exercise: Architectural
- Challenge Exercise: Mechanical
- Chapter Summary

Lesson: Changing the Angle of an Object's Position ■ 203
4.
To select the chair:
■ On the Home tab, click Modify Panel >
Rotate.
■ Click the chair object above the desk. Press
ENTER.
■ Press SHIFT+right-click anywhere in the
drawing. Click Insert.
■ Click the chair object to display the Insert
Object Snap marker, then click to select the
point.
5.
To rotate the chair to face the desk:
■ Enter -90.
■ Press ENTER to rotate the chair 90 degrees
counter-clockwise.
The chair should be positioned facing the desk.
6.
To select the chair and base point:
■ Press ENTER to repeat the Rotate
command.
■ Select the chair object next to the small
conference table. Press ENTER.
■ Select the center of the conference table
as the base point.
7.
To rotate the chair around the round table
using the Reference option:
■ Right-click anywhere in the drawing. Click
Reference.
■ Define the reference angle by selecting
the center of the conference table and the
midpoint of the chair back rest.
■ Enter 90. Press ENTER.
The chair should be positioned 90 degrees up
from the center of the conference table.
8.
To make a copy of the chair while rotating it
around the round table:
■ On the command line, enter RO. Press
ENTER.
■ Select the chair object. Press ENTER.
■ Click the center of the conference table as
the base point.
■ Right-click anywhere in the drawing. Click
Copy.
■ Position the cursor so that the polar angle
displays 90 degrees. Click to select that
point.
A copy of the chair is rotated.