
User`s guide
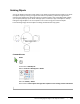

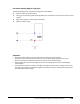
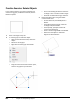
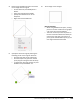
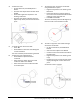
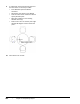
Table Of Contents
- Introduction
- Chapter 1: Taking the AutoCAD Tour
- Chapter 2: Creating Basic Drawings
- Chapter 3: Manipulating Objects
- Lesson: Selecting Objects in the Drawing
- Lesson: Changing an Object's Position
- Lesson: Creating New Objects from Existing Objects
- Lesson: Changing the Angle of an Object's Position
- Lesson: Creating a Mirror Image of Existing Objects
- Lesson: Creating Object Patterns
- Lesson: Changing an Object's Size
- Challenge Exercise: Grips
- Challenge Exercise: Architectural
- Challenge Exercise: Mechanical
- Chapter Summary
- Chapter 4: Drawing Organization and Inquiry Commands
- Chapter 5: Altering Objects
- Lesson: Trimming and Extending Objects to Defined Boundaries
- Lesson: Creating Parallel and Offset Geometry
- Lesson: Joining Objects
- Lesson: Breaking an Object into Two Objects
- Lesson: Applying a Radius Corner to Two Objects
- Lesson: Creating an Angled Corner Between Two Objects
- Lesson: Changing Part of an Object's Shape
- Challenge Exercise: Architectural
- Challenge Exercise: Mechanical
- Chapter Summary

200 ■ Chapter 3: Manipulating Objects
Practice Exercise: Rotate Objects
In this practice exercise, you draw a rectangle and
rotate it using grips, the Rotate command, and the
Reference option.
1.
Draw a rectangle of any size.
2.
To use the grips to rotate the object:
■ With the command line blank, select the
object.
■ Select one of the grips.
■ Right-click the active grip. Click Rotate.
■ Drag the mouse around the rotation point,
which is the grip that you selected.
■ Click in the drawing window to rotate the
rectangle. This is a random rotation angle.
■ Press ESC to deactivate the grip selection.
3.
Rotate the object again using the Rotate
command this time.
■ On the Home tab, click Modify Panel >
Rotate.
■ At the Select object prompt, select the
rectangle and press ENTER.
■ At the prompt, specify the lower left
corner as the basepoint.
■ Enter a rotation angle of 10. Press ENTER.
■ Notice that the object is rotated 10
degrees counterclockwise.