
User`s guide


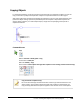
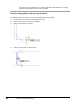
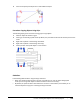
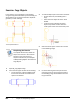
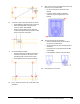
Table Of Contents
- Introduction
- Chapter 1: Taking the AutoCAD Tour
- Chapter 2: Creating Basic Drawings
- Chapter 3: Manipulating Objects
- Lesson: Selecting Objects in the Drawing
- Lesson: Changing an Object's Position
- Lesson: Creating New Objects from Existing Objects
- Lesson: Changing the Angle of an Object's Position
- Lesson: Creating a Mirror Image of Existing Objects
- Lesson: Creating Object Patterns
- Lesson: Changing an Object's Size
- Challenge Exercise: Grips
- Challenge Exercise: Architectural
- Challenge Exercise: Mechanical
- Chapter Summary
- Chapter 4: Drawing Organization and Inquiry Commands
- Chapter 5: Altering Objects
- Lesson: Trimming and Extending Objects to Defined Boundaries
- Lesson: Creating Parallel and Offset Geometry
- Lesson: Joining Objects
- Lesson: Breaking an Object into Two Objects
- Lesson: Applying a Radius Corner to Two Objects
- Lesson: Creating an Angled Corner Between Two Objects
- Lesson: Changing Part of an Object's Shape
- Challenge Exercise: Architectural
- Challenge Exercise: Mechanical
- Chapter Summary

Lesson: Changing an Object's Position ■ 187
9.
Adjust your view to include this area of the
drawing.
10.
Move the dinette set to the interior of the
room as shown:
■ With the command line blank, select the
dinette set.
■ Select the grip at the center.
■ Drag the dinette set towards the room.
■ Hover over the midpoint of the first wall,
then the midpoint of the adjacent wall as
indicated.
■ Drag the dinette set to the middle of the
room. Click when you see the tracking lines
of the midpoints intersect.
11.
To relocate the water closet towards the other
wall:
■ With the command line blank, select the
water closet.
■ Select the grip and drag it up.
■ Enter 2'3 and press ENTER.
12.
Zoom to display your entire drawing.
13.
Close all files. Do not save.