
User`s guide
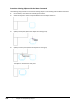
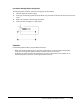
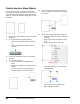
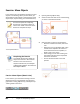
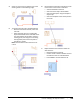
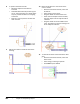
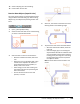
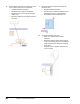
Table Of Contents
- Introduction
- Chapter 1: Taking the AutoCAD Tour
- Chapter 2: Creating Basic Drawings
- Chapter 3: Manipulating Objects
- Lesson: Selecting Objects in the Drawing
- Lesson: Changing an Object's Position
- Lesson: Creating New Objects from Existing Objects
- Lesson: Changing the Angle of an Object's Position
- Lesson: Creating a Mirror Image of Existing Objects
- Lesson: Creating Object Patterns
- Lesson: Changing an Object's Size
- Challenge Exercise: Grips
- Challenge Exercise: Architectural
- Challenge Exercise: Mechanical
- Chapter Summary
- Chapter 4: Drawing Organization and Inquiry Commands
- Chapter 5: Altering Objects
- Lesson: Trimming and Extending Objects to Defined Boundaries
- Lesson: Creating Parallel and Offset Geometry
- Lesson: Joining Objects
- Lesson: Breaking an Object into Two Objects
- Lesson: Applying a Radius Corner to Two Objects
- Lesson: Creating an Angled Corner Between Two Objects
- Lesson: Changing Part of an Object's Shape
- Challenge Exercise: Architectural
- Challenge Exercise: Mechanical
- Chapter Summary

186 ■ Chapter 3: Manipulating Objects
6.
Use the Move command to relocate the couch
to the interior of the room as indicated:
■ Activate the Move command.
■ Select the couch object. Press ENTER.
■ Select the base point using the midpoint
object snap.
■ Select the midpoint of the wall to position
the couch.
7.
Repeat the Move command and select the
desk and chair:
■ Repeat the Move command.
■ Click to create a selection window around
the desk and chair as indicated below.
■ Press ENTER to end the selection set.
8.
To position the desk and chair:
■ Select the midpoint of the desk as
indicated.
■ Hold down SHIFT+D while positioning the
cursor. This temporarily turns off all object
snaps to prevent the desk from snapping
to the wall.
■ Drag the cursor to position the desk and
chair as shown.