
User`s guide

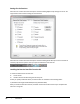


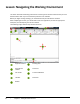

Table Of Contents
- Introduction
- Chapter 1: Taking the AutoCAD Tour
- Chapter 2: Creating Basic Drawings
- Chapter 3: Manipulating Objects
- Lesson: Selecting Objects in the Drawing
- Lesson: Changing an Object's Position
- Lesson: Creating New Objects from Existing Objects
- Lesson: Changing the Angle of an Object's Position
- Lesson: Creating a Mirror Image of Existing Objects
- Lesson: Creating Object Patterns
- Lesson: Changing an Object's Size
- Challenge Exercise: Grips
- Challenge Exercise: Architectural
- Challenge Exercise: Mechanical
- Chapter Summary
- Chapter 4: Drawing Organization and Inquiry Commands
- Chapter 5: Altering Objects
- Lesson: Trimming and Extending Objects to Defined Boundaries
- Lesson: Creating Parallel and Offset Geometry
- Lesson: Joining Objects
- Lesson: Breaking an Object into Two Objects
- Lesson: Applying a Radius Corner to Two Objects
- Lesson: Creating an Angled Corner Between Two Objects
- Lesson: Changing Part of an Object's Shape
- Challenge Exercise: Architectural
- Challenge Exercise: Mechanical
- Chapter Summary

6 ■ Chapter 1: Taking the AutoCAD Tour
3.
Select acad.dwt
(imperial) or
acadiso.dwt (metric)
as the template file.
4.
Click the Workspaces
settings icon, located
at the bottom
right corner of the
AutoCAD window.
Select 2D Drafting &
Annotation.
Procedure: Setting the AutoCAD LT Workspace
The following steps give an overview of activating the AutoCAD LT 2D Drafting & Annotation
workspace.
1.
Launch AutoCAD LT.
2.
On the Workspaces toolbar, select 2D Drafting and Annotation from the list.
3.
Start a new drawing and select acadlt.dwt (imperial) or acadltiso.dwt (metric) as the template file.
The instructions and exercise steps covered in this course are based on the 2D
Drafting & Annotation workspace. Please activate this workspace if you have not
already done so.