
User`s guide

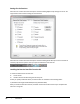


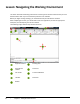

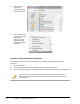
Table Of Contents
- Introduction
- Chapter 1: Taking the AutoCAD Tour
- Chapter 2: Creating Basic Drawings
- Chapter 3: Manipulating Objects
- Lesson: Selecting Objects in the Drawing
- Lesson: Changing an Object's Position
- Lesson: Creating New Objects from Existing Objects
- Lesson: Changing the Angle of an Object's Position
- Lesson: Creating a Mirror Image of Existing Objects
- Lesson: Creating Object Patterns
- Lesson: Changing an Object's Size
- Challenge Exercise: Grips
- Challenge Exercise: Architectural
- Challenge Exercise: Mechanical
- Chapter Summary
- Chapter 4: Drawing Organization and Inquiry Commands
- Chapter 5: Altering Objects
- Lesson: Trimming and Extending Objects to Defined Boundaries
- Lesson: Creating Parallel and Offset Geometry
- Lesson: Joining Objects
- Lesson: Breaking an Object into Two Objects
- Lesson: Applying a Radius Corner to Two Objects
- Lesson: Creating an Angled Corner Between Two Objects
- Lesson: Changing Part of an Object's Shape
- Challenge Exercise: Architectural
- Challenge Exercise: Mechanical
- Chapter Summary

Lesson: Navigating the Working Environment ■ 5
AutoCAD is shown here with the AutoCAD Classic workspace active.
After you start the program you can switch to the desired workspace. The application will open with
the last workspace used. The Workspace Switching dropdown list is accessed in the lower right corner
of the AutoCAD window on the Status Bar.
Procedure: Setting the 2D Drafting & Annotation Workspace
The following steps give an overview of activating the 2D Drafting & Annotation workspace.
1.
Start AutoCAD.
2.
Use the default
drawing or on the
Quick Access toolbar,
click New.