
User`s guide
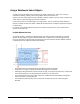

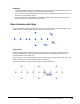
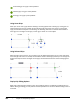
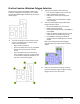
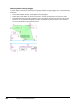
Table Of Contents
- Introduction
- Chapter 1: Taking the AutoCAD Tour
- Chapter 2: Creating Basic Drawings
- Chapter 3: Manipulating Objects
- Lesson: Selecting Objects in the Drawing
- Lesson: Changing an Object's Position
- Lesson: Creating New Objects from Existing Objects
- Lesson: Changing the Angle of an Object's Position
- Lesson: Creating a Mirror Image of Existing Objects
- Lesson: Creating Object Patterns
- Lesson: Changing an Object's Size
- Challenge Exercise: Grips
- Challenge Exercise: Architectural
- Challenge Exercise: Mechanical
- Chapter Summary
- Chapter 4: Drawing Organization and Inquiry Commands
- Chapter 5: Altering Objects
- Lesson: Trimming and Extending Objects to Defined Boundaries
- Lesson: Creating Parallel and Offset Geometry
- Lesson: Joining Objects
- Lesson: Breaking an Object into Two Objects
- Lesson: Applying a Radius Corner to Two Objects
- Lesson: Creating an Angled Corner Between Two Objects
- Lesson: Changing Part of an Object's Shape
- Challenge Exercise: Architectural
- Challenge Exercise: Mechanical
- Chapter Summary

Lesson: Selecting Objects in the Drawing ■ 165
Practice Exercise: Windows Polygon Selection
Draw the outer shape shown below and fill it with
a random arrangement of rectangles. Then practice
using the Windows Polygon selection option to erase
the rectangles.
1.
Turn Polar Tracking on. Draw the outer shape
any size, resembling more or less the shape
shown in the illustration:
■ Begin the Line command.
■ Start at the lower left corner (1) and follow
the points to draw each line as shown
below.
■ If you were able to do this continuously,
when you get to point (6), you may enter C
to close the line segments. Otherwise, you
will have to select the Endpoint.
2.
To draw the rectangles inside the shape:
■ First check that Object Snap is turned off.
■ Begin the Rectangle command.
■ Pick the first corner, then the opposite
corner.
■ Continue until you have filled your object
with rectangles.
3.
To erase the rectangles using the Windows
Polygon selection option:
■ Be sure that Object Snap is turned off.
■ Begin the Erase command.
■ At the Select objects prompt, enter WP and
press ENTER.
■ Begin the Window Polygon at point (1) and
continue until you get back to point (1).
■ Press ENTER to complete the Window
Polygon and press ENTER again to erase the
objects.
Notice that making the Windows Polygon
was like stretching a rubber band around the
objects.
4.
Undo. You may Save this drawing in order to
practice erasing the objects using the Crossing
Polygon option in the next section.