
User`s guide


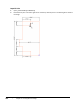
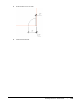


Table Of Contents
- Introduction
- Chapter 1: Taking the AutoCAD Tour
- Chapter 2: Creating Basic Drawings
- Chapter 3: Manipulating Objects
- Lesson: Selecting Objects in the Drawing
- Lesson: Changing an Object's Position
- Lesson: Creating New Objects from Existing Objects
- Lesson: Changing the Angle of an Object's Position
- Lesson: Creating a Mirror Image of Existing Objects
- Lesson: Creating Object Patterns
- Lesson: Changing an Object's Size
- Challenge Exercise: Grips
- Challenge Exercise: Architectural
- Challenge Exercise: Mechanical
- Chapter Summary
- Chapter 4: Drawing Organization and Inquiry Commands
- Chapter 5: Altering Objects
- Lesson: Trimming and Extending Objects to Defined Boundaries
- Lesson: Creating Parallel and Offset Geometry
- Lesson: Joining Objects
- Lesson: Breaking an Object into Two Objects
- Lesson: Applying a Radius Corner to Two Objects
- Lesson: Creating an Angled Corner Between Two Objects
- Lesson: Changing Part of an Object's Shape
- Challenge Exercise: Architectural
- Challenge Exercise: Mechanical
- Chapter Summary

156 ■ Chapter 2: Creating Basic Drawings
Chapter Summary
The concepts and techniques covered in this lesson serve as the building blocks for every drawings
that you create. The sooner you master these concepts, the sooner you will be able to move on to
more advanced geometry creation and editing.
Having completed this chapter, you can:
■ Identify the default coordinate system and use dynamic input, direct distance, and shortcut
menus.
■ Use the Line, Circle, Arc, Erase, Rectangle, and Polygon commands to create and erase geometry
in the drawing.
■ Use object snaps to accurately place and create objects in the drawing.
■ Activate and use the Polar Tracking and PolarSnap modes to more accurately create geometry at
different angles in the drawing.
■ Enable and use object snap tracking to position geometry in the drawing.
■ Use the Unit command to set up the drawing environment.
■ Use the concepts and tools that you learned in Chapter 2 to begin a small architectural floor plan.
■ Use the concepts and tools that you learned in Chapter 2 to create the initial geometry for a small
mechanical assembly drawing.