
User`s guide

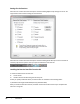


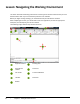

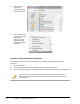
Table Of Contents
- Introduction
- Chapter 1: Taking the AutoCAD Tour
- Chapter 2: Creating Basic Drawings
- Chapter 3: Manipulating Objects
- Lesson: Selecting Objects in the Drawing
- Lesson: Changing an Object's Position
- Lesson: Creating New Objects from Existing Objects
- Lesson: Changing the Angle of an Object's Position
- Lesson: Creating a Mirror Image of Existing Objects
- Lesson: Creating Object Patterns
- Lesson: Changing an Object's Size
- Challenge Exercise: Grips
- Challenge Exercise: Architectural
- Challenge Exercise: Mechanical
- Chapter Summary
- Chapter 4: Drawing Organization and Inquiry Commands
- Chapter 5: Altering Objects
- Lesson: Trimming and Extending Objects to Defined Boundaries
- Lesson: Creating Parallel and Offset Geometry
- Lesson: Joining Objects
- Lesson: Breaking an Object into Two Objects
- Lesson: Applying a Radius Corner to Two Objects
- Lesson: Creating an Angled Corner Between Two Objects
- Lesson: Changing Part of an Object's Shape
- Challenge Exercise: Architectural
- Challenge Exercise: Mechanical
- Chapter Summary

2 ■ Chapter 1: Taking the AutoCAD Tour
Lesson: Navigating the Working Environment
This lesson describes theworking environment and the types of interface elements that you must
become familiar with if you are to become proficient in the software.
Before you begin creating drawings, you should familiarize yourself with the interface.
After completing this lesson, you will be able to start the application, activate the appropriate
workspace, and identify key parts of the interface.
The following image identifies key interface elements:
Application Menu
Drawing Area
Quick Access
Toolbar
Crosshairs
Info Center
Command Window
Title Bar
Status bar
Ribbon