
User`s guide
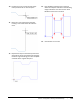
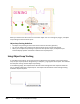

Table Of Contents
- Introduction
- Chapter 1: Taking the AutoCAD Tour
- Chapter 2: Creating Basic Drawings
- Chapter 3: Manipulating Objects
- Lesson: Selecting Objects in the Drawing
- Lesson: Changing an Object's Position
- Lesson: Creating New Objects from Existing Objects
- Lesson: Changing the Angle of an Object's Position
- Lesson: Creating a Mirror Image of Existing Objects
- Lesson: Creating Object Patterns
- Lesson: Changing an Object's Size
- Challenge Exercise: Grips
- Challenge Exercise: Architectural
- Challenge Exercise: Mechanical
- Chapter Summary
- Chapter 4: Drawing Organization and Inquiry Commands
- Chapter 5: Altering Objects
- Lesson: Trimming and Extending Objects to Defined Boundaries
- Lesson: Creating Parallel and Offset Geometry
- Lesson: Joining Objects
- Lesson: Breaking an Object into Two Objects
- Lesson: Applying a Radius Corner to Two Objects
- Lesson: Creating an Angled Corner Between Two Objects
- Lesson: Changing Part of an Object's Shape
- Challenge Exercise: Architectural
- Challenge Exercise: Mechanical
- Chapter Summary

134 ■ Chapter 2: Creating Basic Drawings
Guidelines for Acquiring Points with Object Snap Tracking
■ To acquire a point, touch it with the cursor.
■ To release a point, touch an acquired point with the cursor.
■ You can acquire up to seven points for object snap tracking.
■ If you attempt to acquire more than seven points, previous points are automatically released on a
first-acquired, first-released basis.
Object Snap Tracking Settings Key Points
■ Object snap tracking uses running object snaps to acquire points.
■ To use object snap tracking, object snaps must be turned on with at least one object snap
selected.
■ Hover over the object snap points but do not select them.