
User`s guide
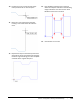
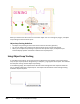

Table Of Contents
- Introduction
- Chapter 1: Taking the AutoCAD Tour
- Chapter 2: Creating Basic Drawings
- Chapter 3: Manipulating Objects
- Lesson: Selecting Objects in the Drawing
- Lesson: Changing an Object's Position
- Lesson: Creating New Objects from Existing Objects
- Lesson: Changing the Angle of an Object's Position
- Lesson: Creating a Mirror Image of Existing Objects
- Lesson: Creating Object Patterns
- Lesson: Changing an Object's Size
- Challenge Exercise: Grips
- Challenge Exercise: Architectural
- Challenge Exercise: Mechanical
- Chapter Summary
- Chapter 4: Drawing Organization and Inquiry Commands
- Chapter 5: Altering Objects
- Lesson: Trimming and Extending Objects to Defined Boundaries
- Lesson: Creating Parallel and Offset Geometry
- Lesson: Joining Objects
- Lesson: Breaking an Object into Two Objects
- Lesson: Applying a Radius Corner to Two Objects
- Lesson: Creating an Angled Corner Between Two Objects
- Lesson: Changing Part of an Object's Shape
- Challenge Exercise: Architectural
- Challenge Exercise: Mechanical
- Chapter Summary

132 ■ Chapter 2: Creating Basic Drawings
In the Polar Tracking tab, you can choose whether to track Orthogonally Only (simplest method) or to
Track using all polar angle settings.
Alignment paths only appear for horizontal and vertical alignments.
Alignment paths appear for all polar angles defined.
Press and hold SHIFT+Q to temporarily turn object snap tracking on or off.
Procedure: Using Object Snap Tracking
The following steps outline how to use object snap tracking to acquire points.
1.
On the status bar, make sure the Osnap and Otrack settings are on.
2.
Start any command that prompts you to select a point.