
User`s guide
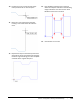
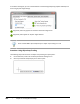

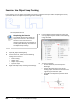
Table Of Contents
- Introduction
- Chapter 1: Taking the AutoCAD Tour
- Chapter 2: Creating Basic Drawings
- Chapter 3: Manipulating Objects
- Lesson: Selecting Objects in the Drawing
- Lesson: Changing an Object's Position
- Lesson: Creating New Objects from Existing Objects
- Lesson: Changing the Angle of an Object's Position
- Lesson: Creating a Mirror Image of Existing Objects
- Lesson: Creating Object Patterns
- Lesson: Changing an Object's Size
- Challenge Exercise: Grips
- Challenge Exercise: Architectural
- Challenge Exercise: Mechanical
- Chapter Summary
- Chapter 4: Drawing Organization and Inquiry Commands
- Chapter 5: Altering Objects
- Lesson: Trimming and Extending Objects to Defined Boundaries
- Lesson: Creating Parallel and Offset Geometry
- Lesson: Joining Objects
- Lesson: Breaking an Object into Two Objects
- Lesson: Applying a Radius Corner to Two Objects
- Lesson: Creating an Angled Corner Between Two Objects
- Lesson: Changing Part of an Object's Shape
- Challenge Exercise: Architectural
- Challenge Exercise: Mechanical
- Chapter Summary

Lesson: Using Polar Tracking and PolarSnap ■ 127
10.
Position the cursor so that the polar angle
tooltip reads 25.00 < 0. Click the point.
11.
Move the cursor upwards until the polar
tracking cursor reads 70.00 < 90. Click the
point.
12.
Repeat these steps to draw the top half of the
object which mirrors the bottom half, changing
the Polar angle accordingly. Your final endpoint
should be at the original start point.
13.
Press ENTER to repeat the Line command.
Select the endpoints indicated in the following
image to draw the inner vertical lines. Press
ENTER to end the Line command.
14.
Close all files. Do not save.