
User`s guide
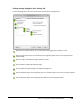
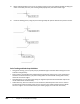
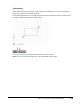
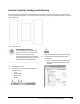

Table Of Contents
- Introduction
- Chapter 1: Taking the AutoCAD Tour
- Chapter 2: Creating Basic Drawings
- Chapter 3: Manipulating Objects
- Lesson: Selecting Objects in the Drawing
- Lesson: Changing an Object's Position
- Lesson: Creating New Objects from Existing Objects
- Lesson: Changing the Angle of an Object's Position
- Lesson: Creating a Mirror Image of Existing Objects
- Lesson: Creating Object Patterns
- Lesson: Changing an Object's Size
- Challenge Exercise: Grips
- Challenge Exercise: Architectural
- Challenge Exercise: Mechanical
- Chapter Summary
- Chapter 4: Drawing Organization and Inquiry Commands
- Chapter 5: Altering Objects
- Lesson: Trimming and Extending Objects to Defined Boundaries
- Lesson: Creating Parallel and Offset Geometry
- Lesson: Joining Objects
- Lesson: Breaking an Object into Two Objects
- Lesson: Applying a Radius Corner to Two Objects
- Lesson: Creating an Angled Corner Between Two Objects
- Lesson: Changing Part of an Object's Shape
- Challenge Exercise: Architectural
- Challenge Exercise: Mechanical
- Chapter Summary

122 ■ Chapter 2: Creating Basic Drawings
3.
Begin creating geometry such as lines or polylines. Click a point in the drawing window and drag your
cursor to the next point. The polar tracking tooltip displays the polar distance and angle.
4.
Continue selecting points, using the polar tracking tooltips for precise distances and points as shown.
Polar Tracking and PolarSnap Guidelines
■ Using polar tracking, you can quickly snap to predefined angle increments while moving the cursor
to draw or edit geometry.
■ Polar tracking is more flexible than traditional Ortho mode that restricts your cursor movement to
horizontal or vertical directions, yet polar tracking offers the same benefit of being able to easily
draw lines at common angles.
■ Using PolarSnap, you can select points along the alignment path that would otherwise require the
use of cumbersome coordinate entry.
■ Unlike Grid snap, which increments all cursor movement, PolarSnap forces the cursor to move in
increments only when the angle of the cursor is equal to a polar tracking angle increment. When
the cursor angle is not an increment of the polar tracking angle, the cursor can move freely.