
User`s guide
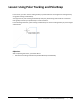
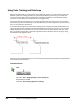
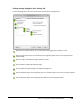
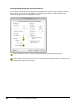
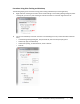
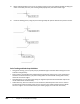
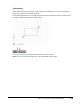
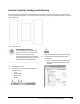

Table Of Contents
- Introduction
- Chapter 1: Taking the AutoCAD Tour
- Chapter 2: Creating Basic Drawings
- Chapter 3: Manipulating Objects
- Lesson: Selecting Objects in the Drawing
- Lesson: Changing an Object's Position
- Lesson: Creating New Objects from Existing Objects
- Lesson: Changing the Angle of an Object's Position
- Lesson: Creating a Mirror Image of Existing Objects
- Lesson: Creating Object Patterns
- Lesson: Changing an Object's Size
- Challenge Exercise: Grips
- Challenge Exercise: Architectural
- Challenge Exercise: Mechanical
- Chapter Summary
- Chapter 4: Drawing Organization and Inquiry Commands
- Chapter 5: Altering Objects
- Lesson: Trimming and Extending Objects to Defined Boundaries
- Lesson: Creating Parallel and Offset Geometry
- Lesson: Joining Objects
- Lesson: Breaking an Object into Two Objects
- Lesson: Applying a Radius Corner to Two Objects
- Lesson: Creating an Angled Corner Between Two Objects
- Lesson: Changing Part of an Object's Shape
- Challenge Exercise: Architectural
- Challenge Exercise: Mechanical
- Chapter Summary

118 ■ Chapter 2: Creating Basic Drawings
Using Polar Tracking and PolarSnap
Because everything that you create requires some degree of precision, it is critical that you learn the
different options for creating geometry accurately and yet efficiently. Previously, you learned how
to enter coordinate data in the form of absolute and relative coordinates. These methods, though
important, are not always the most efficient for creating geometry.
Using polar tracking and PolarSnap, you can create geometry with the same precision as coordinate
entry allows you, but more efficiently. To use these features, you need to adjust their options and turn
them on using the status bar buttons.
In the following illustration, the same paths are being drawn using polar tracking and PolarSnap. The
alignment paths appear as dotted lines extended indefinitely from the point of your cursor. The polar
tooltips display the current position of the cursor relative to the last point selected. The path on the
left is using polar tracking with an absolute angle measurement, while the path on the right is using
the Relative to Last Segment option.
Using polar tracking with PolarSnap, you can accurately draw the previous geometry without having to
enter cumbersome coordinates.
Command Access
Polar
Menu Bar: Tools > Drafting Settings > Polar Tracking tab
Keyboard Shortcut: F10
Status Bar: Polar Tracking; Right-click > Settings