
User`s guide
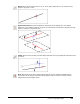
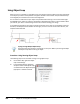
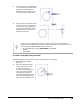

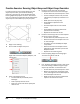

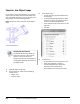

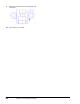
Table Of Contents
- Introduction
- Chapter 1: Taking the AutoCAD Tour
- Chapter 2: Creating Basic Drawings
- Chapter 3: Manipulating Objects
- Lesson: Selecting Objects in the Drawing
- Lesson: Changing an Object's Position
- Lesson: Creating New Objects from Existing Objects
- Lesson: Changing the Angle of an Object's Position
- Lesson: Creating a Mirror Image of Existing Objects
- Lesson: Creating Object Patterns
- Lesson: Changing an Object's Size
- Challenge Exercise: Grips
- Challenge Exercise: Architectural
- Challenge Exercise: Mechanical
- Chapter Summary
- Chapter 4: Drawing Organization and Inquiry Commands
- Chapter 5: Altering Objects
- Lesson: Trimming and Extending Objects to Defined Boundaries
- Lesson: Creating Parallel and Offset Geometry
- Lesson: Joining Objects
- Lesson: Breaking an Object into Two Objects
- Lesson: Applying a Radius Corner to Two Objects
- Lesson: Creating an Angled Corner Between Two Objects
- Lesson: Changing Part of an Object's Shape
- Challenge Exercise: Architectural
- Challenge Exercise: Mechanical
- Chapter Summary

Lesson: Using Object Snaps ■ 113
8.
To draw the four connecting lines from the
midpoint of each line in the rectangle:
■ On the Home tab, click Draw panel > Line.
■ Shift+right-click and select Midpoint from
the shortcut menu.
■ Move the mouse to the midpoint and click
when you see the Midpoint object snap
marker.
■ Continue with the Line command. Shift
+right-click and select Midpoint from the
short-cut menu and move the mouse to
the midpoint of the adjacent line. Click
when you see that marker.
■ Repeat these steps for the remaining lines.
Though it is far easier and quicker to use
running object snap, it is also convenient to
occasionally use the object snap overrides. In
this exercise you turned object snap off to do
the second drawing, however note that it can
be left on when the object snap overrides are
needed.
9.
Close all files. Do no not save.