
User`s guide
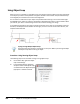
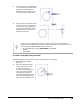
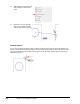

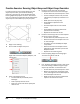

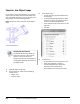

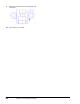
Table Of Contents
- Introduction
- Chapter 1: Taking the AutoCAD Tour
- Chapter 2: Creating Basic Drawings
- Chapter 3: Manipulating Objects
- Lesson: Selecting Objects in the Drawing
- Lesson: Changing an Object's Position
- Lesson: Creating New Objects from Existing Objects
- Lesson: Changing the Angle of an Object's Position
- Lesson: Creating a Mirror Image of Existing Objects
- Lesson: Creating Object Patterns
- Lesson: Changing an Object's Size
- Challenge Exercise: Grips
- Challenge Exercise: Architectural
- Challenge Exercise: Mechanical
- Chapter Summary
- Chapter 4: Drawing Organization and Inquiry Commands
- Chapter 5: Altering Objects
- Lesson: Trimming and Extending Objects to Defined Boundaries
- Lesson: Creating Parallel and Offset Geometry
- Lesson: Joining Objects
- Lesson: Breaking an Object into Two Objects
- Lesson: Applying a Radius Corner to Two Objects
- Lesson: Creating an Angled Corner Between Two Objects
- Lesson: Changing Part of an Object's Shape
- Challenge Exercise: Architectural
- Challenge Exercise: Mechanical
- Chapter Summary

112 ■ Chapter 2: Creating Basic Drawings
Practice Exercise: Running Object Snap and Object Snap Overrides
In order to practice using running object snap and
object snap overrides, you create this drawing
two times. The first time, do this drawing with the
Running Object Snap option turned on. The second
time, turn it off and use the overrides by selecting the
object snap each time before you pick your point.
1.
Begin a new drawing.
2.
Be sure that the object snap is on.
Right-click and check Endpoint, Midpoint, and
Intersection.
3.
Draw a rectangle (any size):
■ On the Home tab, click Draw panel >
Rectangle.
■ Click to specify the first corner.
■ Drag your mouse and click to specify the
other corner.
4.
Draw four circles the same size with the
centerpoints at each corner of the rectangle:
■ On the Home tab, click Draw panel > Circle.
■ For the centerpoint of the circle, click the
intersection (or endpoint) of the lines at a
corner.
■ Make your first circle (any size).
■ Press ENTER to repeat the Circle
command.
■ Click the endpoint of a line at another
corner
■ Press ENTER to accept the default size
[which will be in brackets]
■ Repeat for the other two circles.
5.
Draw four connecting lines from the midpoint
of each line in the rectangle:
■ On the Home tab, click Draw panel > Line.
■ Move the mouse to the midpoint of a line
on the rectangle.
■ Click when you see the Midpoint object
snap marker.
■ Move the mouse to the midpoint of the
adjacent line and click when you see that
Midpoint marker.
■ Repeat for the remaining lines.
6.
Erase everything. Begin this drawing again.
This time turn object snap off.
7.
First, draw the rectangle (any size), then create
the same drawing as before using the single
object snap overrides. To draw the circles:
■ On the Home tab, click Draw panel > Circle.
■ Before you specify the centerpoint of the
circle, shift+right-click and select Endpoint.
■ Click the Endpoint of the line.
■ Make the circle any size and repeat these
steps for the other three circles.