
User`s guide
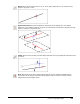
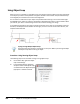
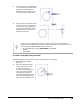
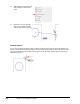

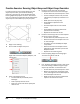

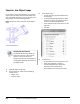

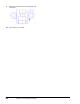
Table Of Contents
- Introduction
- Chapter 1: Taking the AutoCAD Tour
- Chapter 2: Creating Basic Drawings
- Chapter 3: Manipulating Objects
- Lesson: Selecting Objects in the Drawing
- Lesson: Changing an Object's Position
- Lesson: Creating New Objects from Existing Objects
- Lesson: Changing the Angle of an Object's Position
- Lesson: Creating a Mirror Image of Existing Objects
- Lesson: Creating Object Patterns
- Lesson: Changing an Object's Size
- Challenge Exercise: Grips
- Challenge Exercise: Architectural
- Challenge Exercise: Mechanical
- Chapter Summary
- Chapter 4: Drawing Organization and Inquiry Commands
- Chapter 5: Altering Objects
- Lesson: Trimming and Extending Objects to Defined Boundaries
- Lesson: Creating Parallel and Offset Geometry
- Lesson: Joining Objects
- Lesson: Breaking an Object into Two Objects
- Lesson: Applying a Radius Corner to Two Objects
- Lesson: Creating an Angled Corner Between Two Objects
- Lesson: Changing Part of an Object's Shape
- Challenge Exercise: Architectural
- Challenge Exercise: Mechanical
- Chapter Summary

Lesson: Using Object Snaps ■ 109
3.
On the Home tab, click Draw panel
> Line. Place the cursor near other
geometry in the drawing. The
AutoSnap marker appears as your
cursor approaches a snap point.
4.
Click to select the snap point, then
move the cursor to the next point
on the screen. As you approach a
snap point, the AutoSnap marker
appears near the cursor. Click to
select the snap point.
If you are using a three-button mouse or a wheel mouse, you can set the default
behavior for the middle button or wheel to activate the Object Snap shortcut menu. Do
this by setting the MBUTTONPAN system variable to 0.
■ On the command line, enter MBUTTONPAN. Press ENTER.
■ Enter 0.
■ Press ENTER.
Procedure: Using Object Snap Overrides
The following steps are an overview of how to use the object snap overrides.
1.
Begin creating or editing
geometry.
2.
When the software prompts
you to select a point, select
an object snap from the
shortcut menu. Then position
your cursor near the object
containing the snap point.
The AutoSnap marker should
appear (1), indicating the snap
point. Click to select the point.