
User`s guide
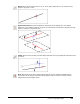
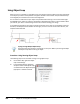

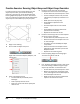

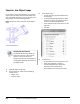

Table Of Contents
- Introduction
- Chapter 1: Taking the AutoCAD Tour
- Chapter 2: Creating Basic Drawings
- Chapter 3: Manipulating Objects
- Lesson: Selecting Objects in the Drawing
- Lesson: Changing an Object's Position
- Lesson: Creating New Objects from Existing Objects
- Lesson: Changing the Angle of an Object's Position
- Lesson: Creating a Mirror Image of Existing Objects
- Lesson: Creating Object Patterns
- Lesson: Changing an Object's Size
- Challenge Exercise: Grips
- Challenge Exercise: Architectural
- Challenge Exercise: Mechanical
- Chapter Summary
- Chapter 4: Drawing Organization and Inquiry Commands
- Chapter 5: Altering Objects
- Lesson: Trimming and Extending Objects to Defined Boundaries
- Lesson: Creating Parallel and Offset Geometry
- Lesson: Joining Objects
- Lesson: Breaking an Object into Two Objects
- Lesson: Applying a Radius Corner to Two Objects
- Lesson: Creating an Angled Corner Between Two Objects
- Lesson: Changing Part of an Object's Shape
- Challenge Exercise: Architectural
- Challenge Exercise: Mechanical
- Chapter Summary

108 ■ Chapter 2: Creating Basic Drawings
Using Object Snap
When you turn on multiple running object snaps, the software uses the object snap most appropriate
to the object you select. If two potential snap points fall within the selection area,the softwaresnaps
to the eligible point closest to the center of the target box.
You can add to or subtract from your object snap modes without exiting a current command. Right-
click OSNAP on the status bar and then click Settings. Add additional modes or remove modes. When
you click OK, you return to the drawing area and can continue creating your design.
In the following illustration, the image on the left shows the cursor closer to the midpoint of the line;
therefore, the midpoint will be selected. On the right, the cursor is closer to the end of the line; the
endpoint will be selected.
Cycling Through Multiple Object Snaps
If the Dynamic Input interface is turned off, you can press TAB to cycle through multiple
valid object snaps while touching an object.
Procedure: Using Running Object Snaps
The following steps are an overview of using running object snaps.
1.
On the Status Bar, right-click Object
Snap. Click Settings.
2.
In the Drafting Settings dialog box,
verify that some of the object snaps
are selected and the Object Snap On
(F3) option is selected. Click OK.