
User`s guide
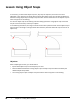

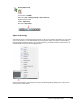

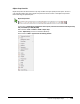

Table Of Contents
- Introduction
- Chapter 1: Taking the AutoCAD Tour
- Chapter 2: Creating Basic Drawings
- Chapter 3: Manipulating Objects
- Lesson: Selecting Objects in the Drawing
- Lesson: Changing an Object's Position
- Lesson: Creating New Objects from Existing Objects
- Lesson: Changing the Angle of an Object's Position
- Lesson: Creating a Mirror Image of Existing Objects
- Lesson: Creating Object Patterns
- Lesson: Changing an Object's Size
- Challenge Exercise: Grips
- Challenge Exercise: Architectural
- Challenge Exercise: Mechanical
- Chapter Summary
- Chapter 4: Drawing Organization and Inquiry Commands
- Chapter 5: Altering Objects
- Lesson: Trimming and Extending Objects to Defined Boundaries
- Lesson: Creating Parallel and Offset Geometry
- Lesson: Joining Objects
- Lesson: Breaking an Object into Two Objects
- Lesson: Applying a Radius Corner to Two Objects
- Lesson: Creating an Angled Corner Between Two Objects
- Lesson: Changing Part of an Object's Shape
- Challenge Exercise: Architectural
- Challenge Exercise: Mechanical
- Chapter Summary

Lesson: Using Object Snaps ■ 103
Object Snap Override
Object Snap override means that the snap stays in effect until you specify the next point. You are in
snap override mode if you click an object snap from the shortcut menu or the object snap toolbar
before selecting the specified point.
Object Snap Toolbar
Command Line: While being prompted to select a point, enter the first 3 letters of the object snap
and press ENTER (i.e. MID, INT, NEA)
Menu Browser: Tools > Toolbars > ACAD > Object Snap
Toolbar: Object Snap (access from the Menu Browser)
Shortcut Menu: SHIFT + right-click in the drawing window