
User`s guide

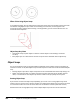
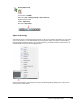

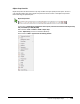
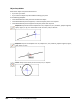

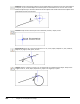
Table Of Contents
- Introduction
- Chapter 1: Taking the AutoCAD Tour
- Chapter 2: Creating Basic Drawings
- Chapter 3: Manipulating Objects
- Lesson: Selecting Objects in the Drawing
- Lesson: Changing an Object's Position
- Lesson: Creating New Objects from Existing Objects
- Lesson: Changing the Angle of an Object's Position
- Lesson: Creating a Mirror Image of Existing Objects
- Lesson: Creating Object Patterns
- Lesson: Changing an Object's Size
- Challenge Exercise: Grips
- Challenge Exercise: Architectural
- Challenge Exercise: Mechanical
- Chapter Summary
- Chapter 4: Drawing Organization and Inquiry Commands
- Chapter 5: Altering Objects
- Lesson: Trimming and Extending Objects to Defined Boundaries
- Lesson: Creating Parallel and Offset Geometry
- Lesson: Joining Objects
- Lesson: Breaking an Object into Two Objects
- Lesson: Applying a Radius Corner to Two Objects
- Lesson: Creating an Angled Corner Between Two Objects
- Lesson: Changing Part of an Object's Shape
- Challenge Exercise: Architectural
- Challenge Exercise: Mechanical
- Chapter Summary

102 ■ Chapter 2: Creating Basic Drawings
Next to each available object snap is an icon referred to as the AutoSnap marker. If AutoSnap is turned
on, the marker appears whenever you move the cursor over a snap point. Press the Tab key to cycle
through the available snap points. Never turn all the object snap modes on at once. It is better to have
several object snaps chosen (such as Endpoint, Midpoint and Intersection) and go back to add others
as needed or use the object snap override.
When Are Object Snaps Available?
You can specify an object snap whenever the software prompts for a point.