
User`s guide

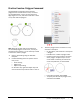


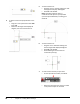
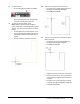
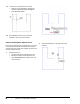
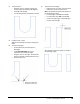

Table Of Contents
- Introduction
- Chapter 1: Taking the AutoCAD Tour
- Chapter 2: Creating Basic Drawings
- Chapter 3: Manipulating Objects
- Lesson: Selecting Objects in the Drawing
- Lesson: Changing an Object's Position
- Lesson: Creating New Objects from Existing Objects
- Lesson: Changing the Angle of an Object's Position
- Lesson: Creating a Mirror Image of Existing Objects
- Lesson: Creating Object Patterns
- Lesson: Changing an Object's Size
- Challenge Exercise: Grips
- Challenge Exercise: Architectural
- Challenge Exercise: Mechanical
- Chapter Summary
- Chapter 4: Drawing Organization and Inquiry Commands
- Chapter 5: Altering Objects
- Lesson: Trimming and Extending Objects to Defined Boundaries
- Lesson: Creating Parallel and Offset Geometry
- Lesson: Joining Objects
- Lesson: Breaking an Object into Two Objects
- Lesson: Applying a Radius Corner to Two Objects
- Lesson: Creating an Angled Corner Between Two Objects
- Lesson: Changing Part of an Object's Shape
- Challenge Exercise: Architectural
- Challenge Exercise: Mechanical
- Chapter Summary

96 ■ Chapter 2: Creating Basic Drawings
7.
To draw a circle:
■ On the Home tab, click Draw panel > Circle.
■ Enter 112.50,65. Press ENTER.
■ In the Dynamic Input Radius field, enter
7.5. Press ENTER.
8.
To draw a rectangle:
■ On the Home tab, click Draw panel >
Rectangle.
■ Select the center point of the circle (1).
Note: The object snap marker should appear as
you approach the center of the circle.
■ Drag the cursor to the upper right (2) and
enter 75,70. Press ENTER.
■ Your drawing should appear as shown.
9.
To draw three more circles as shown:
■ On the Home tab, click Draw panel > Circle.
■ Create three circles, each with a 7.5 unit
radius, using the corners of the rectangles
as center points.
Tip: The software stores the last radius that
you entered. If the command prompt is reading
<7.500> you can press ENTER to reuse that
value for the radius.
10.
On the Home tab, click Modify panel > Erase.
Select the rectangle that was used to position
the circles. Press ENTER.
11.
To draw a polygon circumscribing the top left
circle:
■ On the Home tab, click Draw panel >
Polygon.
■ When prompted for the number of sides,
enter 6.
■ Select the center of the top left circle.
■ In the Dynamic Input menu, select
Circumscribed About Circle.
■ For the radius, enter 8. Press ENTER.