
User`s guide

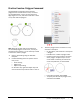


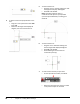
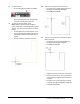
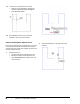
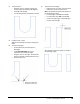

Table Of Contents
- Introduction
- Chapter 1: Taking the AutoCAD Tour
- Chapter 2: Creating Basic Drawings
- Chapter 3: Manipulating Objects
- Lesson: Selecting Objects in the Drawing
- Lesson: Changing an Object's Position
- Lesson: Creating New Objects from Existing Objects
- Lesson: Changing the Angle of an Object's Position
- Lesson: Creating a Mirror Image of Existing Objects
- Lesson: Creating Object Patterns
- Lesson: Changing an Object's Size
- Challenge Exercise: Grips
- Challenge Exercise: Architectural
- Challenge Exercise: Mechanical
- Chapter Summary
- Chapter 4: Drawing Organization and Inquiry Commands
- Chapter 5: Altering Objects
- Lesson: Trimming and Extending Objects to Defined Boundaries
- Lesson: Creating Parallel and Offset Geometry
- Lesson: Joining Objects
- Lesson: Breaking an Object into Two Objects
- Lesson: Applying a Radius Corner to Two Objects
- Lesson: Creating an Angled Corner Between Two Objects
- Lesson: Changing Part of an Object's Shape
- Challenge Exercise: Architectural
- Challenge Exercise: Mechanical
- Chapter Summary

Lesson: Creating Basic Objects ■ 95
3.
To finish the arc:
■ Drag the cursor to the left, making sure
that the angle field displays 180 degrees.
■ Enter 25. Press ENTER.
■ Your drawing should now appear as shown.
4.
Click File menu > Save.
Tip: You should develop a habit of saving files
often.
5.
To draw a rectangle:
■ On the Home tab, click Draw panel >
Rectangle.
■ Touch (DO NOT CLICK) point (1) as
indicated in the following image.
■ Drag the cursor to the right. The extension
object snap draws a dashed extension line.
■ Click near point (2).
6.
To position the rectangle:
■ Right-click near your first point and select
Dimensions on the shortcut menu.
Note: This specifies the Dimension option of
the Rectangle command.
■ For the length, enter 25. Press ENTER.
■ For the width, enter 100. Press ENTER.
■ Click in the upper right of the drawing to
position the rectangle.
Your drawing should now appear as shown in
the following image.