
User`s guide

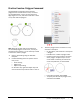


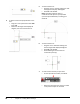
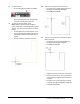
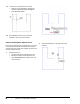
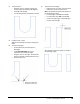

Table Of Contents
- Introduction
- Chapter 1: Taking the AutoCAD Tour
- Chapter 2: Creating Basic Drawings
- Chapter 3: Manipulating Objects
- Lesson: Selecting Objects in the Drawing
- Lesson: Changing an Object's Position
- Lesson: Creating New Objects from Existing Objects
- Lesson: Changing the Angle of an Object's Position
- Lesson: Creating a Mirror Image of Existing Objects
- Lesson: Creating Object Patterns
- Lesson: Changing an Object's Size
- Challenge Exercise: Grips
- Challenge Exercise: Architectural
- Challenge Exercise: Mechanical
- Chapter Summary
- Chapter 4: Drawing Organization and Inquiry Commands
- Chapter 5: Altering Objects
- Lesson: Trimming and Extending Objects to Defined Boundaries
- Lesson: Creating Parallel and Offset Geometry
- Lesson: Joining Objects
- Lesson: Breaking an Object into Two Objects
- Lesson: Applying a Radius Corner to Two Objects
- Lesson: Creating an Angled Corner Between Two Objects
- Lesson: Changing Part of an Object's Shape
- Challenge Exercise: Architectural
- Challenge Exercise: Mechanical
- Chapter Summary

94 ■ Chapter 2: Creating Basic Drawings
12.
To draw a line perpendicular to the last:
■ Drag the cursor downward, making sure
that the angle field displays 90 degrees.
■ Enter 50. Press ENTER.
13.
Press ENTER to exit the Line command.
Proceed to part two of this exercise.
Practice Creating Basic Objects: Part 2
In this part of the exercise, you draw the arc (1) in the
front view of the bracket and add the side view (2).
You then place the circles and polygons (3) in the four
corners of the front view.
1.
Now draw the arc:
■ On the Home tab, click Draw panel > Arc.
■ Select the endpoint of the previous line.
■ Press DOWN ARROW and click End on the
shortcut menu.
2.
Select the endpoint on the right side of the
opening.