
User`s guide

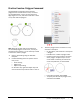


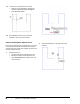

Table Of Contents
- Introduction
- Chapter 1: Taking the AutoCAD Tour
- Chapter 2: Creating Basic Drawings
- Chapter 3: Manipulating Objects
- Lesson: Selecting Objects in the Drawing
- Lesson: Changing an Object's Position
- Lesson: Creating New Objects from Existing Objects
- Lesson: Changing the Angle of an Object's Position
- Lesson: Creating a Mirror Image of Existing Objects
- Lesson: Creating Object Patterns
- Lesson: Changing an Object's Size
- Challenge Exercise: Grips
- Challenge Exercise: Architectural
- Challenge Exercise: Mechanical
- Chapter Summary
- Chapter 4: Drawing Organization and Inquiry Commands
- Chapter 5: Altering Objects
- Lesson: Trimming and Extending Objects to Defined Boundaries
- Lesson: Creating Parallel and Offset Geometry
- Lesson: Joining Objects
- Lesson: Breaking an Object into Two Objects
- Lesson: Applying a Radius Corner to Two Objects
- Lesson: Creating an Angled Corner Between Two Objects
- Lesson: Changing Part of an Object's Shape
- Challenge Exercise: Architectural
- Challenge Exercise: Mechanical
- Chapter Summary

Lesson: Creating Basic Objects ■ 87
Polygon Command
Use the Polygon command to create regular polygon geometry by specifying the center point and
radius of an imaginary circle, or the start point and endpoint of one of the polygon edges. Regardless
of the method you choose to define the polygon, all of its sides are equal in length.
The default method for creating polygons is to specify a center point and radius. When you choose this
method, you must choose either the Inscribed or Circumscribed option. Depending on the option you
choose, the size of the polygon is calculated as shown in the following image.
Command Access
Polygon
Command Line: POLYGON, POL
Menu Bar: Draw > Polygon
Ribbon: Home tab > extended Draw panel > Polygon