
User`s guide

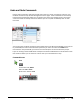

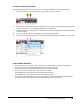

Table Of Contents
- Introduction
- Chapter 1: Taking the AutoCAD Tour
- Chapter 2: Creating Basic Drawings
- Chapter 3: Manipulating Objects
- Lesson: Selecting Objects in the Drawing
- Lesson: Changing an Object's Position
- Lesson: Creating New Objects from Existing Objects
- Lesson: Changing the Angle of an Object's Position
- Lesson: Creating a Mirror Image of Existing Objects
- Lesson: Creating Object Patterns
- Lesson: Changing an Object's Size
- Challenge Exercise: Grips
- Challenge Exercise: Architectural
- Challenge Exercise: Mechanical
- Chapter Summary
- Chapter 4: Drawing Organization and Inquiry Commands
- Chapter 5: Altering Objects
- Lesson: Trimming and Extending Objects to Defined Boundaries
- Lesson: Creating Parallel and Offset Geometry
- Lesson: Joining Objects
- Lesson: Breaking an Object into Two Objects
- Lesson: Applying a Radius Corner to Two Objects
- Lesson: Creating an Angled Corner Between Two Objects
- Lesson: Changing Part of an Object's Shape
- Challenge Exercise: Architectural
- Challenge Exercise: Mechanical
- Chapter Summary

86 ■ Chapter 2: Creating Basic Drawings
Practice Exercise: Rectangle Command
Practice drawing rectangles using coordinate
dimensions.
Practice other Rectangle options. Adjust your display
as you work
using the Zoom and Pan Realtime commands.
1.
Open a new drawing.
2.
Check that the Dynamic Input option on the
status bar is not selected.
3.
To draw Rectangles using relative coordinates
@x,y:
■ On the ribbon, click Home tab > Draw
panel > Rectangle.
■ To specify the first corner, click anywhere
in the drawing window.
■ At Specify first corner point prompt, enter
@4,5 and press ENTER.
■ Notice that a rectangle was drawn up and
to the right of the first point selected. If
this did not happen, then you forgot to
enter @ before the x,y coordinates. Try
again.
4.
Continue to draw Rectangles using relative
coordinates @x,y:
■ On the Home tab, click Draw panel >
Rectangle. Click the first corner anywhere
in the drawing window.
■ Enter the relative coordinates @x,y and
press ENTER to make rectangles with the
following dimensions:
■ 6 x 7 (enter @6,7)
■ 7 x 6 (enter @7,6)
■ 9 x 9 (enter @9,9)
5.
Turn on the Dynamic Input option on the
status bar.
6.
To draw a rectangle 7 x 10:
■ On the Home tab, click Draw panel >
Rectangle. Click the first corner anywhere
in the drawing window.
■ Enter 7,10 (do not enter the @ symbol)
and press ENTER.
■ A rectangle should have been made up and
to the right of the start point. If not, check
to be sure that Dynamic Input is on in the
Status Bar and try again.
■ Press F2.
■ Observe that @ symbol was automatically
added to the coordinate making it relative
to the last point you selected.
■ Practice making the following rectangles:
■ 2 x 2 (enter 2,2)
■ 4 x 6 (enter 4,6)
7.
To use the Rectangle > Area option:
■ On the Home tab, click Draw panel >
Rectangle.
■ Click a point anywhere in the drawing
window for the first corner.
■ Enter A (for Area) and press ENTER.
■ Enter 35 for the area and press ENTER.
■ To specify the Length, press ENTER to
accept the default if [Length] is already
in brackets. Otherwise, enter L and press
ENTER.
■ Enter 7 for the rectangle length and press
ENTER.