
Technical information


Building Surfaces | 71
■ You can access surfaces simultaneously across a network. The first user
who opens the surface has read/write access to it. All other users have read-
only access.
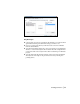
To build a surface
Steps
Use to locate
1 From the Terrain menu, choose Terrain Model Explorer
to display the Terrain Model Explorer dialog box.
Using the Terrain Model
Explorer
2 Right-click the Terrain folder and choose Create
New Surface from the shortcut menu.
Creating a New Surface
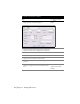
3 Open the new surface folder to display the icons.
4 Add the data to be included in the surface. This data can
be points, DEM files, contours, boundaries, or breaklines.
To add a point group to the surface, right-click the Point
Groups icon and select the point group.
To add contour data to the surface, Right-click the
Contours icon and generate the contour data.
Creating Surface Data and
Adding It to the Surface
Folders