
2008


Scene States and Batch Render
Scene states do not store viewport layouts, such as which camera view is active,
so you can use the
Batch Render tool on page 6352 to coordinate rendering
from any camera that is saved with the model. With each camera task that
you assign to the batch render tool, you can specify a saved scene state that
will be automatically loaded and rendered.
See also:
■
Manage Scene States Dialog on page 7188
■ Batch Rendering on page 6347
■ Batch Rendering - Batch Render Dialog on page 6352
Manage Scene States Dialog
Tools menu > Manage Scene States
Right-click to open the quad menu. > Display (upper-right quadrant) > Manage
Scene States
The Manage Scene States dialog is a modeless dialog where you can select,
save, rename, and delete
scene states on page 7185 .
Procedures
To save a scene state:
1 Set up the scene in the viewport.
TIP It is best to first render the scene to see if it is set up the way you want
before saving it. If it isn't, make the desired changes and render again before
proceeding to the next step.
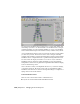
2 Right-click in a viewport and choose Save Scene State from the quad
menu.
3 In the Save Scene State dialog, highlight the parts you want saved in the
scene state, then enter a descriptive name. For descriptions of these parts,
see
Managing Scene States on page 7185 .
4 Click the Save button. This saves the scene state to the MAX file.
7188 | Chapter 21 Managing Scenes and Projects