WinCue Pro News Active Data Receiver Version 1.
About this guide The WinCue Pro News prompting solution has been designed for general production and prompting; its features include Runorder management, simultaneous prompt, edit, and script timings calculation. WinCue Pro News can also be used to connect to networked newsroom systems; by doing this WinCue Pro News is able to open scripts, sent from a third party newsroom system, and then prompt them.
Contents About this guide ........................................................................................................2 Audience ....................................................................................................................2 1 Set-Up 1.1 2 ADR Set-Up.....................................................................................................5 Configuration 2.1 2.2 6 WinCue Configuration.........................................................................
1 Set-Up WinCue Pro News ADR Interface User Guide Set-Up • 4
1.1 ADR Set-Up The Active Data Receiver Interface has been produced for clients that have developed their own newsroom system and need to connect to a WinCue prompter. WinCue can communicate with the third-party newsroom via Serial, TCP/IP, or SPX connection. As the newsroom system that WinCue will be connecting to is specific to the client site the Active Data Receiver (ADR) interface set-up is completely reliant on the settings of the newsroom system, WinCue is configured to match its settings.
2 Configuration WinCue Pro News ADR Interface User Guide Configuration • 6
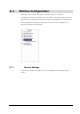
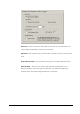
2.1 WinCue Configuration In WinCue, click on the Tools menu and select Options, a WinCue Configuration window will open, from here click on the News Interfaces option and then on the Active Data Receiver option. The settings for the Active Data Receiver interface will appear opposite; it is here that you configure how WinCue and ADR communicate. 2.1.1 General Settings This is the first window you will see upon opening the Active Data Receiver menu.
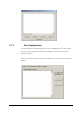
Auto Save – If this is checked, when WinCue receives an updated script, the script will automatically be saved to its hard drive. File Name – This specifies how your files will be saved if you have selected auto save. Keep Old Auto Saves – This specifies how long your old scripts will be kept for. Preview Mode – This is used to monitor the data that is being sent to the WinCue machine, when this option is selected, you will see the following window when “Start Receiving Downloads“ is activated.
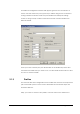
2.1.2 Port Configurations The next tab after General Settings is the Port Configurations tab, this is where you set-up how your WinCue machine is going to communicate with your newsroom system. Firstly, you need to create a new port connection, to do this click on the Add button.
An ADR Port Configuration window will appear, give the new connection a name, and then select the port type that you will be using for the connection. If using a Serial connection enter the port details in the Serial port settings section, if using a TCP/IP or SPX connection enter the network details in the Network details.
An Add Profile box will appear, enter a name for the Profile and then click on OK. 2.1.3.1 General An ADR Profile Settings window will appear, it is from here that you will configure how WinCue will handle the incoming scripts. The first Tab will contain the settings for the font that is used to display the scripts, click on the Font button to select the font and font size of the text.
2.1.3.2 On-line Editing The tab after General is the On-line Editing tab; these options determine whether the WinCue user will be able to modify the scripts received by WinCue via the ADR interface. Edit Story Text – If this is selected then the user can edit the scripts. Re-Order Rundown – This allows the user to change the order in which the stories are prompted. Create/Delete Items – This allows the user to add or delete stories from the Runorder.
2.1.3.3 Order List The tab after On-Line Editing is the Order list tab; the settings here are related to how WinCue translates the code from the newsroom system into the downloaded scripts you see in the WinCue Script Editor. Note: Before editing the available settings it is necessary that you have the relevant information about your newsroom system's code. The Order List settings are used in conjunction with the Story (Type 1) settings.
Sequence Separator – This is used to separate the items in a Runorder. End Sequence – This is used to indicate where a Runorder ends. If the Automatically create the link option is selected then items without scripts will not be displayed in the Runorder. Click on the option that you wish to edit and then click on the Edit button; this will open an Edit Control Code box, enter the relevant details from your newsroom system code, and then click OK.
Enter the newsroom system code details for each of the options then click on the OK button and test them by sending a Runorder from the newsroom system to WinCue. 2.1.3.4 Story (Type 1) As with the Order List settings, the Story (Type 1) settings are used to translate the newsroom system code into code that WinCue can understand. Note: Before editing the available settings it is necessary that you have the relevant information about your newsroom system's code.
Sequence field separator – This is used to divide the end of the field data and the start of the next field name. Sequence fields end – This indicates the end of the last fields data, and by inference the start of the item script. End sequence – This indicates the end of the complete story item. If the Automatically create the link option is selected then items without scripts will not be displayed in the Runorder.
Enter the newsroom system code details for each of the options then click on the OK button and test them by sending a Runorder from the newsroom system to WinCue. 2.1.3.5 Story (Type 2) Like Story (Type 1), Story (Type 2) is used to translate the third party newsroom system code into WinCue script items. Unlike the Story (Type 1) settings, with Story (Type 2) settings you are able to choose which Control Code you wish to use in code transfer.
To add one of these fields to the translation process simply click on the Add button and select it from the list of fields.
Then add the relevant code from your newsroom system into the Field Information box, click on OK, and then test them by sending a Runorder from the newsroom system to WinCue. 2.1.3.6 Rundown (Type 2) Like Story (Type 1), Story (Type 2) is used to translate the third party newsroom system code into WinCue rundowns. Unlike the Story (Type 1) settings, with Story (Type 2) settings you are able to choose which Control Code you wish to use in code transfer.
Generic Data String 1 – 10: These 10 fields are used to display text. Item Number: This will add the item numbers to the Runorder. Presenter Name: This will add presenter names to the Runorder. Queue Title: This will add the name of the queue to the Runorder. Unique ID: This will add the Runorders ID. The Runorder (Type 2) settings are used in conjunction with Story (Type 2) settings.
2.1.3.7 Return On-Prompt Item (Unique ID) The Return On-Prompt Item settings are used to enable WinCue to send information back to the newsroom system from the prompter. Note: It is necessary that your newsroom system is able to receive files that are sent from the WinCue prompter. Firstly enable the setting by clicking on the Return On-Prompt Item check box, once you have done this the Edit Start Sequence button, and Edit End Sequence button will become enabled.
2.1.3.8 Goto Prompt This option will force WinCue to go to a specific item, in your Runorder, when a specified sequence is received. Enter where the sequence should start by clicking on the Edit Start Sequence button, type in the code and then select OK. Enter where the sequence should end by click on the Edit End Sequence button, type in the code and then select OK. 2.1.3.
This will open a Text Conversion Settings window, click on the Insert Control Code in Target String button and a list of WinCue elements will appear. Select the element you want to add and it will appear in the Convert To: box.
Insert your newsroom systems equivalent code, for the WinCue element, in the Convert to: box. Then insert the equivalent code from your newsroom system into the Convert from: box. The following Options explained: Start Ignore: If this setting is checked then the control code used will be a signal for WinCue to ignore the subsequent transferred code.
Once you have entered the required information to the Text Conversion Settings click on OK and the control code will be ready to convert the newsroom system code into a WinCue element. 2.1.3.10 Code Page Use the Code Page tab to select the code page that the newsroom system that you will connect with the ADR interface uses. 2.1.3.
WinCue Pro News ADR Interface User Guide Configuration • 26
2.1.3.12 Banner The Banner tab is used if you want to change the colour or font style used for the prompter banner. See your WinCue Pro News User Guide for more information about setting this up. 2.1.4 Logging Click on the Logging Tab, it is from here that you are able to configure the settings for how WinCue will report any problems that it has while using the ADR interface.
2.2 Quick Configuration The following instructions have been provided to assist those who need to setup their ADR connection quickly 1. Click on the Tools menu; select Options, then News Interfaces, and then Active Data Receiver. 2. From the ADR options first menu (General) select Preview Mode. 3. Then select the Profiles tab and select Add, give the Profile a name, e.g. test, do not change any other settings at this time. Click on ok 4. Click on the Port Configurations tab and select Add 5.
8. If you get the error (ADR port configuration unknown) ignore this and click OK. You may have to re-enter your settings. 9. When the transfer has finished click on the Save to File button. 10. This will make a text file; called adrlog.txt, in the wincue\logs folder and it will contain the profile information used. From this file, you can work out the settings needed to complete the profile for WinCue. 11. So now, you can make a new profile and change the settings in the ADR Profile settings menu.
3 Opening ADR Scripts in WinCue WinCue Pro News ADR Interface User Guide Opening ADR Scripts in WinCue • 30
3.1 Opening ADR scripts Once you have connected the WinCue machine to the ADR network, as discussed in the previous sections, you will be able to open Runorders and scripts from the ADR newsroom system. This section will explain how to open these ADR scripts in WinCue. In WinCue click on the red folder button on the toolbar: Or Left-click on the File menu and then select Open Queue from the drop-down menu. WinCue will now attempt to connect to the ADR server.
If the Runorder that you wish to load (for prompting) is not listed in this box ensure that the Runorder has been dumped from the ADR machine. To open an ADR Runorder on WinCuePro ready for prompting, do either of the following: Double left-click on the Runorder that you want to open. Or Left-click (select) the Runorder you want to open and then click on the 'OK' button. A Scanning ADR Folder dialog box will appear showing you WinCue's progress in connecting to the ADR Queues selected.
If Panic Mode is enabled the WinCue machine will stop trying to receive updates from ADR, as soon as Panic Mode is disabled the WinCue machine will re-start trying to receive updates from ADR. Note: Any changes to the Runorder and stories on WinCuePro while in 'Panic Mode' will be lost as soon as 'Panic Mode' is disabled 3.2.1 Enabling/Disabling Panic Mode Click on the Panic Mode icon on the tool bar at the top of the screen to toggle Panic Mode.
4 Technical Support WinCue Pro News ADR Interface User Guide Technical Support • 34
4.1 Technical Support Technical Support is of prime importance to the management of Autocue, we therefore provide a 24-hour help line service to assist and advise. For more technical help or advice, please call our 24-Hour Technical Support Help Line: For customers located in Europe, Asia, Africa, and Australia call: +44 208 665 2992 For customers located in the Americas, call: +1 704.377.