QMaster Prompting Software and QBox Installation and Operation Guide
Contents Latest additions ...................................................................................................................................................................3 Getting started .....................................................................................................................................................................4 Equipment you will need ..................................................................................................................
Latest additions This document was written for build 787 of the QMaster software, released on 12 July 2011. Any changes since that point have been referenced below. Revision history Build number Release date Changes 787 12 July 2011 Windows 7 Compatibility Remove references to QBox Prompt engine no longer appear if the API is not installed psiglueVC6.
Getting started This section is designed to get your system setup as quickly as practical so that you can get on with writing and prompting your scripts. It is written to reflect the most common package that Autocue supplies to customers: QMaster software, QBox and Contour Design‘s ShuttlePRO scroll controller. If you are interfacing with a newsroom computer system (NRCS) it is essential that you also have the correct NRCS API manual.
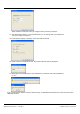
3. Select Install Software. The Welcome to QMaster Setup dialogue box is displayed. 4. Click Next. Your licence information is on the installation CD and the Licence Agreement will be displayed. The license information is stored in a folder named ―License‖ on the installation CD. If the license file cannot be found, a dialog box is displayed that asks you to locate a valid license file. 5. Click Browse… to locate the folder containing your licence key. Press OK to proceed.
Refer to the ―Automation‖ section for further information about configuring the interface to such devices. 8. Click Next. The Select Program Installation Path dialogue box is displayed. Note: Autocue strongly recommends that you use the default location of C:\QMaster. 9. Click Next to use the default location. 10. Various messages are displayed indicating that the installation is in progress and the QMaster files are being copied, extracted and downloaded from the CD. 11.
3. Press the Down arrow to highlight Network Configuration and press Enter. 4. Press Enter and then use the arrow keys to highlight the lan0 Wired Network Connection and then press Enter. 5. Use the left and right keyboard arrow keys to select the IPv4 Settings tab. 6. Press the Tab key to highlight the Manual Configuration option and press the spacebar to select it if is not already. 7. Use the Tab key to highlight the IP Address field. QMaster-UserGuide.
. Enter the chosen IP address. Press the full stop/dot key to move to the next block of the IP address. IP addresses of the computer and QBox should be in the same range. For example, if the address of the computer is 192.168.50.5 you might assign 192.168.50.10 to the QBox. As long as the first three blocks of numbers are the same, the two devices will be able to communicate. 9. Press the Tab key to highlight the Subnet Mask field. QBox stores this value as a two-digit number.
Note: It is recommended that the licence dongle is always inserted into the same USB port. Depending on the hardware and software configuration of your computer, it may be necessary to re-install the Sentinel drivers for each USB port. When you start QMaster for the first time you will be prompted to configure the connection to your QBox. A connection wizard will guide you through this process. 1. The dialog box below will be displayed. Press Next if you wish to configure the connection. 12.
The IP address will be the value you assigned in the previous procedure. 14. The default Port number is recommended but you can change this to an alternative one if your network requires it. 15. Press Next to display a summary of the information entered. 16. Press Connect to establish the link. A progress indicator will be displayed. 17. Messages will be displayed to show whether the connection has been established or not.
The QBox Status Panel displays all your QBox connections. Your QBox will show as Master as illustrated in the example below. Connect and configure your scroll controller 1. Plug the supplied Contour Design ShuttlePRO controller into your computer. Note: Do not try to install any software that comes with the ShuttlePRO. 18. From the main menu bar select Tools >> Options... 19. On the QMaster Configuration window, double-click on QBox Prompt Engines or click the [+] sign next to that entry. 20.
This will install the scroll control device with its default configuration. If you have to change the configuration of the buttons or use an alternative controller please refer to the ―Control scrolling of your script‖ section later in this manual. Create and prompt scripts QMaster can be used to create scripts. Multiple scripts can be combined into rundowns. Multiple scripts are useful where more than one presenter will be reading the script or if you are preparing a broadcast with several stories.
26. Make your choices from the options on the various tabs. You can select such settings as the default font to use on importing, specify a particular code page if you use a specific language or override the Locale associated with the imported file. Note: If you are going to regularly import the same type of file you can enable the ―Automatically use these settings‖ parameter so that they are applied each time a file is imported. 27. Click OK.
Make the most of your software QMaster allows you to quickly and simply create, edit, format and prompt the scripts you write. If you are planning to use multiple scripts as part of a broadcast program or for a conference, refer to the section ―Managing multiple scripts in a rundown‖ later in this manual. If the appropriate license options have been purchased you may also interface to newsroom systems and other broadcast equipment, robotic conference stands and Microsoft PowerPoint presentations.
30. Select Simple Script File. 31. An Untitled Simple Script file will appear inside the QMaster Client window. Note: For information about using the Simple Rundown File type, refer to the section: Managing Multiple Scripts. 32. Type the text of your script into the Script Editor window. The pink line denotes the bottom of the script so you can only type above it. 33. When you have finished entering the text, save your work.
When amending, updating or correcting a script, you can either enter new text directly or insert text from other sources. You can also edit scripts using the search and replace function. Note: It is a good working practice to regularly save your changes by pressing the Save button or the keyboard shortcut sequence [Ctrl] and [S]. Direct entry In the Script Editor, enter text directly using a keyboard. Cut and paste To copy text from an existing script: 1.
Format alteration Key sequence Underline [Ctrl] and [U] Italic [Ctrl] and [I] Bold [Ctrl] and [B] Select alternative font [Ctrl] and [F] Inverse [Ctrl] and [E] Change text to the default colour [Ctrl] and [0] Change text colour to red [Ctrl] and [1] Change text colour to green [Ctrl] and [2] Change text colour to blue [Ctrl] and [3] Change text colour to yellow [Ctrl] and [4] Justify text to the right [Ctrl] and [Shift] and [R] Justify text to the left [Ctrl] and [Shift] and [L] Ju
Choose a different typeface and then select the required size for the text. An example of the appearance of your chosen settings is displayed in the lower display panel of the dialog. When you are satisfied with your selections, click OK. Inverse Default QMaster scripts are written as white text on a black background. Inverse changes any highlighted text to be black text on a white background. 40. Highlight the text you wish to change. 41.
Leave: retain formatting already applied to the selected text. On: apply the formatting to the selected text. Off: clear the formatting from the selected text. Click the Font button to alter the typeface and size for all the text in the script. Manage multiple scripts in a rundown QMaster allows you to manage more than one script via rundowns.
Rundown window column identifiers Field Description ID This provides a unique number for all stories in the rundown and is not connected with the running order. Story Title Simply a title to identify the individual stories. Words The number of words in the script displayed in the Script Editor. Link This is the time for this script based on the set read rate. (Default read rate 180 words per minute).
Managing scripts in a rundown After creating a new rundown you can add one or more scripts. Creating scripts To create a new script: 1. Select Story >> New from the QMaster menu bar. 43. From the sub menu that appears select either Single-column Script or Single-column Break. If you choose Single-column Script, the New Item Title dialogue box appears. 44. Enter the script name in the text box and click OK. The name should be very concise description of the script.
Editing scripts To edit the text of a script using the Script Editor, double click on the item in the QMaster Rundown window. The entry in the rundown is highlighted in black to indicate the script you are currently editing. The Story Title will be shown at the top of the Script Editor window. The cursor is automatically placed in the Script Editor window and you can type in the text for the story. The text written in the Script Editor will appear on the prompt output monitor.
Select Edit Story from the context menu. The item opens in the Script Editor where it can then be edited. You can also edit the attached script by double-clicking on the item and the text will appear in the Script Editor window. View Story Select View Story from the context menu. Viewing the text allows you to read the relevant script but does not allow you to make changes to it. The item can also be viewed by selecting it from the rundown list and using the menu commands.
When you are prompting a rundown, you can rearrange the order in which items are sent to the prompter. To access the following commands QMaster must be in Prompt mode. Select Prompt >> Begin Prompting from the menu bar. Prompt From Here The Prompt From Here command allows you to begin prompting from anywhere within the rundown. To enable this, right-click once on the line at which you wish to begin prompting. Select Prompt From Here on the context menu.
When windows are tiled the operator can see part of all the rundowns on one screen. The way in which the windows are tiled depends on how many are open. If you wish to see only the Rundown windows, then close all the Script Editor windows. Choose Window, then Tile Horizontally or Tile Vertically from the sub-menu. To make a window active choose the corresponding Rundown name from the window and click on it.
If you select Simple Rundown File Defaults the profiles you create will be available to scripts created within a rundown. Follow the steps outlined below to a create a set of parameters for an individual presenter. Note: Presenter Profiles that are created will only be available to include in new scripts or rundowns. They will not be available for any scripts previously created. 1. Click the Presenter Settings tab to specify which parameters may be set for an individual presenter.
52. Click Add to create a new Presenter Profile. 53. Enter the name of the Presenter and then select the parameters you wish to apply to all scripts written for that presenter. From the Presenters tab of the QMaster Configuration interface you can also change the profile of an existing Presenter by clicking Modify or remove a particular Presenter profile by clicking Delete. After making all the additions or changes to Presenter profiles, click OK.
Note: If a presenter profile includes a specific colour, style or other setting, all the text after the point where the name is inserted will change to match the parameters of the presenter profile. Modifying or deleting presenter profiles Follow the steps outlined below to amend or remove a particular presenter profile. Remember that presenters can be associated with either a script or a rundown so you must select the appropriate File Based Queues defaults to display the appropriate list of profiles. 1.
Moving between markers in a script There are several commands and short-cuts that control jumping to markers within a script. When using the Script Editor While editing a script you can use the following key combinations: [CTRL] - [M] insert a Marker [CTRL] - [0] to go to the Next Marker [CTRL] - [9] to go to the Previous Marker When prompting While prompting, you can use the CTRL-N key combination to advance to the next Marker.
Scroll controls are used to control prompting of scripts. They can be connected to either the computer running the prompting software or to your QBox. The connection can be either a physical cable or wireless. Prompting can be controlled using hand or foot devices that use either the USB or serial interfaces of a computer.
67. The Available Control Types lists all the scroll controls that are currently licensed for your software. 68. From the list, select the type of control you wish to use. After a scroll control has been selected for operation with QMaster, you can configure it so that the various buttons and wheels perform specific actions. Note: You cannot configure scroll controls when you are in Prompt mode.
Configure a Two-button Serial Controller Select your controller from the list and click Setup. On the Settings tab, you can set stop zones and button actions according to your scrolling requirements. It is also possible to change the speed at which the text moves using the Rates tab. If your computer has one serial port, the serial port menu shows as COM1 only. To change to a different serial port from the one selected, unplug the scroll control from the serial port and plug it into another one.
To select an action for the red button, click on the arrow to the right of the field and select the required action from the displayed list. Available actions include: Move to different points in the script Control real time clock and cue timer settings Manage runorders Add user messages Set remote interface triggers Show a blank screen Scroll rates The scroll rate is the speed at which the script moves up the prompter screen.
1. Click the Save As Profile button. 2. Enter a profile name in the Profile Name field. 3. Click OK. Once the profile is saved, you can then load it again the next time you wish to use the settings in the profile. You can do this by clicking the Load button and selecting the profile from the dialogue box. Note: It is also possible to use a profile created for an Autocue Serial Multibutton scroll controller.
The Centre Stop Mode is a setting that allows you to control the direction and speed of the scrolling text using the knurled wheel. As the wheel passes the designated stop point, the movement of the text will slow down and then change direction. To enable this feature, select the Centre Stop Mode box. Stop Point To select a Stop Point, enter a value in the Stop Point field. This is a point during the turn of the scroll wheel where scrolling stops. Values range from 0 to 63.
The scroll rate is the speed at which the script moves up the prompter screen. As the control wheel is turned, the speed of the script increases according the value specified for the distance the wheel is moved. The default values are set so that when the wheel is turned approximately halfway, the script is moving at an average reading speed. To modify scroll rates, click on the Rates tab. A list of Scroll Values and rates is displayed. Update scroll rate setting 1. Select a scroll value. 2.
ShuttleXpress The controller is designed for one-hand access to the buttons and jog/shuttle knob. The inner 'jog' control rotates through 360 degrees and provides precision forward and reverse scrolling. The outer black ring or 'shuttle' is rubberized and spring-loaded. The controller is connected via a USB port. The ShuttleXpress has five fully programmable buttons. Connect a Contour Design controller to a USB port on your computer.
2. Click More Settings to display the dialog illustrated below. 3. Select an action for the shuttle from the list in the Shuttle Wheel Action field. 4. To adjust the speed of the shuttle from the default, enter values in the seven boxes. Each box represents the desired speed at the various wheel positions. 5. Select an action for the jog control from the Jog Wheel Action list. 6. Click OK to return to the Configure Scroll Control dialog. 7.
Sensitive jog speed allows scrolling to take place at relatively high speed as soon as the jog is moved to the right. Turning the jog back to the left lets you return to the original position at relatively high speed. Normal jog speed allows scrolling at a normal speed to take place as soon as the jog is moved to the right. Turning the jog back to the left lets you return to the original position at normal speed.
2. Click Setup to display the following dialog The illustration shows the default assignment of buttons. 3. Click on a button and the action currently assigned to it is displayed in the Button Function field. Click the row at the end of the field to display the list of available functions. 4. Select an action from the list. If you want to change the functions assigned to other buttons, click on each and select an action from the list. 5. Click OK.
1. Click Setup to display the following dialog. The illustration shows the default assignment of buttons. 2. Click on a button and the action currently assigned to it is displayed in the Button Function field. 3. Click the arrow at the end of the field to display the list of available functions. 4. Select an action from the list. 5. If you want to change the functions assigned to other buttons, click on each and select an action from the list. 6. Click OK.
a multi-connector serial cable with multi-port PCI SCSI card a USB-multi-port serial convertor Attach the hardware you have for connecting multiple serial devices to your prompting system and then install any device drivers. Ensure that the device is recognised by your operating system‘s device manager function. Virtual Spider Box software To use more than one serial scroll controller with QMaster you will need to have the optional Virtual Spider Box application installed and configured.
70. To add a new controller to the VSB click Add and enter the required details. 71. Each type of device you add to the Virtual Spider Box can be configured using the procedures described above. 72. If you want to modify or delete an existing serial controller associated with the VSB, click the appropriate button. 73. Select the required mode of operation. The most common mode is Active Controller Wins which means that the controller currently active has control of prompting.
Parameters set using the configuration interface will be available every time you start the QMaster software. The following sections give an overview of the parameters that can be enabled and edited to change the performance and operation of your QMaster software. Access Control If you want to restrict the actions of people using QMaster you must create a user ID for them and assign to them specific user rights. Security Add user names to the QMaster system.
Note: Automation Services are different to the separate newsroom computer system (NRCS) integration options available within QMaster. Data Converters This section explains the settings that can be used to handle the conversion of non-native files that are imported into QMaster. In the QMaster Configuration dialog, click on [+] next to Data Converters and select a file type from the options available.
Typeface Available Font Styles Typeface Available Font Styles Franklin Gothic Medium Regular, Italic Sylfaen Regular Gautami Regular Symbol Regular Impact Regular Tahoma Regular, Bold Kartika Regular Times New Roman Regular, Bold, Italic, Bold Italic Lucida Sans Unicode Regular Trebuchet MS Regular, Bold, Italic, Bold Italic Import Overrides If you have to change the character set or locales that are used when importing word files then you can change this here.
This is used to change the default code page for imported files. Options for text files Translate Carriage Returns to Spaces If this setting is selected carriage returns will be converted into spaces. Without this setting being selected QMaster will convert the single returns into double returns. Combine Multiple Spaces into Singles When this setting is selected large spaces within the imported text will be reduced to a single space.
Presenter Settings There are two ways of adding presenters to a script. On opening a script file you can add presenters by selecting Properties from the file menu. Any presenters created or settings changed using this method are only available to that specific script file. By adding Presenters using the Tools >> Options >> File Based Queues method any presenters or settings changed here will apply to all QMaster files.
QMaster can interface with the newsroom computer systems (NRCS) from most of the leading manufacturers. All NRCS interfaces are optional items which must be purchased. If an NRCS has been enabled in your licence file the QMaster Configuration interface will show an entry labelled News Interfaces as illustrated below. Click on [+] next to the entry to expand the list of newsroom automation products with which your QMaster is licensed to work. An example is illustrated below.
Select the port you wish to connect your caption generator to from the drop down list in the Serial Port panel. Specify the Baud Rate for that connection from the drop-down list in the Baud Rate panel. In the other four panels set the parameters to define the type of ―error correction‖ the interface will use. This allows the caption generator to continually check to make sure it is receiving valid data.
Demo Mode: Loop Forever This would rarely be used in a conference or studio situation. This command is used when demonstrating the QMaster software. When the end of a script or rundown is reached, scrolling automatically starts again from the beginning. Text/Ink colours On this tab you can specify the colour for the background of the prompt output in addition to defining five colours that can be used for text.
If your QMaster system stops performing at an optimum level, contact Autocue Technical Support to discuss the parameters that you need to set to record in the log. User Preferences Specify how your QMaster software behaves by setting the various parameters in the User Preferences configuration dialogs. User Interface The table below gives an overview of the actions of the selections you can make on this dialog.
roup Main Window Parameter Description prompt on opening a Queue soon as you open a rundown. Automatically open the Queue Browser once the last Queue is closed When connected to an automated newsroom system, this command automatically opens the browser when all current rundowns and scripts have been closed. Restore Main Window Position If the main window has been resized then QMaster will remember the changed settings.
Group Parameter Description the rundown. Rundown Got Item By Item ID When you select the Goto Item command, you can indicate which identifier you wish to use as the key. By Item Number By Item Title Rundown Editing Options Require Conformation For Single / Multi Story Delete Forces you to confirm that you wish to delete an item. Select Twice Field Editing This will allow you to edit an item name by double clicking on the item title.
Parameter Description Activate AutoCaptioning has a similar function but is cancelled when the QMaster software is shut down. Editor Prevent replacement of selections when entering characters This will prevent you from accidentally deleting a section of highlighted text. Enable Delete Mode Ctrl-D This is used to quickly enable or disable the QMaster editor. TAB spacing Sets the number of spaces inserted when the Tab key is pressed when writing scripts.
To enable support for a particular language, you must purchase a licence upgrade from Autocue. If you have to use a specific language not currently supported, contact Technical Support to discuss your requirements. . QMaster-UserGuide.docx 2011-08-11 56 © 2003-2011 Autocue Group Ltd.
Adjust your QBox configuration Select different QBox video settings A QBox has both composite and VGA signal outputs. Either video standard (PAL or NTSC) can be used for the composite output. A variety of resolutions can be selected when using VGA output. Note: You should choose one output only as the quality of the scroll output will be degraded due to the differences in display formats if both outputs are enabled. To alter the video output settings use the procedures outlined below.
79. If you have a composite monitor you must select either the NTSC or PAL standard for the display mode. 80. When you have selected your display mode press the Ctrl and Page Down key to display the Outputs page. 81. Press the Tab key to select OK and then the Space key or Enter key to confirm your selections. VGA output 1. Use the Tab key to move through the list and use the Space bar to select the appropriate setting. QMaster-UserGuide.docx 2011-08-11 58 © 2003-2011 Autocue Group Ltd.
82. If you are connecting a VGA monitor check the screen resolutions of your monitor or prompter and select the appropriate VGA setting. 83. When you have selected your display mode press the Ctrl and Page Down key to display the Outputs page. 84. Press the Tab key to select OK and then the Space key or Enter key to confirm your selections. Note: If neither output is selected a warning message will be displayed because at least one must be selected. 85. Press the Tab key to highlight OK and press Enter.
Alternative network connections to a QBox The number of QBoxes you plan to use will determine the type of connection required. If you plan to deploy a single QBox system then you can use a direct connection. If you plan to operate multiple QBoxes from a central control computer you will need to create or link to an Ethernet network. Types of connection You can indirectly link to your QBox by adding the prompting computer and QBox to an existing network.
89. Press Enter and then use the arrow keys to highlight the type of connection you wish to configure. This will be either lan0 (a wired connection) or wlan0 (a WiFi connection). 90. Press Enter to access the network configuration interface. IP address assignment After selecting the type of connection you must set the IP addresses for the various parameters of the connection. Assignment by DHCP This method is most commonly used when you attach a device to a larger established network.
93. Use the keyboard arrow keys to select the DNS Settings tab. 94. Ensure that the Automatic Configuration option is enabled. 95. Press the Tab key to highlight OK and press Enter. 96. Press F10 to return to the main configuration options. Assignment via ZeroConf Access the network connection configuration interface as outlined earlier in this section. 7. Press the keyboard arrow keys to select the IPv4 Settings page. 8.
A static IP address requires the user to manually enter a valid IP address as well as a Subnet Mask. Note: Duplicate IP addresses will cause problems on the network. If static IP addresses are to be used, it is very important to ensure that they are different from other addresses already in use. 1. Access the network connection configuration interface as outlined earlier in this section. 97. Press the keyboard arrow keys to select the IPv4 Settings page. 98.
255.255.0.0 B 16 255.0.0.0 8 A The other available subnet mask numbers are shown in the following list. Value IP address Value IP address Value IP address 0 0.0.0.0 11 255.224.0.0 22 255.255.252.0 1 128.0.0.0 12 255.240.0.0 23 255.255.254.0 2 192.0.0.0 13 255.248.0.0 25 255.255.255.128 3 224.0.0.0 14 255.252.0.0 26 255.255.255.192 4 240.0.0.0 15 255.254.0.0 27 255.255.255.224 5 248.0.0.0 17 255.255.128.0 28 255.255.255.240 6 252.0.0.0 18 255.255.192.
If you are connecting QBox in a field situation, make sure that the Bonjour software has been installed on your computer beforehand, as you may not have access to a Broadband Internet connection. Wireless operation QMaster can be configured to operate via a wireless connection to an existing network or as a wireless peer-to-peer connection.
6. Press the Tab key and highlight the WEP option and press the Space bar on the keyboard. 7. Press the Tab key until the WEP Key field is highlighted and enter the required key. This is usually a string of 26 alphanumeric characters. Note: Take care when entering the key as you must enter the same key for any device that will be connected to the QBox. 8. Press the Ctrl and Page Down keys to select the IPv4 Settings tab and the DNS Settings tab. 9.
108. Press the Tab key and enter the ESSID of your WiFi network. Contact your IT department to obtain the necessary information for your network. 109. Use the keyboard arrow keys to access the WiFi Security tab. 110. Press the Tab key and highlight the WEP option and press the Space bar on the keyboard. 111. Press the Tab key until the WEP Key field is highlighted and enter the required key. This is usually a string of 26 alphanumeric characters. 112.
117. Press Return on the keyboard to save your wireless network access settings. 118. Close the configuration interface on your QBox and you can begin loading information and prompting scripts remotely. You will need to check in QMaster that the QBox connection has been established. Select Prompt >> QBox Status Panel and ensure that the QBox is connected and, if there are more than one, at least one appears as Master.
from the internal FTP server on the QBox After a script has been loaded it can be prompted by any controller that is attached to the QBox. Deactivate the connection to QMaster If QMaster has an active connection to your QBox, you will not be able load or prompt any files stored locally on the QBox. To do this you can either shut down QMaster or disable the connection from the QBox Status Panel. 1. Select Prompt >> Stop Prompting from the QMaster menu bar 119. Select Prompt >> QBox Status Panel 120.
If you have more than one USB device connected to your QBox, there will be additional USB Key entries in the Select Data Source menu. 124. Press Enter and the script will be copied to the QBox. If any previous files were being prompted while you loaded new files onto the QBox, the new files will automatically start to be prompted using the same settings. Transfer via FTP Files to be prompted directly on your QBox must be stored in a folder on the internal FTP server of the unit. 1.
If no keyboard is attached, use the appropriate button on a connected scroll controller. 129. Select the FTP server option from the list in the Select Data Source menu. 130. Select the required runorder folder name. 131. Press Enter and the scripts will be copied to the QBox. If you created folders to store scripts for different runorders, select the required runorder name and press Enter.
Upgrading Autocue products You will need to upgrade your Autocue products, from time to time, especially when new features and enhancements are released for the software. Follow the procedures outlined below and any additional steps that are contained in the notification email or letter. After upgrading, ensure that the version numbers of your software and firmware are compatible. If you have any doubts, contact Autocue Technical Support for assistance.
Your current prompting software should be fully uninstalled before performing a fresh install of the QMaster software. If you have any issues or problems with this process contact the Autocue Technical Support team for guidance. Hardware upgrades If you wish to upgrade the size of your teleprompter or add functionality to a QBox contact the Autocue sales team to discuss your requirements. As all components are standard you may only need to replace the specific ones you require.
The QBox will check if the information is valid and then install the upgraded firmware on to your QBox. Various progress messages will be displayed. When the upgrade has completed, click OK and reboot the QBox. A warning message will be displayed if no appropriate information can be found. QMaster-UserGuide.docx 2011-08-11 74 © 2003-2011 Autocue Group Ltd.
If you need to contact Autocue or QTV Support Our hardware and software support is provided by in-house teams of experienced and dedicated staff. We provide free telephone support for prompting customers during UK office hours (9am till 6pm GMT) and US office hours (9am till 5pm EST). When contacting the technical support teams, please provide as much detail as possible. Check the FAQ section of the web site to see if the answer you need has already been provided: http://www.autocue-qtv.