QMaster for Complex Languages Installation and Maintenance Guide
Contents Getting started ....................................................................................................................................... 4 Equipment you will need .................................................................................................................... 4 Install the QMaster software .............................................................................................................. 4 Prepare and connect to your QBox................................
Output Colours ............................................................................................................................. 43 User Interface ............................................................................................................................... 43 Scroll Controls .............................................................................................................................. 44 Supported scroll controllers................................................
Getting started This section is designed to get your system setup as quickly as practical so that you can get on with writing and prompting your scripts. It is written to reflect the most common package that Autocue supplies to customers: QMaster software, QBox and Contour Design’s ShuttlePRO scroll controller.
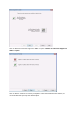
NB: Do not connect the dongle until prompted to do so by the setup program. Select the Sentinel Drivers option and choose the default options to install the driver. Return to the Main Menu and select the Install QMaster Software option. At the next dialog click on the red arrow to start the installation, and then Next.
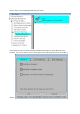
You will be prompted to browse to your license file, the license information is stored in a folder named “License” on the installation CD. Browse to the file and click on OK and the Licence Agreement will be displayed. Read through the license agreement and click Accept. The “Select the components to install” dialog box is displayed.
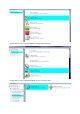
Click on Next and select the Support for QBox r2 option. NB: Do not select the Support for QBox r1 option. Click on Next to continue You will be prompted to select the Installation Root Folder, it is recommended that you keep the default option.
Click Next to continue. Various messages are displayed indicating that the installation is in progress and the QMaster files are being copied, extracted and downloaded from the CD. When the installation is complete, a message is displayed indicating successful setup. Click OK. You should now follow the steps to “Prepare and connect to your QBox” before running the QMaster software.
Use the down arrow to highlight Network Settings and press Enter. Use the down arrow to highlight Network devices and press enter.
Use the down arrow to highlight Lan0 and press enter. On the General Tab ensure that Interface Enabled and Activate at system Boot are both checked. You can use Tab to move to each option in the dialog and space bar to enable or disable.
Use the right arrow key to move to the IPV4 Settings tab. Use the Tab key to move to each option and ensure that Manual Configuration is checked. Enter the chosen IP address. Press the full stop/dot key to move to the next block of the IP address. IP addresses of the computer and QBox should be in the same range. For example, if the address of the computer is 192.168.80.95 you might assign 192.168.80.96 to the QBox.
Note: It is recommended that the licence dongle is always inserted into the same USB port. Depending on the hardware and software configuration of your computer, it may be necessary to re-install the Sentinel drivers for each USB port. When you start QMaster for the first time you will be prompted to configure the connection to your QBox. A connection wizard will guide you through this process. The dialog box below will be displayed. Press Next if you wish to configure the connection.
The IP address will be the value you assigned in the previous procedure. The default Port number is recommended but you can change this to an alternative one if your network requires it. Press Next to display a summary of the information entered. Press Connect to establish the link. A progress indicator will be displayed. Messages will be displayed to show whether the connection has been established or not.
The QBox Status Panel displays all your QBox connections. Your QBox will show as Master as illustrated in the example below. Connect and configure your scroll controller Plug the supplied Contour Design ShuttlePRO controller into your computer. Note: Do not try to install any software that comes with the ShuttlePRO. From the main menu bar select Tools >> Options... On the QMaster Configuration window, double-click on QBox Prompt Engines or click the [+] sign next to that entry.
Highlight Contour ShuttlePRO and click OK. This will install the scroll control device with its default configuration. If you have to change the configuration of the buttons or use an alternative controller please refer to the “Control scrolling of your script” section later in this manual. Configuring a News Interface Although autocue can supply its own Newsroom system, many customers will be using a third party Newsroom system such as ENPS, iNews or Octopus.
In this example we will configure the MOS (r2) interface, for configuring the iNews and MOS (r1) Interfaces please seen Appendix A. Highlight the MOS (r2) option. The MOS ID should be the FQDN of the QMaster workstation. The Incoming ports should ideally be left at the default but they will need to be made available on the network and configured in the Newsroom system. The local storage patch is where the MOS rundowns and scripts are exported to by the Newsroom system.
The ReSync MOS on Startup option should be checked if you want the QMaster client to attempt to resync to the Newsroom system rather than relying on the Newsroom system to re-send MOS data. Select the MOS Peers tab to enter details of the Newsroom system. The remote NCS ID is the FQDN of the newsroom server, the Server Address is its IP address and the Local MOS ID is the FQDN of the QMaster workstation. The Ports must match the ports set in the Main settings Tab.
At this stage QMaster should be ready to receive runorders from the Newsroom system (there may be additional configuration required in the Newsroom system, please consult the Newsroom provider for more information. Click on OK to save the settings, you will be prompted to restart QMaster.
Optimise QMaster for Prompting In order to improve the way an operator uses the prompter there are several settings that can be configured to optimise how the program behaves. Firstly most prompter operators prefer to work with only 2 Panes, the rundown on the left and the script on the right. Firstly Pane Three needs to be removed. Right click on the Pane Header for Pane Three and select Destroy Pane. For Pane One we want our runorders to open here. Right click on the Pane Header and select Pane Settings.
Click on OK and the right click on the header for Pane 2 and select Pane Settings. Ensure that the Script option for Multicolumn rundown Queues and Prompt-format Rundown Queues is checked. Click on the Other Tab and ensure that Restrict to a single text view is checked.
Click on OK and then go to the Windows, Settings menu. Under the Pane Settings 1 tab ensure that there are no Text in List Pane options checked.
Click on OK. Now open a runorder by clicking on the Red Folder and then select the News Interface/MOs option and there should be a list of all available rundorders, select one and click on OK, it should open into the Pane One. Now double-click on a script and ensure it opens in Pane Two.
Finally go to Tools, Options and expand the QBox Prompt Engine option and highlight the User Interface option. Ensure that both the “Jump editor to Prompt Position on Speed Zero” and “Jump Editor to Prompt Position every Prompt Line” are checked. Multilingual Support For complex languages Multilingual Support needs to be configured. From Tools, Options select Multilingual Support.
Ensure that the “Use Windows Complex Leanguage Handling” option is checked. The option to Underline Select is checked by default as well. Select the Keyboards tab.
Check the keyboards that you wish to use – NB: these must be installed within Windows. All supported fonts are available in the folder C:\Program Files\Autocue\AppData\Fonts, any that are not within Windows by default will need to be copied to the C:\Windows\Fonts folder. Under the Miscellaneous tab you can also change the way that the read rate is calculated. By default it uses standard western calculations of words per minute, however for languages such as Chinese this does not provide an accurate count.
You can select the option to count the number of seconds per line rather than words per minute. Making the Most of your Prompting Package The following chapters cover some of the more detailed options within the QMaster software. Menu Options The following provides a brief description of the menu options in QMaster for complex Languages.
File New File – Creates a new local file for a Rundown Queue, this queue will not be accessible on the QSeries Network. Open File – Opens an existing local file of a Rundown Queue. Save to File – Saves a copy of a network Multicolumn Rundown Queue as a local file Rundown Queue. Open Queue (Ctrl+Q) – Opens the network Queue Browser. Queue List – Opens the Network Queue Browser in a pane and keeps it within the pane, even after opening and closing the client until the Queue List is closed within the pane.
Stop Active Data Receiver – Only available in stand-alone prompter mode when licensed Panic Mode – not currently implemented. Print Setup – Shows the current printer setup in Windows on the current PC. Add to Favourites – Adds an open and highlighted Queue to the users favourites list. Organise Favourites – Opens to option to change the order of the users current favourites list. Favourites – Opens the users Favourites list. Recently Used – Shows a list of the 10 most recently used Queues for that user.
View Settings – Opens the View Settings dialogue box. Change Layout – Opens the Change Layout dialogue box. Rundown Settings – Opens the dialogue box for Queue settings for the open and selected Rundown. Edit Presenter Table – Opens the dialogue box for the Presenter Table for the open and selected Rundown. Print Scripts – Prints selected Scripts. Renumber Items – Automatically re-numbers each item in the rundown list. Trashcan – Not currently available. Print Rundown – Prints the current Rundown List.
Story New Script (Insert) – Inserts a new script into the current Runorder, either above a highlighted item or at them bottom of an un-highlighted list. New Break Script (Alt+Insert) – Inserts a new Break script as above. Delete (Delete) – Deletes any highlighted items. Split Story by Marker – Only available on the Prompter PC, this breaks up the story based on Markers that have been added to the scripts. Edit (Enter) – Opens the highlighted script in Edit mode.
Prompt Begin Prompting – Begin Prompting at the first story in the rundown. Stop Prompting – Stop Prompting the rundown. Send Scripts to Prompter – Not currently Implemented Edit at Prompt Position (F11) – Opens the currently being prompted script in edit mode and places the cursor at the point of the prompt output to enable editing. Script Lock Mode (Ctrl + F11) – Locks all scripts from editing Jump Prompter to Editor (Shift + F11) – Jumps the prompt output to the point in the current script.
Prompt Preview – Allows you to preview the prompt using the Prompt Monitor without sending the text to the prompter units. QBox Configuration Wizard (Ctrl + W) – Runs the QBox Configuration Wizard to allow you to reconfigure any QBox settings. QBox Status Panel – Runs the QBox Status Panels to show QBox status, configure overlays and configure any scroll controls connected to it. Double click on the QBox shown to see its properties.
Here you can change its Name or Description and the IP address it is using. Right click on the QBox to bring up a context menu. Reconnect – Allows you to attempt a reconnection if you have lost connectivity to the QBox. Resume with the QBox – Allows you to resume the session with the QBox at the point in the rundown the QBox is at if you have lost connectivity. Show System Info Panel – Shows the QBox system Info panel on the QBox output.
Hide System Info Panel – Hides the System Info Panel on the QBox output. Disable – disables the connection to the QBox to allow you to make configuration changes directly on the QBox. Modify – Opens the Configure QBox menu Delete – deletes the reference to the QBox Set As Master – This is a licensed option for connecting to Multiple QBoxes from one QMaster client. Reboot QBox – Reboots the QBox. QBox Manager – Opens the QBox Manager which allows you to make configuration changes on the Actual QBox itself.
Tools Toolbars – Allow the user to select which toolbars appear in the Client screen. Layout Editor – Opens the Layout Editor for those users with access. Video Clip Manager – Not implemented in the QMaster client. Low Res Video Editor – not currently implemented. Print LMS barcode – A customer specific requirement for LMS users. Web Browser – Opens the PC’s default web browser in a pane. Clip Editor – not currently implemented. Video Clip Browser – Not implemented in the QMaster client.
Startup Layout – Not implemented in the QMaster client. Short Message List – Not implemented in the QMaster client. Customise – Opens the Keyboard, Shortcut and Macro Toolbar dialogue box. Options – Opens the Tools, Options dialogue box for those users with access. Change User Interface Language – Changes the current default keyboard setting to another of the system’s licensed languages.
Toolbars - allows you to select which toolbars are available in the QMaster client. Keyboard – Lists the currently assigned Shortcut keys for certain commands, per queue type and enables the user to add or modify shortcuts.
Macro Toolbar – Allows the user to assign a macro from the Macro Editor to a new button on the Toolbar. Window Settings – Opens the Frame and Pane Settings dialogue box for the current user. Frame Mode – Gives the user options to select Frame mode for the current session – Horizontal or Vertical Splitter etc. Profiles – Allows the user to save the current settings as a profile. New Frame – not implemented yet. 1., 2., 3 – Lists the current Panes in use. Help Index – Opens the Help Index dialogue box.
Edit Cut (Ctrl+X) – Cut the selected text and place on the “clipboard” Copy (Ctrl+C) – Copy the selected text and place on the “clipboard”. Paste (Ctrl+V) – Paste anything stored on the “clipboard” to above the highlighted item or to the position of the cursor Paste Special – Gives the option to paste Unicode text Select All (Ctrl + A) – Selects all text in the script Find (Ctrl +F3) – Opens the Find dialogue Find Next (F3) – Finds the next instance of the search.
Save view Settings – Saves the current view settings. Format Bold (Ctrl+B) – Bolds any selected text. Underline (Ctrl+U) – Underlines any selected text. Italic (Ctrl+I) – Marks any selected text as Italics. Inverse (Ctrl+E) – lMarks any selected text in it’s inverse colour. Font (Ctrl+F) – Opens the font dialogue box. Change Case (Ctrl+L) – Changes the case of any selected text. Colour – Offers the selection between the 5 main colours.
Marker (Ctrl + M) – Add a Marker to the Script Automation Element – Allows you to add a PC90 event to the script. This is a licensed option. Script Next Script – Open the next script Previous Script – Open the previous script Print… - Print the script Undo Changes – Undo the last change Commit Changes – Save the last change Tools Options Configuration The Tools Options menus contain much of the system configuration options from QBox settings, Scroll Control configuration and Presenter settings.
QBox Prompt Engine Additional configuration options are available for configuring the QBox being controlled by the QMaster client and client behaviour. Settings Settings provide options regarding the behaviour of the client and the prompt output during prompt mode. Under the Layout tab there are options to change the scale factor of the text on the QBox output – allowing you to increase or decrease the scale factors without actually changing the font size within the scripts.
Output Colours This allows you to set the different colour options for the QBox output, it doesn’t have any impact on the colour of text within a script.
Scroll Controls Scroll controls are used to control prompting of scripts. They can be connected to either the computer running the prompting software or to your QBox. The connection can be either a physical cable or wireless. Prompting can be controlled using hand or foot devices that use either the USB or serial interfaces of a computer.
The Available Control Types lists all the scroll controls that are currently licensed for your software. From the list, select the type of control you wish to use. After a scroll control has been selected for operation with QMaster, you can configure it so that the various buttons and wheels perform specific actions. Note: You cannot configure scroll controls when you are in Prompt mode.
If you have purchased the option to have more than one scroll controller attached to your computer, you will be able to select and configure the Virtual Spider Box as the default controller. Access scroll control configuration Highlight a scroll control device in the list of available controllers and click the Setup button. The appropriate configuration screen for the type of controller will be displayed.
On the Settings tab, you can set stop zones and button actions according to your scrolling requirements. It is also possible to change the speed at which the text moves using the Rates tab. If your computer has one serial port, the serial port menu shows as COM1 only. To change to a different serial port from the one selected, unplug the scroll control from the serial port and plug it into another one. (This may require you to restart your computer.
Move to different points in the script Control real time clock and cue timer settings Manage runorders Add user messages Set remote interface triggers Show a blank screen Scroll rates The scroll rate is the speed at which the script moves up the prompter screen. As the control wheel is turned, the speed of the script increases according the value specified for the distance the wheel is moved.
Click the Save As Profile button. Enter a profile name in the Profile Name field. Click OK. Once the profile is saved, you can then load it again the next time you wish to use the settings in the profile. You can do this by clicking the Load button and selecting the profile from the dialogue box. Note: It is also possible to use a profile created for an Autocue Serial Multibutton scroll controller.
Centre Stop Mode The Centre Stop Mode is a setting that allows you to control the direction and speed of the scrolling text using the knurled wheel. As the wheel passes the designated stop point, the movement of the text will slow down and then change direction. To enable this feature, select the Centre Stop Mode box. Stop Point To select a Stop Point, enter a value in the Stop Point field. This is a point during the turn of the scroll wheel where scrolling stops. Values range from 0 to 63.
Click the arrow at the end of the field to display the list of available functions. Choose a function or action for the button from the list. Note: Once a button function has been chosen, that function will not be available to assign to any other button. Scroll rates The scroll rate is the speed at which the script moves up the prompter screen. As the control wheel is turned, the speed of the script increases according the value specified for the distance the wheel is moved.
ShuttleXpress The controller is designed for one-hand access to the buttons and jog/shuttle knob. The inner 'jog' control rotates through 360 degrees and provides precision forward and reverse scrolling. The outer black ring or 'shuttle' is rubberized and spring-loaded. The controller is connected via a USB port. The ShuttleXpress has five fully programmable buttons. Connect a Contour Design controller to a USB port on your computer.
The shuttle and jog controls can operate at the same time. For example, if you are scrolling with the shuttle and turn the jog, the script will jump to the next story and continue scrolling from that point. Configuring the shuttle and jog controls The shuttle and jog controls may have the following actions assigned to them: Scroll Previous/Next Story If you wish, you can also choose to assign no action to either control.
script, particularly during a rehearsal. The shuttle allows you to scroll backwards and forwards, as well as “fast-reverse” and “fast-forward” to different points of a script. The speed increments allow you to alter reading speeds, where you can set low and high values at the different speed increments. Changing speed increments is particularly useful as it allows you to synchronize your reading speed with the reading speed of the presenter.
Function PREV ITEM NEXT ITEM FWD/REV RESET ITEM RESET R.O. Description The scroll position will reset to the beginning of the previous story. The scroll position will reset to the beginning of the next story. This changes the direction of the scroll. The cue marker will change direction to indicate the scroll direction. The scroll position will reset to the beginning of the current story. The scroll position will reset to the beginning of the runorder.
Function PREV ITEM NEXT ITEM FWD/REV RESET ITEM RESET R.O. Description The scroll position will reset to the beginning of the previous story. The scroll position will reset to the beginning of the next story. This changes the direction of the scroll. The cue marker will change direction to indicate the scroll direction. The scroll position will reset to the beginning of the current story. The scroll position will reset to the beginning of the runorder. Click Setup to display the following dialog.
Note: Multicontroller functionality is an optional feature. Autocue can supply the necessary equipment for you to install and the necessary licence upgrade or it can be pre-installed if requested when you order your QMaster system. Multiple controller hardware There are two recommended ways in which you can attach multiple controllers to your system.
Highlight Virtual Spider Box and click Setup to display the configuration dialog for the VSB. To add a new controller to the VSB click Add and enter the required details. Each type of device you add to the Virtual Spider Box can be configured using the procedures described above. If you want to modify or delete an existing serial controller associated with the VSB, click the appropriate button. Select the required mode of operation.
You can change the default standard colours. Under the Text Attributes and Editor Bits tab there are further options. Single Column Editor Single Column scripts are normally used when the prompter is connected to a third party newsroom system. The Text Colours are the same as Multi Column editor however there are less options under the Text Attributes.
Wire Viewer This option is only available within the Autocue Newsroom system. Lexicography Lexicography allows you to set the Spell check language (based on what is set in the license). You can also edit the User and Site AutoCorrect Dictionary, howevers these options are only available with the autocue Newsroom system. Miscellaneous UI Settings The options here are only available for the Autocue Newsroom system. Acquisition Settings The options here are only available for the Autocue Newsroom system.
Startup The Startup page allows you to change the default Read Rate (only applicable for the Autocue Newsroom system) and also set the default prompting scroll type. For QMaster with complex languages this should be set to QBox Version 2. Single Column and Multicolumn Editor Prefs Single Column Editor Prefs and Multicolumn Editor Prefs refer to options that are available when editing single or multicolumn scripts.
Some options for the Multicolumn Editor are only available with the Autocue Newsroom system. News Interfaces As detailed in the section Configuring a News Interface, you can configure the settings for the third party Newsroom here. File Export Allows you to select which fields will be included when you use the Export Scripts option within the client.
File Based Queues File base queues are rundowns that are not being exported from the newsroom system, but only being created and used locally on the prompter client. It allows you to create local Presenter tables, assign default fonts for scripts and configure the banner settings for the prompt output. Filter Options This allows you to configure the settings that will be used when exporting or importing text from external programs such as Word.
Prefill Tables Prefill tables allow you to create simple “Text Macros” that can be added quickly into scripts. This option is only ever used within an Autocue Newsroom system. Rich Text Editing (External Files) This option is only ever used within an Autocue Newsroom system. Troubleshooting The most common FAQs for QMaster and the QBox can be found on our website at; http://www.autocue.com/service-support/faq Alternatively please contact Autocue or QTV using the details below.
Revision history Build Number Release date Changes
If you need to contact Autocue or QTV Support Our technical support is provided by in-house teams of experienced and dedicated staff. We provide free telephone support for prompting customers during UK office hours (9am till 6pm GMT) and US office hours (9am till 5:30pm EST).