
User Guide User guide

Section 4: QBox Configuration and Operation
Configure QBox display output
Loss of network connections
QBox
Installation & Operation
Guide
Issue #: 090924 ©2003-2009 Autocue Group Ltd
37
www.autocue-qtv.com
4.9: Configure QBox display output
In addition to the resolution and output mode, you can also configure the margins
of the QBox display output.
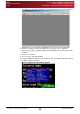
1. Attach a keyboard to the QBox and access the configuration menu by pressing F8.
2. Press the Down arrow key to highlight Configure QBox and then press Enter.
3. Use the arrow keys to highlight Display Settings and press Enter.
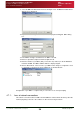
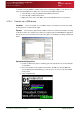
4. Press the Ctrl and Page Down keys to select the Margins tab.
The Left Margin field will be highlighted.
5. If necessary, press the Backspace key to delete the current entry and then enter the
number of pixels required for the left margin.
6. Press the Tab key to highlight the Right Margin field.
7. If necessary, press the Backspace key to delete the current entry and then enter the
number of pixels required for the right margin.
8. Press the Tab key to highlight the OK button and press Enter to confirm changes.
NOTE: You must reboot your QBox in order for the changes to take effect.
4.10: Load files onto a QBox remotely
Script files and rundowns are automatically stored on to your QBox while it is attached to an IT
network by either a cable or wireless connection.
An advantage of QBox is that it can be operated in situations away from a studio environment.
The rundown for a broadcast is stored on the QBox before the presenter and cameraman leave,
but if changes need to be added or the presenter writes a special script while on location, this can
be loaded onto the QBox.
Files can be loaded using a variety of methods. These include:
• from a USB memory device
• from the internal FTP server on the QBox
• from a Bluetooth® device
NOTE: If the QMaster software has an active connection to your QBox, you will not
be able load or prompt any files stored locally on the QBox.