INSTALLATION & OPERATION GUIDE
QBox Installation & Operation Guide Autocue and QTV have been serving the broadcast industry since the mid-1950s when QTV in New York and Autocue in London supplied the very first prompters via their rental divisions. Creating broadcast history. The two companies merged in 1984 under Autocue Group and, with the introduction of the QSeries family of software, became the only company to offer the television industry a single solution for all transmission, newsroom, scripting and prompting requirements.
QBox Installation & Operation Guide Preface About this guide This guide provides: • an overview of the QMaster software • guidance on installing QMaster • guidance for configuring QMaster software • an overview of the scroll controls that are used with QMaster • information about the operation of the QMaster software QMaster is part of Autocue’s prompting software application suite. Audience This guide is for operators and presenters wishing to set up and operate QMaster.
Preface QBox Installation & Operation Guide Disclaimer Autocue Group Ltd reserves the right to revise this publication and to make changes in its content without obligation of Autocue Group Ltd to notify any person or persons of such revision. Issue #: 090924 ©2003-2009 Autocue Group Ltd iv www.autocue-qtv.
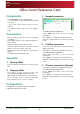
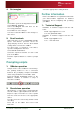
QBox Installation & Operation Guide QBox Quick Reference Card Components 1: A standard QBox unit is supplied with: • A 12-volt power supply unit with a 4-pin XLR connector • Any scroll control devices that you have ordered • An Ethernet cable and a crossover adaptor plug. Select F 8 to open the Configuration interface. Select N e t w o r k C o n f i g u r a t i o n Select L A N 1 and then set the necessary parameters. Press E n t e r to restart the network interface.
QBox Installation & Operation Guide 4: Set margins Select the appropriate loading method. Further information Refer to the QMaster user guide that came with your Autocue/QTV equipment for detailed information about configuring and operating your QBox. Select F 8 to open the Configuration interface. Select D i s p l a y S e t t i n g s Select the M a r g i n s tab and then set the necessary parameters. Press E n t e r to save changes. You must restart the QBox for the changes to take effect.
QBox Installation & Operation Guide Table of Contents Preface................................................................................................ iii Table of Contents ............................................................................. vii 1 Prompting Software Overview........................................................... 1 1.1: The prompting software suite .......................................................................... 1 1.1.1: QStart ................................
Table of Contents QBox Installation & Operation Guide 4.7.1: Loss of network connections ............................................................ 34 4.8: Configure QBox scroll controls...................................................................... 36 4.9: Configure QBox display output...................................................................... 37 4.10: Load files onto a QBox remotely ................................................................... 37 4.10.
QBox Installation & Operation Guide Prompting Software Overview SECTION 1: Autocue's revolutionary prompting and scripting application suite offers a range of prompting solutions to match your needs and your budget. From the entry-level QStart through the QPro to the fullyfeatured QMaster for the more demanding, live broadcast environment. These prompting applications were developed in response to customer needs for a modular product set that can be upgraded to more feature-rich variants at any time.
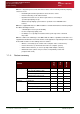
Section 1: Prompting Software Overview The prompting software suite Feature summary QBox Installation & Operation Guide QMaster is targeted at professionals who want a robust, resilient and fully-featured prompting solution for use in: • Demanding live broadcast productions and conference events • News broadcasting - both studio and field • Dynamic and creative shoots, which require wireless connectivity or specialised prompting set-ups • Multi-location prompting systems that are operated over a LAN/
QBox Installation & Operation Guide Section 1: Prompting Software Overview Prompting hardware - QBox Feature summary Computer mouse Serial 2-button Serial multi-button Wireless Multiple Wireless operation Multi-head prompting QMaster Software QPro Scroll controls QStart Feature 3 3 3 3 3 3 3 3 3 3 3 3 3 1.2: Prompting hardware - QBox QBox is a hardware scroll device with a difference. It supersedes the Autocue IMT card and delivers a step change improvement in prompting capability.
Section 1: Prompting Software Overview Prompting hardware - QBox Feature summary Issue #: 090924 ©2003-2009 Autocue Group Ltd QBox Installation & Operation Guide 4 www.autocue-qtv.
QBox Installation & Operation Guide SECTION 2: QMaster Application Architecture Autocue’s QMaster software has been designed to operate on a standard computer and interface seamlessly with QBox prompting hardware using TCP/IP via a direct or networked connection. The QBox hardware may also be operated as a standalone unit without a connection to a computer. After configuration, script information can be sent to the QBox through a variety of interfaces.
Section 2: QMaster Application Architecture QMaster and QBox operational scenarios Studio deployments QBox Installation & Operation Guide QBox is particularly suitable for use in the field because: • the crew does not have to carry a heavy computer. All data can be placed on portable devices such as a mobile phone, PDA or USB memory device. • less equipment allows shooting to take place in relatively inaccessible locations, such as a war torn city or a jungle.
QBox Installation & Operation Guide Section 2: QMaster Application Architecture QMaster and QBox operational scenarios Large-scale field deployments would be able to switch back so that the script or rundown is at the correct point when each of the presenters delivers their part of the bulletin. Multiple scroll controllers. More than one scroll control can be connected either to the QMaster computer or to a QBox.
Section 2: QMaster Application Architecture QMaster and QBox operational scenarios Small-scale field deployments Issue #: 090924 ©2003-2009 Autocue Group Ltd QBox Installation & Operation Guide 8 www.autocue-qtv.
QBox Installation & Operation Guide SECTION 3: QBox Hardware QBox is the latest generation of prompting hardware from Autocue. The design of QBox allows the inbuilt prompting intelligence to be distributed away from any control computer allowing more scalable prompting solutions. Benefits of QBox. • Reliability Rarely revert to hard copy again. QBox stores a copy of the current rundown or script. This copy remains even if the QBox is disconnected or powered down.
Section 3: QBox Hardware QBox components Other required equipment 3.1.2: QBox Installation & Operation Guide Other required equipment A QBox installation also usually requires the following pieces of equipment. Prompt monitor. A prompt monitor displays output from QBox allowing presenters to read their prepared scripts. A QBox is usually connected directly to a prompt monitor.
QBox Installation & Operation Guide Section 3: QBox Hardware QBox physical characteristics Connect QBox to a prompter or monitor 3.2: QBox physical characteristics C AUTION : A QBox is a static sensitive device. Use appropriate ESD precautions, especially if you have removed the cover from the device. Several variants of the QBox have been developed by Autocue.
Section 3: QBox Hardware Set up QBox Connect any peripherals to the QBox Issue #: 090924 ©2003-2009 Autocue Group Ltd QBox Installation & Operation Guide 12 www.autocue-qtv.
QBox Installation & Operation Guide SECTION 4: QBox Configuration and Operation QBox is the innovative output engine that offers 4.1: QBox operating system QBox includes its own customised operating system based on Linux. 4.1.1: QBox onscreen menus QBox includes onscreen menus for checking and updating configurations. The onscreen menus are also used for key functions including loading scripts and rundowns from a source. Accessing menus.
Section 4: QBox Configuration and Operation QBox operating system Configure and test the QBox QBox Installation & Operation Guide The diagram below outlines the steps to follow depending on the type of monitor you use. • If your monitor accepts only a composite video signal then follow the • If your monitor is a VGA monitor you can configure the QBox to generate “Composite Only” path. either a VGA signal or a primary VGA signal with a secondary, lower quality, composite signal.
QBox Installation & Operation Guide Section 4: QBox Configuration and Operation QBox operating system Configure and test the QBox Use the following steps to configure the monitor output settings: 1. Press the F 8 key on the QBox keyboard to bring up the configuration menu. 2. Use the D o w n arrow key to select C o n f i g u r e Q B o x and then press E n t e r . 3. Press the R i g h t arrow key to select D i s p l a y S e t t i n g s .
Section 4: QBox Configuration and Operation QBox operating system Configure and test the QBox QBox Installation & Operation Guide The table below lists the recommended QBox display mode and output settings.
QBox Installation & Operation Guide Section 4: QBox Configuration and Operation Basic operational checks Configure and test the QBox If video output is enabled, you also need to specify the composite standard. Press the T a b key and S p a c e key to enable PAL or NTSC as appropriate. 7. Press the T a b key to select O K and then the S p a c e key or E n t e r key to confirm your selections.
Section 4: QBox Configuration and Operation Basic operational checks Reboot and shutdown 4.2.1: QBox Installation & Operation Guide Reboot and shutdown Ensure that you are able to reboot and shutdown QBox using the System Operations menu or the QBox configuration task selection screen. C AUTION : If your QBox needs to be rebooted for any reason, ensure there are no USB memory devices attached to the unit. Rebooting QBox. You can reboot QBox from two locations. System Operations menu: 1.
QBox Installation & Operation Guide Section 4: QBox Configuration and Operation Basic operational checks Reboot and shutdown Configuration task selection interface: 1. Press F 8 to access the configuration task selection interface. 2. Press either the D o w n or the R i g h t arrow key to select the R e b o o t Q B o x option. 3. Press E n t e r . N OTE : The time taken for a QBox to reboot will vary depending on the number of active network interfaces that are configured on the device.
Section 4: QBox Configuration and Operation Direct and network connections to a QBox Ethernet network QBox Installation & Operation Guide QBox can be shutdown from the S y s t e m O p e r a t i o n s menu at any time, even when in prompt mode. 1. Press the F 4 key to display the S y s t e m O p e r a t i o n s menu. Shutting Down QBox. 2. Use the D o w n arrow key to highlight the S h u t d o w n QBox a n d p o w e r o f f option. 3. Press E n t e r . 4.
QBox Installation & Operation Guide Section 4: QBox Configuration and Operation Direct and network connections to a QBox Ethernet crossover cable In order to use an Ethernet network you will require at least two Ethernet cables with RJ45 connectors: • one cable each to connect the computer to the network or hub/switch. • one cable to connect the QBox to the network or hub/switch. Your decision to use a hub or switch should be based upon the purpose and complexity of the network.
Section 4: QBox Configuration and Operation Configuring network connections Configuring a direct QBox-computer connection N OTE : QBox Installation & Operation Guide Not all models of QBox have FireWire connectors. FireWire connectors. Obtain a FireWire cable with connectors that match the ports on your PC/laptop and QBox. The QBox FireWire port is of the 6-pin variety. Most laptops have 4 pin ports while PCs may have either type.
QBox Installation & Operation Guide N OTE : Section 4: QBox Configuration and Operation Configuring network connections Configuring a direct QBox-computer connection If you have a crossover cable and wish to attempt connection, connect the cable between the Ethernet port on your computer and the Ethernet port on QBox. 1. Press the F 8 key on the QBox keyboard to display the Configuration menu. 2. Use the D o w n arrow key to select C o n f i g u r e QBox and press the E n t e r key. 3.
Section 4: QBox Configuration and Operation Configuring network connections Configuring a direct QBox-computer connection QBox Installation & Operation Guide 4. Use the arrow keys to select the L a n 0 interface type and press E n t e r . N OTE : The image above is for illustrative purposes only. You would highlight the appropriate connection depending on which type of network port you have chosen to use. 5. Press the C t r l and P a g e D o w n key to bring up the I P v 4 S e t t i n g s page. 6.
QBox Installation & Operation Guide Section 4: QBox Configuration and Operation Configuring network connections Connecting QBox to an existing network 8. Add the name to the QBox Status Panel when configuring the QMaster to QBox interface. For detailed information about this, refer to section 4.7. Managing network devices.
Section 4: QBox Configuration and Operation Configuring network connections Connecting QBox to an existing network QBox Installation & Operation Guide DHCP IP address assignment. Using DHCP, the IP address is automatically assigned by the DHCP server to a computer (the DHCP client) without user intervention. A DHCP server must be running on a network, the steps outlined below should be followed. 1. Connect one RJ45 cable from the hub/switch to the PC.
QBox Installation & Operation Guide N OTE : Section 4: QBox Configuration and Operation Configuring network connections Connecting QBox to an existing network Duplicate IP addresses will cause problems on the network. If static IP addresses are to be used, it is very important to ensure that they are different from other addresses already in use.
Section 4: QBox Configuration and Operation Configuring network connections Connecting QBox to an existing network QBox Installation & Operation Guide 11.Press the T a b key until the I P A d d r e s s field is highlighted. 12.Enter an IP address for the QBox on the network then press the T a b key. 13.Enter the 24-Bit S u b n e t M a s k for QBox on the network and then press the T a b key. The Subnet Mask is a two digit figure relating to the number of binary 1s in the address of the mask.
QBox Installation & Operation Guide Section 4: QBox Configuration and Operation Time settings on a QBox Connecting QBox to an existing network 15.Press the C t r l and P a g e D o w n key to get to the D N S S e t t i n g s page. 16.Select M a n u a l C o n f i g u r a t i o n by pressing the T a b key and then the S p a c e bar. The P r i m a r y D N S S e r v e r field is highlighted. 17.Press the T a b key until the P r i m a r y D N S S e r v e r field is selected. 18.
Section 4: QBox Configuration and Operation Using a scroll control device to configure QBox Connecting QBox to an existing network QBox Installation & Operation Guide Selecting a time zone for your QBox. 1. From the T i m e a n d D a t e configuration options window use the arrow keys on the keyboard to select T i m e Z o n e s . 2. Use the arrow keys to select the required time zone. Selecting a time zone for the QMaster computer.
QBox Installation & Operation Guide Section 4: QBox Configuration and Operation Using a scroll control device to configure QBox Altering QBox configuration using a ShuttlePRO controller This section refers to using the Contour Design ShuttlePRO and ShuttleXpress controllers utilising both the buttons as well as the jog wheel. N OTE : It is recommended that you use a USB controller as it must be able to be connected and disconnected without having to restart QBox. 4.6.
Section 4: QBox Configuration and Operation Configure the QMaster to QBox interface Altering QBox configuration using a ShuttlePRO controller QBox Installation & Operation Guide 9. To exit the menu, press the button for selecting the previous menu multiple times until the menu clears. 4.7: Configure the QMaster to QBox interface This section describes how you configure the connection between the QMaster software and a QBox. You must have a scroll control ready when configuring this interface. 1.
QBox Installation & Operation Guide Section 4: QBox Configuration and Operation Configure the QMaster to QBox interface Altering QBox configuration using a ShuttlePRO controller 5. You will be presented with a blank grey screen with menu bars at the top of the screen. 6. Open the Configure Scroll Controls window by selecting T o o l s > > O p t i o n s . 7. Click on the [ + ] sign to expand the Q B o x P r o m p t E n g i n e s menu and select S c r o l l Controls. 8. Plug in a scroll control. 9.
Section 4: QBox Configuration and Operation Configure the QMaster to QBox interface Loss of network connections QBox Installation & Operation Guide 11.Select the Q B o x S t a t u s P a n e l from the P r o m p t menu. The Q B o x S t a t u s P a n e l dialogue box is displayed. 12.Right-click in the dialog box and select A d d to display the C o n f i g u r e QBox dialog box. 13.In the N a m e field type an identifier for the QBox if desired. 14.
QBox Installation & Operation Guide Section 4: QBox Configuration and Operation Configure the QMaster to QBox interface Loss of network connections Physical disconnection. If the network plug is disconnected from a QBox or the computer running the QMaster software, a warning message will be displayed that this loss has occurred and ask if you want to reconnect. QBox operating software failure.
Section 4: QBox Configuration and Operation Configure QBox scroll controls Loss of network connections QBox Installation & Operation Guide If you click Y e s the relevant rundown will be displayed in the Script Editor window at the current position in the script but with scrolling stopped. 4.8: Configure QBox scroll controls Scroll controls may be connected to either the computer running the QMaster software or attached directly to the QBox. C AUTION : Serial ports are not “hot pluggable”.
QBox Installation & Operation Guide Section 4: QBox Configuration and Operation Configure QBox display output Loss of network connections 4.9: Configure QBox display output In addition to the resolution and output mode, you can also configure the margins of the QBox display output. 1. Attach a keyboard to the QBox and access the configuration menu by pressing F 8 . 2. Press the D o w n arrow key to highlight C o n f i g u r e Q B o x and then press E n t e r . 3.
Section 4: QBox Configuration and Operation Load files onto a QBox remotely Transfer via a USB device QBox Installation & Operation Guide To load files remotely QMaster software must not be controlling your QBox. To do this you can either shut down QMaster or disable the connection from the QBox Status Panel. 1. Select Prompt >> Stop Prompting from the QMaster menu bar 2. Select Prompt >> QBox Status Panel 3. Right-click on the name of the QBox and selecting Disable from the context menu 4.10.
QBox Installation & Operation Guide Section 4: QBox Configuration and Operation Load files onto a QBox remotely Transfer via FTP N OTE : If no keyboard is attached, use the appropriate button on a connected scroll controller. 4. Select the USB option from the list in the Select Data Source menu. N OTE : If you have more than one USB device connected to your QBox, there will be additional USB Key entries in the Select Data Source menu. 5. Press Enter and the script will be copied to the QBox.
Section 4: QBox Configuration and Operation Load files onto a QBox remotely Transfer via FTP N OTE : QBox Installation & Operation Guide If you are using Microsoft Internet Explorer v7 you will need to select Page >> Open FTP Site in Windows Explorer to access the page. 3. Create a folder on the internal QBox FTP server for each of your runorders. N OTE : Runorder folders are single level directories and do not support nested folders. 4. Add your script files to the appropriate folder. 5.
QBox Installation & Operation Guide N OTE : Section 4: QBox Configuration and Operation Load files onto a QBox remotely Transfer via a Bluetooth® device If no keyboard is attached, use the appropriate button on a connected scroll controller. 3. Select the [FTP Server] option from the list in the Select Data Source menu. 4. Select the required runorder folder name. 5. Press Enter and the scripts will be copied to the QBox.
Section 4: QBox Configuration and Operation Load files onto a QBox remotely Transfer via a Bluetooth® device N OTE : QBox Installation & Operation Guide Runorder folders are single level directories and do not support nested folders. Device pairing. You can pair your Bluetooth device with any number of QBoxes in order to provide additional security and reduce the time taken to upload files. 1. Initiate pairing on your Bluetooth device. 2. Following the commands displayed on your device. 3.
QBox Installation & Operation Guide Section 4: QBox Configuration and Operation Load files onto a QBox remotely Transfer via a Bluetooth® device 3. Select the [Bluetooth] option from the Select Data Source menu. 4. If the file transfer method was not specified, your scripts will be stored in the Bluetooth inbox on the QBox. Select Inbox from the list of data sources or alternatively, if you created folders to store scripts for different runorders, select the required runorder name. 5.
Section 4: QBox Configuration and Operation Load files onto a QBox remotely Transfer via a Bluetooth® device Issue #: 090924 ©2003-2009 Autocue Group Ltd QBox Installation & Operation Guide 44 www.autocue-qtv.
QBox Installation & Operation Guide SECTION 5: Upgrading QBox Components You will need to upgrade your Autocue products when new features and enhancements are released for QBox firmware When features are made available, Autocue customers are informed and requested to upgrade the products they have purchased. Follow the procedures outlined in this chapter and any additional steps that are contained in the notification email or letter.
Section 5: Upgrading QBox Components QBox upgrades Firmware upgrade QBox Installation & Operation Guide 3. Press [ F 5 ] on the keyboard. QBox system information similar to below will be displayed. 4. Ensure that your QBox is NOT in prompt mode. 5. Plug the USB key containing the extracted files into a USB port on the QBox. Wait approximately 10 seconds for the USB key to be registered. 6. Press [ F 8 ] on the keyboard connected to the QBox to open the configuration menu. 7.
QBox Installation & Operation Guide Section 5: Upgrading QBox Components QBox upgrades Licence upgrade 9. Check that your QBox has been updated by pressing F 5 when the QBox is in prompt mode. The firmware version will be a higher number if the upgrade has been successful. 5.1.2: Licence upgrade If you are upgrading QBox from a trial version you will require a new licence. 1. Contact Autocue to request a QBox permanent licence. New licences will be emailed.
Section 5: Upgrading QBox Components QBox upgrades Licence upgrade Issue #: 090924 ©2003-2009 Autocue Group Ltd QBox Installation & Operation Guide 48 www.autocue-qtv.
QBox Installation & Operation Guide APPENDIX A: Multihead Prompting Using more than one QBox on the same network in a studio allows each presenter to independently scroll a script while a show is on air. N OTE : Multihead prompting functionality can be implemented where you have purchased the appropriate licence or upgrade. During a broadcast, there is often more than one presenter reading from a script. A simple example would be a news bulletin where there is a newsreader and sports presenter.
Appendix A: Multihead Prompting Configuring QMaster for multi-head prompting Issue #: 090924 ©2003-2009 Autocue Group Ltd QBox Installation & Operation Guide 50 www.autocue-qtv.
QBox Installation & Operation Guide APPENDIX B: Wireless Operation QMaster can be configured to operate via a wireless connection to an existing Ethernet network. Wireless connectivity means that QBoxes and computers running the QMaster software can be moved around to different physical locations without the constraint of trailing wires. You can also use wireless capable scroll controllers to control prompting of a script or rundown on a remote QBox. B.
Appendix B: Wireless Operation Configure QBox for a wireless access point QBox Installation & Operation Guide B.2: Configure QBox for a wireless access point 1. With an operating QBox, press F 8 on the keyboard attached the unit. 2. Select the C o n f i g u r e QBox option and press E n t e r . 3. Use the arrow keys on the keyboard to select N e t w o r k C o n f i g u r a t i o n . 4. Press E n t e r on the keyboard. Issue #: 090924 ©2003-2009 Autocue Group Ltd 52 www.autocue-qtv.
QBox Installation & Operation Guide Appendix B: Wireless Operation Configure QBox for a wireless access point 5. Use the arrow keys on the keyboard to select w l a n 0 and press E n t e r to display the tabs containing controls for setting the wireless network parameters. 6. Press the T a b key to highlight I n f r a s t r u c t u r e ( v i a a c c e s s p o i n t ) M o d e and press the S p a c e bar on the keyboard. 7. Press the T a b key and enter the ESSID of your WiFi network.
Appendix B: Wireless Operation Configure QBox for a wireless access point QBox Installation & Operation Guide 9. Press the T a b key and highlight the W E P option and press the S p a c e bar on the keyboard. 10.Press the T a b key until the W E P K e y field is highlighted and enter the required key. This is usually a string of 26 alphanumeric characters. N OTE : Take care when entering the key as you must enter the same key for any device that will be connected to the QBox. 11.
QBox Installation & Operation Guide Appendix B: Wireless Operation Configure QBox for wireless peer-to-peer connection B.3: Configure QBox for wireless peer-to-peer connection 1. With an operating QBox, press F 8 on the keyboard attached the unit. 2. Select the C o n f i g u r e QBox option and press E n t e r . 3. Use the arrow keys on the keyboard to select N e t w o r k C o n f i g u r a t i o n . 4. Press E n t e r on the keyboard. Issue #: 090924 ©2003-2009 Autocue Group Ltd 55 www.autocue-qtv.
Appendix B: Wireless Operation Configure QBox for wireless peer-to-peer connection QBox Installation & Operation Guide 5. Use the arrow keys on the keyboard to select w l a n 0 and press E n t e r to display the tabs containing controls for setting the wireless network parameters. 6. Press the T a b key to highlight A d - H o c ( p e e r - t o - p e e r ) M o d e and press the S p a c e bar on the keyboard. 7. Press the T a b key and enter the ESSID of your WiFi network.
QBox Installation & Operation Guide Appendix B: Wireless Operation Configure QBox for wireless peer-to-peer connection 12.Press the T a b key to select the A u t o m a t i c v i a Z e r o c o n f option and press the S p a c e bar on the keyboard. 13.Press the C t r l and P a g e D o w n keys to select the D N S S e t t i n g s tab. 14.Press the T a b key to select the D N S D i s a b l e option and press the S p a c e bar on the keyboard. 15.
Appendix B: Wireless Operation Configure QBox for wireless peer-to-peer connection Configure the wireless interface on a computer B.3.1: QBox Installation & Operation Guide Configure the wireless interface on a computer You must also correctly configure the parameters of the wireless interface device on the computer running the QMaster software. Open the configuration tool for wireless LAN device that you have installed on your computer.
QBox Installation & Operation Guide APPENDIX C: Time Synchronisation When operating more than one computing devices that are linked it is advisable to have them all refer to the same time. This is important where, for example, a news show takes place in different studios across the globe. C.1: Time signals QBox and QMaster can obtain a time signal from either a network time protocol (NTP) server or from the Time Synchronisation application from Autocue.
Appendix C: Time Synchronisation Time signals Operational scenarios requiring synchronisation N OTE : QBox Installation & Operation Guide If you are moving an existing QBox to a different network, it is recommended that you remove all time sources from the list associated with Time Synchronisation Daemon. Standalone network with one or more QBoxes.
QBox Installation & Operation Guide Appendix C: Time Synchronisation Time synchronisation on a QBox Operational scenarios requiring synchronisation C.2: Time synchronisation on a QBox To select time settings on a QBox follow the steps outlined below. 1. With an operating QBox, press F 8 on the keyboard attached the unit. 2. Select the C o n f i g u r e QBox option and press E n t e r . 3. Use the arrow keys on the keyboard to select T i m e a n d D a t e .
Appendix C: Time Synchronisation Time Synchronisation Daemon Operational scenarios requiring synchronisation QBox Installation & Operation Guide 4. Press E n t e r on the keyboard. C.3: Time Synchronisation Daemon Time Synchronisation Manager from Autocue supports three types of time signal source: Auto Network Discovery. This method uses the pre-installed Bonjour software on the QBox to locate all Time Synchronisation Daemons on the local network and synchronise with the best time source.
QBox Installation & Operation Guide C.3.1: Appendix C: Time Synchronisation Time Synchronisation Daemon Synchronisation options Synchronisation options 1. From the T i m e a n d D a t e configuration options window select T i m e S y n c h r o n i s a t i o n D a e m o n and press E n t e r on the keyboard. 2. The S o u r c e s dialog is displayed. Click A d d on the screen or press the I n s e r t key on the keyboard. 3.
Appendix C: Time Synchronisation Time Synchronisation Daemon Computer firewall settings QBox Installation & Operation Guide 5. The Time Synchronisation Daemon will automatically stop and then restart. C.3.2: Computer firewall settings Your computer or network firewall settings may prevent the effective operation of the Time Synchronisation Daemon.
QBox Installation & Operation Guide Appendix C: Time Synchronisation NTP Server Settings Adding servers to an existing NTP server list C.4: NTP Server Settings The following NTP server functions can be set in the onscreen menus: • Adding NTP servers to an existing NTP server list. • Disabling the iBurst function • Specifying an undisciplined local clock. N OTE : When you make changes to any NTP setting, messages are displayed stating that the NTP daemon has been stopped and then restarted. C.4.
Appendix C: Time Synchronisation NTP Server Settings Using an undisciplined local clock C.4.3: QBox Installation & Operation Guide Using an undisciplined local clock An undisciplined local clock allows a QBox to be a self-referencing time source. 1. Bring up the onscreen menu by pressing the F 8 key. 2. Select C o n f i g u r e QBox and press E n t e r . 3. Use the R i g h t arrow key to select T i m e a n d D a t e , and press E n t e r . 4.