Quick Guide Autocue Teleprompter Dalet SiteóAutocue Integration O CTOBER 2008 ACI0002007-07-08-02 www.dalet.
July 2007 Oct. 2008 Quick Guide Autocue Teleprompter Revision History Document version 1 for Dalet 1.5 General Revision C op y r i g h t ( c ) 1 9 9 2 -2 0 0 8 Da le t Di g i t a l M e d i a Sy st e m s All r i g h t s r e se r v e d . Pr i n t e d i n F r a nc e .
TTaabbllee ooff CCoonntteennttss:: S TEP 1: I NSTALLATION OF THE S OFTWARE .............................................. 5 S TEP 2: D ALET S IDE ......................................................................... 5 S TEP 3: A UTOCUE S IDE ..................................................................... 7 A DDITIONAL S ETTINGS IN S CREENSHOTS ...................................................
Page 4 of 16 Q ui ck Gui de AutoCue @ Dal et
Step 1: Installation of the Software In order to be able to create an instance of the Autocue device instance on the Dalet side, make sure that: Exchange and Distribution setup has been run, with the option Integration Gateway checked, on the computer(s) which will host the MOS server. You have to end all Dalet applications, including Dalet Service, as well as the name server in order to run this setup. Install the Autocue software.
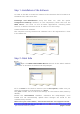
Open SchedulingðStudio1. Mark the target studio for which to use the teleprompter. Open the external devices tab. Assign the device instance to the Assigned devices list. Open Site ConfigurationðInventoryðApplication Server tab. Create an instance of the MOS server2 and for this server, check the box next to the Autocue entry. 1 Dalet 1.
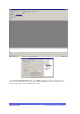
Step 3: Autocue Side QMaster After having installed the Autocue software QMaster, place the Nexus Download Profile file into the ADR profiles folder which is located in \...\AutoCue\ Configuration. Make sure that you have licensed your software for “Active Data Receiver”. Run the application and disable in the File menu “Stop Receiving Downloads”. Open the Autocue configuration and open News InterfacesðActive Data Receiver. In the General tab, enable Start Sequences Only.
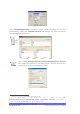
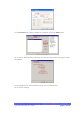
In the Port Configuration tab, click Add and in the pop-up window, fill in the info according to the screenshot: Name: Dalet, Protocol: TCP/IP, Port 2001, and Profile: Nexus Download Profile.
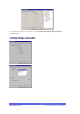
In the Profiles tab, Nexus should be selected, from the Add button. Go to online editing Check the first and the last box while leaving all others unchecked. In the Logging tab, there should not be any checked boxes.
To enable interaction with Dalet, enable Start Receiving Downloads in the File menu.
Q ui ck Gui de AutoCue @ Dal et page 11 of 16
Page 12 of 16 Q ui ck Gui de AutoCue @ Dal et
Q ui ck Gui de AutoCue @ Dal et page 13 of 16
Page 14 of 16 Q ui ck Gui de AutoCue @ Dal et
Q ui ck Gui de AutoCue @ Dal et page 15 of 16
Page 16 of 16 Q ui ck Gui de AutoCue @ Dal et