JAN/07/2003 RS-850lcd PROFESSIONAL REMOTE CAR STARTER WITH ALARM SYSTEM & 2-WAY LCD COMMUNICATION OPERATION MANUAL THIS PRODUCT IS DESIGNED FOR PROFESIONAL INSTALLATION ONLY RS850 OP 1
JAN/07/2003 TABLE OF CONTENTS: A. REMOTE TRANSMITTER OPERATION …………………….………. 4 B. BUTTON LOCK ……………………………………………….……...…. 5 C. LED DISPLAY .……………..……..……………………….……………. 5 D. CHIRP INDICATOR ..………..………..……………………………..…. 5 E. PARKING LIGHT ………..………………………………………..….…. 6 F. ALARM OPERATION CONDITION .…..…………………………...…. 6 G. ACTIVE ARMING – ARM & LOCK .……..……………...……………. 6 Defective Sensor Reminder Silent Arming / Disarming Shock Sensor By-Pass H. PASSIVE ARMING .………………………………………….………….
JAN/07/2003 U. TRUNK RELEASE (CHANNEL 3) OUTPUT ………..……….………13 V. CHANNEL 4 TIMER CONTROL OUTPUT ………..…………………13 W. CHANNEL 5 TIMER CONTROL OUTPUT ………..……………….. 13 X. CHANNEL 6 TIMER CONTROL OUTPUT ………..………………... 13 Y. POWER ON MEMONRY: ………..…………...………….…….…..…. 13 REMOTE START OPERATION: A. TO REMOTE START THE VEHICLE ………..…………..…………. 14 Safe Start (Child safety mode) B. TO OPERATE THE VEHICLE WHILE RUNNING ON THE REMOTE STTART………………………………………………………………………14 C. TEMPORARY STOP FEATURE …………………..………...….…… 14 D.
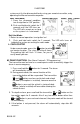
JAN/07/2003 As with any product that performs automatic functions, there are certain safety precautions that you must practice and be aware of. 1. Keep the transmitter out of children’s reach. 2. Do not leave anyone in the vehicle while running on remote control. 3. Alert servicing personnel that the vehicle can be started automatically. 4. Do not start the vehicle by remote while it’s in an enclosed area or garage. 5. Always apply the parking brake and lock the vehicle as you exit the vehicle. 6.
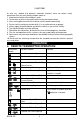
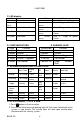
JAN/07/2003 LCD DISPLAY TRANSMITTER OPERATION ONLY: Transmitter Button - (C) - - System Function System’s Trigger Record Check System’s Status Check Remark Press within 3 seconds Button Lock Press within 3 seconds and Hold Press within 3 seconds (C) - ( - ) ( ) - ( ) - ( ) - - Optional Driving Pager button for 2 seconds Press within 3 seconds Monitor Indoor Temperature Press within 3 seconds Daily Timer Start Press within 3 seconds LCD screen lamp turns on for 5 seconds.
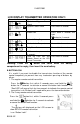
JAN/07/2003 C. LED display: LED Off Slow Flash Flash Function Disarmed Armed Fast Flash Passive Arming On (Solid) Valet Mode D. CHIRP Chirp 1 chirp 2 chirps 3 chirps 4 chirps 6 chirps Passive Starter Disable LED 2 pause 3 pause 4 pause 5 pause INDICATORS: Function Arm Disarm Defective Reminder Disarm / Triggered Car Locator flashes... Function Zone 1 / Warn-Away Trigger Zone 2 / Trigger on Trunk/Hood flashes... Zone 3 / Trigger on Door Switch flashes...
JAN/07/2003 System Arm Door Ajar Trunk / Hood Ajar Clear The Flash Icon: Press the button 3 times within 3 seconds will clear the flash icon on the LCD screen transmitter. DEFECTIVE SENSOR REMINDER: If the siren sounds 3 chirps, then you have left a door, trunk, or hood lid ajar.
JAN/07/2003 I. ACTIVE DISARMING – UNLOCK & DISARM: 1. Press button on the transmitter. 2. The siren will chirp twice and parking light flash twice to indicating that the security system is now disarmed. The vehicle’s door will unlock and dome light turns on for 30 seconds upon disarming when interfaced with the security system.
JAN/07/2003 OVERRIDES THE ALARM WITHOUT PASSWORD PIN CODE: (Factory Default Setting) The Override function may be used if the remote transmitter is lost or inoperative. 1. Enter the vehicle and turn the ignition switch to 'ON’ position. 2. (Alarm will sound.) 3. Within 10 seconds push and release the valet switch, The alarm will stop sounding and enter the disarm mode. You can now start and operate the vehicle normally.
JAN/07/2003 system must first be disarmed either by using your remote transmitter, or by operating the Manual override sequence. Enter Valet Mode: Remote Door Lock Remote Door Unlock 1. From the disarmed condition, turn the ignition to “ON” position. 2. Push and hold valet switch for 2 seconds until the LED turns on. The LED wills remain on as long as the system is in 'valet mode'. Exit Valet Mode: 1.Return to normal operation, turn ignition 'on'. 2.
JAN/07/2003 N. TRIGGER THE SYSTEM When armed, your vehicle is protected as follows: 1. Light impact will trigger the warn-away signal. 2. Heavy impacts / Doors open / Hood open / Trunk open / Turn on the ignition key will trigger the programmed sequence. The starter disable relay (if installed) prevents the vehicle’s starter from cranking. The siren, horn, parking lights, and dome light will turn on to alerting of an intrusion for 60 seconds. Then it will stop and automatic reset and re-arm.
JAN/07/2003 O. ANTI CAR- JACKING Warning: If you don't need the car jacking function in this alarm system, be sure to set car jacking feature “OFF”. This system is default setting all car-jacking “OFF”. (See Alarm Feature I - 6 Programming.) ACTIVE ANTI CAR JACKING: 1. Press and hold the transmitter and button at the same time for 2 seconds while the vehicle’s ignition is ON. The parking lights will turns on for 1.5 seconds to indicate this enter. 2.
JAN/07/2003 P. SYSTEM’S TRIGGER CHECK Press the transmitter first, within 3 seconds press (C) button. It responds with one melody sound and all trigger’s records will immediately displayed on the LCD screen. Q. SYSTEM’S STATUS CHECK When you want to check the system’s present status through the LCD screen, Press the transmitter button twice, within 3 seconds press It responds with one melody sound. (C) button. R.
JAN/07/2003 1. Press the transmitter button first, within 3 seconds press ( ) button to activate outdoor driver paging function, It responds with chirps of the vehicle, a melody sound and " " indication flashes on the LCD screen to confirm the function is on. 2. When tapping the paging (knock) sensor, one chirp sound shall be emitted from the vehicle and the paging melody sound continues sounding from you Remote LCD Transmitter and “ on the LCD screen. ” indication flashes 3.
JAN/07/2003 Press the transmitter (4) and (4) button at the same time to active Channel 4 function. Channel 4 is user-programmable timer output. You may program the built-in timer to send a ground signal for any time duration from 1 second to 120 seconds. For instance, this timer output may be used to turn on the headlight, power window or sunroof. (Factory defaults setting at momentary output.) W. CHANNEL 5 TIMER CONTROL OUTPUT (See Alarm Feature III – 6 Programming.
JAN/07/2003 When you want to start your vehicle, Activate Remote Start 1. Press button once on the transmitter. 2. The parking light will activate to indicate the remote start received the signal. 3. The engine will start approximately 5 seconds. 4. Once the engine is running, after couple seconds the parking light will turn on again and climate controls will activate and adjust the vehicles interior temperature to your preset setting.
JAN/07/2003 1.Before turning off the engine, press the button twice on the transmitter and the LED indicator will flash 3 times to confirm enter. 2.Turn the ignition key to OFF position. (The engine will stay running.) 3.The engine will run until the pre-programmed time elaps ed or shutdown input is received. D.
JAN/07/2003 parking light will flash (6) times. The siren chirps (6) times. The vehicle is now programmed to start at the real time of the next day. Your set time for the next day engine start flashes for approx. 3 seconds on the LCD screen. After 3 seconds the icon stays displayed on the LCD screen. 4. Press the brake pedal to stop the vehicle running. Exit the timer start: Timer start can be exited manually as follows: 1. Make sure the remote start system is not operating the engine. 2.
JAN/07/2003 1. 2. 3. 4. The hood is opened. The brake pedal is pressed. Engine is over-revved. {“Tachometer checking type” only} The pre-programmed run ti me (5 /10 / 20 / 30 minutes) has elapsed. 5. Press button once on the remote transmitter under remote start mode . 6. Move the optional remote start enable toggle switch to OFF position. (If installed) 7. The vehicle refused to start running after {3} unsuccessful attempts. H.
JAN/07/2003 Note: If the system is interfered by stronger radio frequency around, sources of high voltage electric power or such Obstacles like tall buildings and so on, the transmission range may get shorter as the system uses low out put powered frequency. A. BATTERY REPLACEMENT: A 1.5V type AAA Alkaline battery powers the Remote Transmitter. When the power of the battery weakens a icon shall be displayed on the LCD screen.
JAN/07/2003 B. THE REMORE LCD ICONS WITH FUNCTION: Door Lock Your vehicle doors are locked Armed Mode Your vehicle is in armed mode Remote Transmission You are transmitting the signal to control unit Door Open Warning Doors are illegally opened (Zone 3) In – Range Indicator Your are within the remote control range.
JAN/07/2003 Vibration Mode Remote Control vibrates when the system is triggered Driver paging Someone is paging you in front of your vehicle Button Lock Disable the transmission function temporarily Low Battery You have to replace the battery of remote control. C. PROGRAMMING OF THE LCD REMOTE TRANSMITTER: Transmitter Button (1 second) (3 seconds) (5 seconds) - - - - (2-second) (2-second) (2-second) Description LCD screen lamp turns on for 5 seconds. Timer Programming Mode.
JAN/07/2003 1. Screen Lamp ON: Press and hold the button one second, with one melody sound and the LCD screen lamp will turns on for 5 seconds 2. Power Save Mode: While the power save mode, the LCD remote transmitter uses “0” current to save the battery power. Entry: 1. Press & hold the button for 5 seconds, with one melody sound and icon on the LCD screen to indicate entry the “power save mode”. 2. Under the “Active Arming Mode” and Disarm mode.
JAN/07/2003 It is useful when you are in a noisy place and difficult to hear beep sound from the remote control as the remote control in this mode, vibrates itself if your security system is triggered. Press the hold the button first, within 3 seconds press and ( ) button for 2 seconds to select the mode of vibration or melody, the icon will displayed on the LCD screen to show the LCD remote transmitter is on vibration mode. 7.
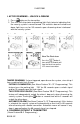
JAN/07/2003 1 2 3 4 Timer Setting (Hour) *Flash digit for adjusting Press & Hold the button for 3 seconds Press the once button Press the once. button Press the once button Press the once button Press the once button Press the once button Press the once button Press & hold the button for 2 seconds.
JAN/07/2003 1. Press & hold the button for 3 seconds, with two-melody sound and the “Hours” digit flashes for adjusting. 2. Press the button twice, the LCD screen will shows “Hours” digit is flashes for adjusting. 3. Press the PM 6:xx 4. Press the adjusting. 5. Press the PM 6:30 or icon and button to decrease or increase the “Hour” digit until button once again then the “Minutes” digit flashes for or button to decrease or increase the “Minutes” digit until 6.
JAN/07/2003 Press the button to stop the count down timer, and the “OFF” icon will show on the LCD screen. 8. Press the button for 2 seconds with one-melody sound to confirm exit the timer program mode. Note: Maximum is 19 hours. 4. Time Set-Up For “Daily Timer Start”: Example to AM 6:30 1. Press & hold the button for 3 seconds, with two-melody sound and the “Hours” digit flashes for adjusting. 2. Press & hold the button for 2 seconds, the LCD screen will flash / icon and “Hours” digit for Hour set-up.
JAN/07/2003 LIMITED LIFETIME WARRANTY PROVISIONS ( U.S. and Continental U.S. Only) 1. AutoPage, Inc. WARRANTS that this new unit has been thoroughly inspected and tested at the factory prior to delivery. Your AutoPage equipment is guaranteed for “life” to the original purchaser/user of the equipment under the following conditions: If the product proves defective (according to AutoPage’s testing) within the first year, the defective unit may be exchanged or repaired free of charge.
JAN/07/2003 4. Any equipment or parts which are claimed to be defective under this WARRANTY must be sent to the AutoPage Service center with “proof of purchase” at the purchaser’s expense prior to such return, a Return Authorization Number should be obtained. AutoPage will return the equipment, charges prepaid. Warranty Service can be provided through the dealer where the equipment is originally purchased. 5.
JAN/07/2003 Serial # _______________ CUSTOMER TO COMPLETE DEALER TO COMPLETE Mr./Mrs./Ms.
JAN/07/2003 1815 West 205th Street Suite 101 Torrance, California 90501-1525 Main Office: 310-618-2002 Customer Service: 800-262-2527 Ext. 462 www.autopageusa.