
Instruction manual


6-1 Basic Automatic Editing
6-10 Chapter 6 Editing
Chapter 6 Editing
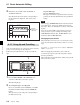
2 Press the + or – button, then use the numeric
buttons to enter the value to be added or
subtracted.
To cancel the entered value
Press the CLR button.
3 Press the SET button.
The result of the addition or subtraction is entered.
4 Press one of the IN, OUT, AUDIO IN, or AUDIO
OUT button.
The modified time data for the edit point appears
in the time data display.
Data entry window
SET is displayed.
2,3
1
423
1
PB/EE
PB
RECINH
off
ASSEM-
BLE
off
INS
TC
off
INS
VIDEO
off
INS
AUDIO
STILL
! ALT+TC
+ 30 00
01
H 04M 58S 00F
01H 04M 58S 00F
AIN 00:01:10:00 AOUT 00:02:10:00
IN 00:01:10:00 OUT 00:02:10:00
INTRP DF F2
INTRP DF 2FO F2
LTC
TCR
2FD
LTC
TCR
HDCAM-SR
REMAIN:01H06M
PLAY LOCK
SS
PB/EE
PB
RECINH
off
ASSEM-
BLE
off
INS
TC
off
INS
VIDEO
off
INS
AUDIO
STILL
! ALT+TC
SET 01 00 30 00
01H 04M 58S 00F
01H 04M 58S 00F
AIN 00:01:10:00 AOUT 00:02:10:00
IN 00:01:10:00 OUT 00:02:10:00
INTRP DF F2
INTRP DF 2FO F2
LTC
TCR
2FD
LTC
TCR
HDCAM-SR
REMAIN:01H06M
PLAY LOCK
SS
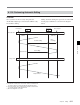
Moving an edit point position by one
frame at a time
1 Press the RECORDER or PLAYER button to
select the VTR on which to modify the edit point.
The button lights up.
2 Press the + or – button while holding down one of
the IN, OUT, AUDIO IN or AUDIO OUT button.
Pressing the + or – button moves the edit point by
one frame forward or backward, respectively.
3 After making the modification, release the
respective edit point button that you have been
holding down at step 2.
Moving an edit point position with the numeric
buttons
1 Press one of the IN, OUT, AUDIO IN, or AUDIO
OUT button while holding down the CLR button.
Time data for the edit point appears in the data
entry window.