
Manual


14
9. Turn barrel bushing counterclockwise, push barrel and barrel bushing forward
until bushing is clear of the slide, then remove bushing from the barrel.
10. Push barrel link forward and remove barrel from the slide.
NOTE: Do not drop the hammer while slide is removed from the frame.
DO NOT STRIP YOUR PISTOL ANY FURTHER THAN PREVIOUSLY
DESCRIBED. DO NOT REMOVE OR ALTER PARTS, PARTICULARLY
SAFETY PARTS. IF ADDITIONAL MAINTENANCE IS REQUIRED SEE
“SHIPPING FIREARMS FOR SERVICE ” ON PAGE 19.
Reassembly of the Auto-Ordnance 1911 Models after Routine
Cleaning
WARNING: ONCE AGAIN MAKE SURE YOUR AUTO-ORDNANCE
HANDGUN AND MAGAZINE IS UNLOADED BEFORE STARTING THIS
PROCEDURE.
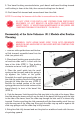
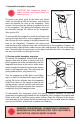
1. With the slide upside down and the bar-
rel link forward, assemble barrel into the
slide (see picture #8).
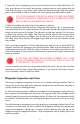
2. Place barrel bushing over muzzle of bar-
rel and into slide until it is flush with the
face of the slide (STEP 1). Turn bushing
clockwise as far as it will go (STEP 2).
3. Place the recoil guide into the recoil
spring so that the open end of the spring is
up against the collar of the guide.
Assemble the recoil spring and guide into
the slide by pushing the end of the spring
through the slide from the rear (STEP 3).
Position the arched portion of the recoil
spring guide over the outside surface of the
barrel directly in front of the barrel link
(STEP 4).
4. Cock the hammer. Look through the slide stop hole in the side of the frame. Move
the slide along the frame until you see the hole in the barrel link line up with the hole
in the side of the frame. Insert the slide stop through the hole until it is almost fully
inserted. Continue pushing the slide rearward until the disassembly notch lines up
with the rear part of the slide stop. Now push the slide stop up and in against the
slide stop plunger until the slide stop is fully inserted.
5. Bring the slide fully forward and rest the pistol on a table or bench with the muz-
zle pointing upward.
STEP 1
STEP 2
STEP 3
STEP 4
PICTURE #8