
Manual


13
Disassembly of the Auto-Ordnance 1911 Models for Routine
Cleaning
WARNING: MAKE SURE YOUR HANDGUN IS UNLOADED BEFORE
STARTING THIS PROCEDURE.
WEAR SAFETY GLASSES IN CASE YOU LOSE CONTROL OF A
SPRING LOADED COMPONENT SUCH AS THE RECOIL SPRING OR
PLUG WHICH COULD INJURE YOUR EYES.
1. Always make sure the magazine is
removed and the pistol is not loaded.
The pistol should be cleaned after
every use and when exposed to dirt,
sand, etc.
2. With the muzzle pointing upward,
rest the pistol on heel of butt and the
grip safety on a table or bench.
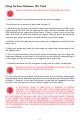
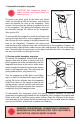
3. Push the slide back about 1/4 inch,
press down on recoil spring plug (locat-
ed just below the muzzle) and at the
same time rotate the barrel bushing
clockwise about 1/4 turn, using a barrel
bushing wrench if necessary; this will
free the plug and recoil spring. Keep
pressure on the plug to prevent it from
being ejected by the spring. Then allow
plug and spring to gradually extend
out of the slide. (See picture #5).
4. Remove the plug from the spring.
5. Cock hammer by pulling back on the
hammer spur.
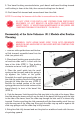
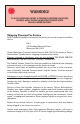
6. Pull slide to rear until lug on slide
stop is opposite disassembly notch
(see picture #6) and push inward on
the end of the slide stop shaft on the
right side of the pistol and remove the
slide stop from the left side.
7. Push slide forward off the frame.
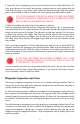
8. Turn the slide upside down and lift the recoil spring and guide and pull them rear-
ward out of the slide (see picture #7).
PICTURE #5
PICTURE #7
PICTURE #6
Barrel bushing
(Clockwise)
Recoil
spring
plug
Recoil
spring
Slide stop
Disassembly notch
Recoil spring
Recoil spring guide
Barrel link
forward