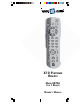
X10 PLATINUM REMOTE MODEL UR73A 5 IN 1 REMOTE OWNER’S MANUAL
READ THIS FIRST! SAFETY CONSIDERATIONS Remember to exercise good common sense when using the Home Automation features of your X10 Platinum Remote – especially when scheduling unattended devices. There can be some unexpected consequences if not used with care. For example, an empty coffee pot can be remotely turned on. If that should happen, your coffee pot could be damaged from overheating. If an electric heater is turned on by remote control while clothing is draped over it, a fire could result.
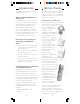
I NTRODUCTION Congratulations on your purchase of the X10 Platinum Remote. Make your lights and appliances go to work for you.... The X10 Platinum Remote will control most or all of your video and audio equipment. But what really sets it apart from other remotes is that you can also control almost any light or appliance in your home – even in another room! And it’s easy to set up.
HOUSE CODES AND UNIT CODES UNIT CODE DIAL HOUSE CODE DIAL Each Module has a specific address made up of a House Code (red dial on the face of the Module) and a Unit Code (black dial on the face of the Module). The Controller first sends an address and then a command on the AC power lines. Only the Module with a matching address will execute the command. If more than one Module has the same address, both Modules will execute the command.
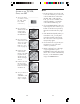
SETTING UP YOUR REMOTE 1. Set the House Code to ‘A’ and the Unit Code to ‘2.’ BUTTON DESCRIPTIONS INDICATOR LIGHT 2. Plug a lamp into the Lamp Module. The indicator light flashes when the remote is operating. POWER Works the same as your original remote. TV, VCR, CBL, SAT Used to select the device to control. X10 3. Plug the Lamp Module into a convenient AC outlet. Lets you control X10 modules to operate lamps and appliances around the home. SET UP Used for programming the remote.
SETTING UP FOR TV, VCR, CABLE, AND SAT 1. Turn on the device you want to control (TV, VCR, cable box, satellite receiver etc.). 2. Press and hold SETUP until the LED indicator lights steadily. Release the SETUP button. 3. Press and release mode button for the device you want to control. The LED blinks once. (See notes on page 11). 4. Enter the 4 digit Code from the Library Code Table (separate sheet). The LED turns off after the last digit entered. Notes: 1.
SEARCHING FOR CODES 1. Turn on the device you want to control. 2. Press and hold SETUP until the LED indicator lights steadily. Release Setup button. 3. Press the mode button that matches the equipment you want to control. The LED blinks once. 4. Press CHANNEL + repeatedly (note 5, page 11) until the device to be controlled changes channel. If you accidentally go past the code, press CHANNEL repeatedly until the channel changes again. 5. Press and release the ENTER button to complete the setup.
PROGRAMMING COMBO DEVICE CODES Some Combo devices (e.g. TV/VCR, TV/ DVD, DVD/VCR, etc.) will require you to set up two different Mode buttons to control both parts of the Combo device. For example, if you have a TV/VCR Combo, you might need to set up one code under the TV button to control the TV part AND a separate code (under any other Mode button) to control the VCR part. CONTROLLING COMBO DEVICES Some Combo devices (e.g. TV/VCR, TV/ DVD, DVD/VCR, etc.
VCR/DVD/DVR PUNCH THROUGH FEATURE, CONT. This feature will not operate if the programmed TV, SAT or Cable code has its own VCR transport button control e.g. a TV Combo, SAT/PVR, etc. VOLUME/MUTE CONTROL AND PUNCH-THROUGH FEATURE This remote lets you select which device Mode controls your Volume/Mute buttons. The remote is initially set (factory default) for all device Modes programmed with “Visual” codes (e.g. TV, VCR, DVD, DVR, SAT & CABLE) and “Audio” codes (e.g.
CONTROLLING X10 MODULES If you have purchased and installed a Transceiver Module, you can control it and other X10 modules as follows: 1. Press and release the X10 button. CHANGING THE X10 HOUSE CODE: The X10 Platinum Remote defaults to House Code A, and in most cases you will not need to change this unless you are experiencing interference from a neighboring X10 system. 1. Press and release the X10 button. 2. Use the number buttons to enter the Unit Code number of the chosen module.
T ROUBLESHOOTING CONTROLLING AN IR MINI CONTROLLER (IR543) If you already own an IR Mini Controller, you will need to change the X10 Home Automation code in the remote to use it. The code for standard X10 RF Home Automation is 0999. The code to control the IR Mini Controller is 0998. To change the code: 1. Press and hold SETUP until the LED indicator lights steadily. Release the SETUP button. 2. Press and release the X10 button. 3.
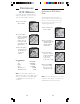
E XPANDING YOUR S YSTEM The modules illustrated below represent just a few of the wide range of X10 compatible modules you can choose from to expand your Home Automation system. They are available from electrical outlets, department stores and mail order catalogs. Switch entrance or garage lights on from your car with the convenient Keychain Remote KR19A and KR21A (shown). Replace your existing wall switches with the Wall Switch Module WS467. Installs like a regular dimmer.
FCC CAUTION WARRANTY 12 MONTH LIMITED WARRANTY THIS DEVICE COMPLIES WITH PART 15 OF THE FCC RULES. X10.com, a division of X10 Wireless Technology, Inc. (X10) warrants X10 products to be free from defective material and workmanship for a period of one (1) year from the original date of purchase at retail. X10 agrees to repair or replace, at its sole discretion, a defective X10 product if returned to X10 within the warranty period and with proof of purchase.
NOTES NOTES 26 27
X10.com, a Division of X10 Wireless Technology, Inc. 3824 North 5th St., Suite C, North Las Vegas, NV 89032 Web Site: http://www.x10.