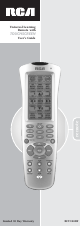
Universal Learning Remote with TOUCHSCREEN remote User’s Guide Limited 90 Day Warranty RCU900RF
Table of Contents Introduction . . . . . . . . . . . . . . . . . . . . . . . . . . . . . . . . . . . . . . . . . . . .3 Battery Information . . . . . . . . . . . . . . . . . . . . . . . . . . . . . . . . . . . . . .3 Battery Installation . . . . . . . . . . . . . . . . . . . . . . . . . . . . . . . . . . . . . .3 Battery Saver . . . . . . . . . . . . . . . . . . . . . . . . . . . . . . . . . . . . . . . . . . .3 Code Saver . . . . . . . . . . . . . . . . . . . . . . . . . . . . . . . . . . . . . . . . . . .
Universal Touchscreen Learning Remote Congratulations on your purchase of the RCU900RF by RCA. The RCU900RF is one of the most sophisticated, yet easy to use, remote control units available today. With the RCU900RF, juggling multiple remote controls is a thing of the past! Your RCU900RF controls up to eight devices, including the most popular brands of TV, VCR, DVD, SAT/CBL, CD and audio equipment.
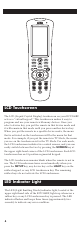
LCD Touchscreen The LCD (Liquid Crystal Display) touchscreen on your RCU900RF acts as a “virtual keypad.” This touchscreen makes it easy to program and use your remote with many devices. Once you select a device key, you put the remote in that device mode and it will remain in that mode until you press another device key. When you put the remote in a specific device mode, the menu that is activated on the touchscreen will be the menu for that mode.
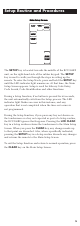
Setup Routine and Procedures The SETUP key is located towards the middle of the RCU900RF unit, on the right-hand side of the rubber keypad. The SETUP key is used to walk you through the steps in setting up the remote. To enter the Setup Mode, press and hold the SETUP key until the LED indicator light remains on. At that time, the Main Setup Screen appears. Setup is used for Library Code Entry, Code Search, Code Identification and other functions.
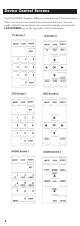
Device Control Screens Your RCU900RF displays different control screens for each device. There are two screens needed to control each device. You can easily switch between these two screens by simply pressing the LCD SCREEN key at the top right of the touchscreen.
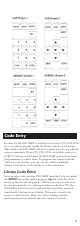
Code Entry In order for the RCU900RF to control your devices (TV, VCR, DVD, etc.), you must program it with the library code for each device. This enables the RCU900RF remote to control your device with the proper commands. If your TV, VCR, DVD, or satellite receiver is an RCA, ProScan or GE brand, the RCU900RF may not need any programming to control them. To program the remote with the codes for your devices, you can use one of three methods: Library Code Entry, Code Search or Code Autosearch.
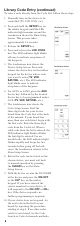
Library Code Entry (continued) To enter a code directly from the Code List, follow these steps: 1. Manually turn on the device to be controlled (TV, VCR, DVD, etc.). 2. Press and hold the SETUP key on the rubber keypad until the LED indicator light remains on and the touchscreen shows the Main Setup Screen. This process takes approximately 2-3 seconds. 3. Release the SETUP key. 4. Press and release the LCD CODE key. The LED indicator light blinks off once to indicate acceptance of the keypress. 5.
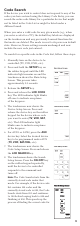
Code Search If the device you wish to control does not respond to any of the codes you have entered using the Library Code Entry, you can search the entire code library for a particular device that might not be listed in the Code List or might be listed under a different brand. When you enter a valid code for any given mode (e.g., when you enter a code for a TV), the default key labels are displayed on the touchscreen and any previously Learned functions for that mode are deleted.
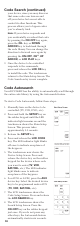
Code Search (continued) your device, since you may discover that some codes can turn on and off your device but are not able to control its other functions. This process allows you to bypass codes you’ve already tried. Note: If your device responds and you accidentally overshoot that code by pressing the ON•OFF key again, press the CH- key or DOWN ARROW key to backtrack through the code library. You can change the direction to forward once again by pressing the ON•OFF, CH+, UP ARROW, or LCD PLAY keys. 9.
9. The Autosearch sends the next code in the list every three seconds. Note: The Autosearch can take a significant amount of time, since there are many codes in the list. 10. To speed up the Autosearch, you can manually override the process and temporarily speed it up by pressing the normal search keys (CH+, CH-, ON•OFF, PLAY, LCD UP, and LCD DOWN keys) in both forward and reverse directions. 11.
Code Identification (continued) one second each, followed by a 0.5 second gap where no digits are shown. The LED indicator light blinks off for each digit display. The sequence is completed once and then the touchscreen returns to the Main Setup Screen. 7. The Code Identification process is now complete. You can write this Code ID in the Code ID Chart for easy reference.
4. The touchscreen now shows the Device Setup Screen. Press and release the device key on the rubber keypad for the device whose keys you want to customize (TV, VCR, SAT/CBL, etc.). The LED indicator light blinks once to indicate acceptance of the keypress. 5. The touchscreen now shows the Key Label Screen. This screen shows the current screen labels for the device you have chosen (TV, VCR, SAT/CBL, etc.). The LCD SETUP and SCREEN labels are also shown. 6.
Learned Key Reference Pages IMPORTANT NOTE: You cannot learn any commands under the LEARN, MACRO, SCREEN, SETUP or any Device key.
Device: Device: 15
Learn Commands Learning Tips Before transferring commands from your original remote to the RCU900RF, check out these useful tips on Learning. 1. Make sure you are using fresh batteries in both the RCU900RF and the original remote. 2. It is recommended that a Master Clear be done before attempting any Learning. This clears all Learned commands for all device modes. (See section on Master Clear). 3.
Learn Commands Now you’re ready to have your RCU900RF learn the commands from your existing remotes. All Learned keys are saved automatically. Remember, only one original remote can be stored under any one mode. The RCU900RF can learn the commands for one TV remote, one VCR remote, one DVD remote, etc. 1. Point the top of the original remote at the base of the RCU900RF so the IR LED on the original remote is in line with the RCU900RF Learning sensor, located at the bottom of the remote. 2.
Learn Commands (continued) 11. To save and exit from the Learn routine, press and release the LCD OK key. The touchscreen returns to the Main Setup Screen. 12. The Learning process is now complete. Clear All Stored Learned Commands Under a Mode If you want to clear all of the Learning commands under one mode, such as TV, VCR or DVD, follow these steps: 1. Press and hold the SETUP key on the rubber keypad until the LED indicator light remains on and the touchscreen shows the Main Setup Screen.
3. Press and hold the LCD LEARN key until the Main Setup Screen is displayed. This process takes approximately 5 seconds. 4. All Learned command entries are now cleared for all device modes. Smart Macro Key Operations Your RCU900RF’s Smart Macro feature allows you to execute a sequence of commands with one keypress. A Smart Macro learns any sequence of original remote commands. A total of 20 learned commands can be stored under each of the nine available LCD MACRO keys.
Program a Smart Macro (continued) 8. Macro Setup Screen 3 now appears on the touchscreen. Press and hold the key on the original remote until the LED indicator light on the RCU900RF blinks off once. This process takes 2-3 seconds to complete. 9. The touchscreen now shows Macro Setup Screen 4. Release the original remote key. 10. Program additional commands in the order you want them to be stored in the Smart Macro.
Delete a Smart Macro To delete a previously programmed Smart Macro, follow these steps: 1. Press and hold the SETUP key on the rubber keypad until the LED indicator light remains on and the touchscreen shows the Main Setup Screen. This process takes approximately 2-3 seconds. 2. Release the SETUP key. 3. Press and hold the LCD MACRO key until Macro Setup Screen 7 is shown. The LED indicator light blinks to indicate acceptance of the keypress. Release the LCD MACRO key.
Method 2 (From Setup Routine) To set your Sleep Timer from the Setup routine, follow these steps: 1. Press the TV device key on the rubber keypad. 2. Press and hold the SETUP key on the rubber keypad until the LED indicator light remains on and the touchscreen shows the Main Setup Screen. This process takes approximately 2-3 seconds. 3. Release the SETUP key. 4. Press and release the SLEEP key. The LED indicator light blinks off once to indicate acceptance of the keypress. 5.
2. Release the SETUP key. 3. Press and hold the device key on the rubber keypad for approximately 5 seconds (TV or AUDIO/AUX) for volume control until the LED indicator light blinks and the Main Setup Screen is shown. 4. The default volume control is now set for the mode you have chosen. VCR Punch-through The RCU900RF punches through the six transport keys (REVERSE, PLAY, FORWARD, RECORD, STOP, and PAUSE) to VCR or DVD Mode, whichever was used most recently.
LCD Touchscreen Display Time (continued) 2. Release the SETUP key. 3. Press and release the SETUP key. The LED indicator light blinks to acknowledge the keypress and the Digit Setup Screen is shown. 4. Press and release a digit key (1-9) to indicate the length of time you wish the touchscreen to remain on. (The RCU900RF can only accept the following options: 1=10 seconds; 2=20 seconds; 3=30 seconds, etc.) Ninety seconds is the longest length of time allowable.
Glossary AUDIO FEATURES (ACTIVE LCD KEYS IN AUDIO DEVICE MODE) AM.FM The AM.FM allows you to select the AM or FM band on your audio system. CD, TAPE, TUNER, TV, VIDEO1 & VIDEO2 Use the CD, TAPE, TUNER, TV, VIDEO1 & VIDEO2 keys to select the device you want to control. CENTER, FRONT, REAR & OPTION You can adjust the levels of the center, front and rear speakers by using the LEVEL▲/LEVEL▼ keys.
Glossary (continued) INPUT The LCD INPUT key selects the video inputs of your device, if the device is equipped with this feature. LCD The Liquid Crystal Display (LCD) acts as a “virtual keypad” on the remote. The touchscreen is normally blank when not in use. Pressing any of the LCD keys or the SETUP key, a device key, or the LIGHT key on the rubber keypad turns the touchscreen on. The remaining rubber keys do not activate the touchscreen.
PUNCH-THROUGH A Punch-through command has the ability to punch-through from one device to another, (e.g., the TV volume can work while the remote is in the VCR Mode). SETUP KEY The SETUP key on the rubber keypad is used to walk you through the steps in setting up the remote. Setup is used for Library Code Entry, Code Search, Code Identification and other functions. During a Setup function, if no button is pressed for 60 seconds, the unit automatically exits from the Setup routine.
Troubleshooting PROBLEM SOLUTION The touchscreen does not show anything when you touch it or when you press the SETUP or LIGHT keys. A) Replace the batteries with four new AA alkaline batteries. B) Check to make sure batteries are properly installed. The remote does not operate your A) Try all code programming audio or video devices. procedures with all the codes from the appropriate part of the Code List.
Code List Televisions Abex . . . . . . . . . . . . . . . . . . . . . . . . . . . . . . . . . . . . . . . . . . . . . . . . . . . . . . . . . . . . . .185 Acme . . . . . . . . . . . . . . . . . . . . . . . . . . . . . . . . . . . . . . . . . . . . . . . . . . . . . . . . .021 ,050 ADA . . . . . . . . . . . . . . . . . . . . . . . . . . . . . . . . . . . . . . . . . . . . . . . . . . . . . . . . . . . . . .013 ADC . . . . . . . . . . . . . . . . . . . . . . . . . . . . . . . . . . . . . . . . . . . . . . . .
Televisions (continued) Majestic . . . . . . . . . . . . . . . . . . . . . . . . . . . . . . . . . . . . . . . . . . . . . . . . . . . . . . .000, 001 Marantz . . . . . . . . . . . . . . . . . . . . . . . . . . . . . . . . . . . . . . . . . . . . . . . . . . .004, 009, 062 Megatron . . . . . . . . . . . . . . . . . . . . . . . . . . . . . . . . . . . . . . . . . . . . . . . . . .004, 009, 059 MEI . . . . . . . . . . . . . . . . . . . . . . . . . . . . . . . . . . . . . . . . . . . . . . . . . . . . . . . .
VCR/PVR Admiral . . . . . . . . . . . . . . . . . . . . . . . . . . . . . . . . . . . . . . . . . . . . . . . . . . . . . . . . . . .001 Adventura . . . . . . . . . . . . . . . . . . . . . . . . . . . . . . . . . . . . . . . . . . . . . . . . . . . . . . . . .026 Aiko . . . . . . . . . . . . . . . . . . . . . . . . . . . . . . . . . . . . . . . . . . . . . . . . . . . . . . . . . . . . . .027 Aiwa . . . . . . . . . . . . . . . . . . . . . . . . . . . . . . . . . . . . . . . . . . . . . . . . .
VCR/PVR (continued) Pioneer . . . . . . . . . . . . . . . . . . . . . . . . . . . . . . . . . . . . . . . . . . . . . . .055, 080, 081, 123 Portland . . . . . . . . . . . . . . . . . . . . . . . . . . . . . . . . . . . . . . . . . . . . . . .016, 017, 019, 110 Proscan . . . . . . . . . . . . . . . . . . . . . . . . . . . . . . . . . . . . . . . . . . . . . . . . . . . . . . . . . . . .000 Protec . . . . . . . . . . . . . . . . . . . . . . . . . . . . . . . . . . . . . . . . . . . . . . . . . . . . . . . . .
Sampo . . . . . . . . . . . . . . . . . . . . . . . . . . . . . . . . . . . . . . . . . . . . . . . . . . . . . . . . . . . .192 SEG . . . . . . . . . . . . . . . . . . . . . . . . . . . . . . . . . . . . . . . . . . . . . . . . . . . . . . . . . . . . . . .203 Sharp . . . . . . . . . . . . . . . . . . . . . . . . . . . . . . . . . . . . . . . . . . . . . . . . . . . . . . . . . . . . .172 Sherwood . . . . . . . . . . . . . . . . . . . . . . . . . . . . . . . . . . . . . . . . . . . . . . . . . . . . . . .
Cable Boxes (continued) Magnavox . . . . . . . . . . . . . . . . . . . . . . . . . . . . . . . . . . . . . . . . . . . . . . . . . . . . . . . . .025 Memorex . . . . . . . . . . . . . . . . . . . . . . . . . . . . . . . . . . . . . . . . . . . . . . . . . . . . . . . . . .026 Movie Time . . . . . . . . . . . . . . . . . . . . . . . . . . . . . . . . . . . . . . . . . . . . . . . . . . . .002, 027 NSC . . . . . . . . . . . . . . . . . . . . . . . . . . . . . . . . . . . . . . . . . . . . . . . . . . . . . .
Carver . . . . . . . . . . . . . . . . . . . . . . . . . . . . . . . . . . . . . . . . . . . . . . . .006, 007, 008, 165 Casio . . . . . . . . . . . . . . . . . . . . . . . . . . . . . . . . . . . . . . . . . . . . . . . . . . . . . . . . . . . . . .117 Citizen . . . . . . . . . . . . . . . . . . . . . . . . . . . . . . . . . . . . . . . . . . . . . . . . . . . . . . . . . . . .166 Curtis Mathes . . . . . . . . . . . . . . . . . . . . . . . . . . . . . . . . . . . . . . . . . . . . . . . . . . . . . .
Helpline If you need additional setup assistance, please call the Helpline at: 1-800-420-7968. Limited 90-Day Warranty Thomson multimedia Inc. warrants that for 90 days from date of purchase, it will replace this product if found to be defective in materials or workmanship. Return it postage paid to the Product Exchange Center address for prompt, no-charge replacement with a current equivalent. This replacement is Thomson multimedia Inc.’s sole obligation under this warranty. Thomson multimedia Inc.