Instruction Manual
sonoro audio GmbH & Co. KG Unter Goldschmied 6 50667 Köln Germany fon +49 221 - 16 79 29 - 0 fax +49 221 - 16 79 29 - 290 info@sonoro-audio.com www.sonoro-audio.com 05/09 The manufacturer continuously works on the further development of all types and models. We ask for your understanding that changes of the scope of delivery in regard to form, components and technology are therefore possible at any time.
Safety Instructions Place the cubo design cd-radio on a firm, level surface. Make sure that • • • • • • the cd-radio is not covered, so as to ensure there is always an adequate circulation of air; there are no direct sources of heat (e.g. radiators) radiating onto the product; the cd-radio is not subjected to direct sunlight; contact with moisture, water or spray is avoided (e.g., never place a flower vase on the cd-radio); the cd-radio does not stand in the vicinity of magnetic fields – e.g.
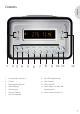
English Controls 1 2 3 4 5 6 7 8 9 10 11 1 Tuning station search +/- 8 Stop CD playback stop 2 CD slot 9 Skip Forward 3 Mode operating mode 10 Open eject CD 4 Menu settings 11 5 Skip Reverse 6 Pause CD pause 7 Play CD playback 12 Power switch cd-radio into standby mode 12 Volume volume control +/- 5
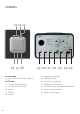
Controls 13 14 15 16 17 18 For radio mode 19 Headphone connector 13, 14, 15 Preset radio station buttons 20 AUX-IN connector For CD mode 21 Security-lock connector 14 -10 Skip 10 tracks forward 22 FM antenna VHF antenna 15 +10 Skip 10 tracks back 23 EXT/INT antenna selector (external/internal) 16 Alarm 1 24 Power supply connector 17 25 Battery compartment Snooze 18 Alarm 2 6 19 20 21 22 23 24 25
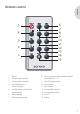
English Remote control 5 6 7 8 9 10 11 12 13 14 15 4 3 2 1 1 Alarm 1 2 Volume volume control - radio stations 1 - 6 3 Volume volume control + 9 Stop CD playback stop 4 Play CD playback / 10 Skip Forward Pause CD pause 11 Skip Reverse Standby switch cd-radio into 12 Tuning station search + standby mode 13 Tuning station search - 6 Menu settings 14 Alarm 2 7 Mode operating mode 15 Snooze 5 8 Favorite press to switch between preset 7
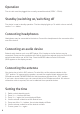
Operation The cd-radio must be plugged into an easily-accessible socket (230 V ~ 50 Hz). Standby/switching on/switching off The device is now in standby operation. The time display lights up. To switch cubo on and off, use the Power button. Connecting headphones Headphones may be connected to the device. Connect the headphones to the connector at the rear of the device. Connecting an audio device External audio devices such as an MP3 player, iPod, Laptop or similar devices may be connected.
1. 2. 3. 4. 5. Switch cubo to standby mode. Press Menu, the time will flash. Press one of the Skip buttons until Set-AP appears in the display. Press Menu again and select with the Skip buttons the desired AM/PM format. Store the input with Menu. English Selecting 12- or 24-hours time display Setting display screen brightness 1. 2. 3. 4. Switch on the device. Press the Menu button. Press one of the skip buttons until you see DISPLAY on the screen.
Snooze function (SNOOZE) The SNOOZE timer can be customised. When switched off, press and hold down the SNOOZE button. Select the desired snooze length and save your selection by pressing the SNOOZE button. Battery Compartment This cubo model has a replaceable battery (CLOCK BATTERY) to back up the clock memory. This means if the power supply is interrupted, for example in the event of a power failure, the alarm and clock settings are saved. The entire display lighting and alarm functions are switched off.
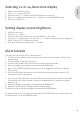
1. Find your desired station. 2. Hold one of the station buttons over the loudspeaker pressed until you hear a short “beep“. The station is now stored at this position. 3. To call up the station again, you only need to press the corresponding station button. English Storing and calling up stations Adjusting tone (bass/treble) 1. 2. 3. 4. 5. Press the Menu button. Press Skip until “Set tone” appears in the display. Press the Menu button and set the bass response with the loudspeaker buttons.
Title skip function To select a specific track from the CD press one of the Skip buttons until you reach the desired track number. This can be done during playback or in Stop mode. If you have many tracks on an MP3 CD you can press the preset radio station buttons 5 and 6 to skip forward or backward 10 tracks at a time. Title search function During playback, hold down one of the Skip buttons, and the search will start. Let go of the button at the desired position. Repeat function Repeat function 1.
1. 2. 3. 4. 5. 6. 7. 8. 9. In the Stop mode, press the Menu button twice. With the Skip Forward button select PROG. Confirm the input with Menu. Now, select the first title with the Skip button. Confirm the chosen title with Play. Repeat the last two steps until all titles are stored. To start the programmed playback, press Menu again. To interrupt the programmed playback, press Stop.
Disposal Packaging Your cubo design cd-radio is protected against transport damage by adequate packaging. Packaging is a raw material which can be re-used or recycled in order to return to the circulation of raw materials. The product When cubo has reached the end of its useful life, on no account should you throw the cd-radio in the normal household debris. Enquire where it may be disposed of in an environmentally-conscious manner. Technical data Power supply: 230 V ~ 50 Hz AUX input: 3.
Warning! Do not attempt to repair the device yourself, this will invalidate any claims under guarantee. Do not open the casing as there is a risk of electric shock. In the case of a fault, please try the steps outlined below before bringing the device in for repair. If you are unable to resolve a failure by following these steps please contact your dealer or our customer service department. English Troubleshooting “NO DISC” displayed on screen • Insert a CD.
Declaration of Conformity Manufacturer: sonoro-audio GmbH & Co. KG We herewith declares that the sonoro eklipse is in conformity with the EMC directive 2004/108/EC, the LVD directive 2006/95/EC and R&TTE directive 1999/5/EC; with respect to its conception and style of construction as well as its performance as issued by us. FCC declaration of conformity statement This device complies with Part 15 of the FCC Rules.
Guarantee claims The following applies when making a claim under this guarantee, this does not affect your statutory rights: • Claims under guarantee can only be made within a maximum of 2 years from date of purchase. • Within this period of guarantee we reserve the right to repair or replace the device free of charge in the event of material or manufacturing defects. • Please send the faulty device along with the guarantee card and purchase receipt to the service address.