
User Manual
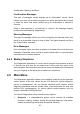


Table Of Contents
- Trademarks
- Copyright Information
- Disclaimer of Warranties and Limitation of Liabili
- For Services and Support:
- Safety Information
- Chapter 1 Using This Manual
- Chapter 2 General Introduction
- Chapter 3 Getting Started
- Chapter 4 Diagnostics Operations
- Chapter 5 Data Manager Operations
- Chapter 6 ADAS
- Chapter 7 MaxiFix Operations
- Chapter 8 Settings Operations
- Chapter 9 Shop Manager Operations
- Chapter 10 Update Operations
- Chapter 11 VCI Manager Operations
- Chapter 12 Remote Desk Operations
- Chapter 13 Support
- Chapter 14 Academy
- Chapter 15 Quick Link Operations
- Chapter 16 MaxiScope Operations
- Chapter 17 Function Viewer
- Chapter 18 Digital Inspection Operations
- Chapter 19 Maintenance and Service
- Chapter 20 Compliance Information
- Chapter 21 Warranty

42
Figure 4- 10 Sample Read Codes Screen
1. Diagnostics Toolbar Buttons – see Table 4- 2 Diagnostics Toolbar
Buttons on page 33 for detailed descriptions of the operations for each
button.
2. Main Section
Code Column – displays the retrieved codes from the vehicle.
Status Column – indicates the status of the retrieved codes.
Description Column – detailed descriptions for the retrieved codes.
Snowflake Icon – only displays when freeze frame data is available for
viewing; Selecting displays a data screen, which looks very similar
to the Read Codes interface, therefore same operation method may
be applied.
3. Functional Button – in this case, only a Back (or sometimes an ESC)
button is available; tap it to return to the previous screen or exit the
function.
4.6.3 Erase Codes
After reading the retrieved codes from the vehicle and certain repairs have
been carried out, you can decide to erase the codes from the vehicle using
this function. Before performing this function, make sure the vehicle’s ignition
key is in the ON (RUN) position with the engine off.