
User Manual
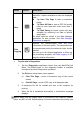


Table Of Contents
- Trademarks
- Copyright Information
- Disclaimer of Warranties and Limitation of Liabili
- For Services and Support:
- Safety Information
- Chapter 1 Using This Manual
- Chapter 2 General Introduction
- Chapter 3 Getting Started
- Chapter 4 Diagnostics Operations
- Chapter 5 Data Manager Operations
- Chapter 6 ADAS
- Chapter 7 MaxiFix Operations
- Chapter 8 Settings Operations
- Chapter 9 Shop Manager Operations
- Chapter 10 Update Operations
- Chapter 11 VCI Manager Operations
- Chapter 12 Remote Desk Operations
- Chapter 13 Support
- Chapter 14 Academy
- Chapter 15 Quick Link Operations
- Chapter 16 MaxiScope Operations
- Chapter 17 Function Viewer
- Chapter 18 Digital Inspection Operations
- Chapter 19 Maintenance and Service
- Chapter 20 Compliance Information
- Chapter 21 Warranty

38
DTCs. The sample operation interface of Auto Scan displays as above:
1. Navigation Bar
2. Main Section
3. Functional Buttons
Navigation Bar
1. List Tab – displays the scanned data in list format
2. Progress Bar – indicates the test progress
Main Section
A. List Tab
Column 1 – displays the system numbers
Column 2 – displays the scanned systems
Column 3 – displays the diagnostic marks indicating different conditions
of the test result:
-!-: Indicates that the scanned system may not support the code reading
function, or there is a communication error between the tester and the
control system.
-?-: Indicates that the vehicle control system has been detected, but the
tester cannot accurately locate it.
Fault | #: Indicates there is/are detected fault code(s) present; “#”
indicates the number of the detected faults.
Pass | No Fault: Indicates the system has passed the scanning
process and no fault has been detected.
Functional Buttons
The table below provides a brief description of the Functional Buttons’
operations in Auto Scan:
Table 4- 3 Functional Buttons in Auto Scan
Name
Description
ESC
Returns to the previous screen or exit Auto Scan.