
User Manual


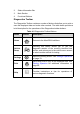
Table Of Contents
- Trademarks
- Copyright Information
- Disclaimer of Warranties and Limitation of Liabili
- For Services and Support:
- Safety Information
- Chapter 1 Using This Manual
- Chapter 2 General Introduction
- Chapter 3 Getting Started
- Chapter 4 Diagnostics Operations
- Chapter 5 Data Manager Operations
- Chapter 6 ADAS
- Chapter 7 MaxiFix Operations
- Chapter 8 Settings Operations
- Chapter 9 Shop Manager Operations
- Chapter 10 Update Operations
- Chapter 11 VCI Manager Operations
- Chapter 12 Remote Desk Operations
- Chapter 13 Support
- Chapter 14 Academy
- Chapter 15 Quick Link Operations
- Chapter 16 MaxiScope Operations
- Chapter 17 Function Viewer
- Chapter 18 Digital Inspection Operations
- Chapter 19 Maintenance and Service
- Chapter 20 Compliance Information
- Chapter 21 Warranty

32
Step-by-step Vehicle Selection
This mode of vehicle selection is menu driven; you simply follow the screen
prompts and make a series of choices. Each selection you make advances
you to the next screen. A Back button at the lower right corner of the screen
returns you to the previous screen. Exact procedures may vary somewhat by
various vehicles being serviced.
4.3.4 Alternative Vehicle Identification
Occasionally, you may identify a test vehicle that the tester does not recognize;
the database does not support, or has some unique characteristics that
prevent it from communicating with the tester through the normal channels. In
these instances, you are provided with the OBD direct entry, through which
you can perform generic OBD II or EOBD tests. See 4.9 Generic OBD II
Operations on page 57 for additional information.
4.4 Navigation
This section describes how to navigate the Diagnostics interface and select
test options.
4.4.1 Diagnostics Screen Layout
The Diagnostics screens typically include four sections (Figure 4- 6).
Figure 4- 6 Sample Diagnostics Screen
1. Diagnostics Toolbar