
User Manual


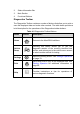
Table Of Contents
- Trademarks
- Copyright Information
- Disclaimer of Warranties and Limitation of Liabili
- For Services and Support:
- Safety Information
- Chapter 1 Using This Manual
- Chapter 2 General Introduction
- Chapter 3 Getting Started
- Chapter 4 Diagnostics Operations
- Chapter 5 Data Manager Operations
- Chapter 6 ADAS
- Chapter 7 MaxiFix Operations
- Chapter 8 Settings Operations
- Chapter 9 Shop Manager Operations
- Chapter 10 Update Operations
- Chapter 11 VCI Manager Operations
- Chapter 12 Remote Desk Operations
- Chapter 13 Support
- Chapter 14 Academy
- Chapter 15 Quick Link Operations
- Chapter 16 MaxiScope Operations
- Chapter 17 Function Viewer
- Chapter 18 Digital Inspection Operations
- Chapter 19 Maintenance and Service
- Chapter 20 Compliance Information
- Chapter 21 Warranty

30
1. Tap the Diagnostics application button from the MaxiCOM Job
Menu. The Vehicle Menu displays (Figure 4- 2).
2. Tap the VIN Scan button on the top toolbar.
3. Select Auto Detect. The tester starts VIN scanning on the vehicle’s
ECU. Once the test vehicle is successfully identified, the system will
guide you to the Vehicle Diagnostics screen directly.
Figure 4- 3 Sample Vehicle Diagnostics Screen
In some cases when users have selected the vehicle brand instead of
performing Auto VIN Scan in the first place, the system still provides an option
for vehicle VIN scan.
Figure 4- 4 Sample Diagnostic Type Selection Screen
Select Automatic Selection and the system will proceed to acquire VIN
information automatically or allow users to input the VIN manually.